How to construct a ceramic chimney: specifics of installing a ceramic smoke duct
Among smoke removal systems, the undisputed leader is the ceramic chimney. This is a modern and reliable device with which you can effectively organize the operation of your heating device.
Installation of such a chimney is not too complicated, although inexperienced builders are better off seeking advice from a good craftsman.
In this material we will talk about the features of ceramic chimneys, and also provide step-by-step instructions for installing them yourself.
The content of the article:
Features of ceramic structures
The use of ceramic components for chimney installation is an ingenious solution in its own way. Burnt clay is resistant to almost any temperature, so such chimneys can be used for boilers running on liquid or solid fuel.
This feature of the material makes it universal in use. A separate version of such a chimney has been developed especially for low-temperature boilers.
Burnt clay tolerates sudden changes in temperature with amazing resistance; the service life of such a chimney reaches three decades. One of the main advantages of ceramics is a high level of fire safety. A minimal amount of soot and other foreign products accumulates on the smooth walls of the structure, which significantly reduces the risk of fire.

Ceramic chimney walls retain heat well and resist the effects of moisture condensed on the walls, even if this moisture contains acids or other corrosive substances.
If installed correctly, combustion products never penetrate into the room through random cracks. Smoke is removed completely and with a high degree of efficiency.
Ceramics not only prevents the transfer of heat to surrounding objects, but also accumulates some of the thermal energy. Such structures can be installed both inside and outside the building. In the latter case, it is necessary to take care of additional insulation of the structure.
Private residential construction is practically the only area of application for ceramic chimney systems. They cannot be installed in multi-storey buildings.

It is worth remembering that such devices are quite expensive compared to their analogues. Another problem that can arise with a ceramic chimney is the prohibition of bends. The ceramic chimney must be installed strictly in a vertical position. If this is not possible, then you will have to give preference to another chimney type.
The ceramic chimney structure weighs a lot. That is why, if the weight of the chimney exceeds 400 kg, you will have to install a separate foundation for it, which should not be connected to the general foundation of the building. However, on monolithic foundations such installation is allowed, but it is still necessary to correlate the increased load with the overall load-bearing capacity of the foundation.
If you plan to install a ceramic chimney not on the ground floor, but above, you need to calculate the load and compare it with the load-bearing capacity of the ceiling.

Installation of a ceramic structure looks relatively simple, but it still requires effort and very careful attention. If a steel structure can be assembled in literally one day, then it will take two or three days to install ceramics of the same length.
In addition, such a chimney cannot be disassembled and installed in a new location, but steel systems are suitable for reuse.
Design and regulations
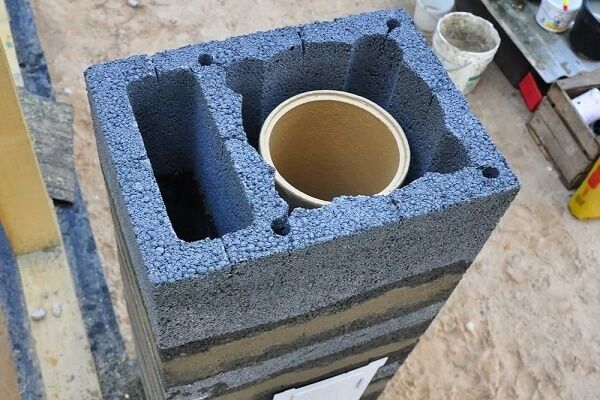
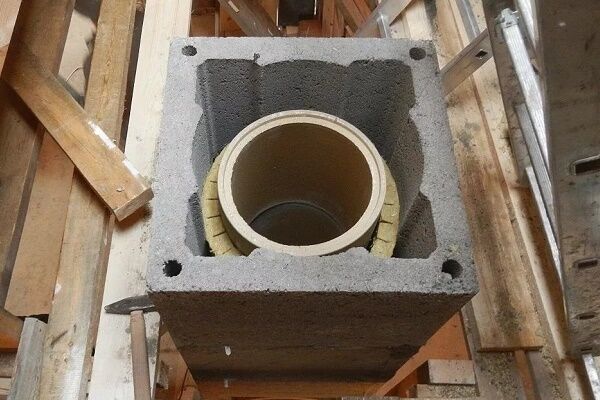
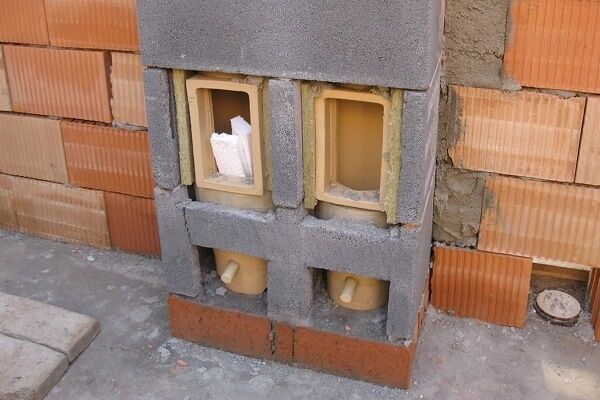
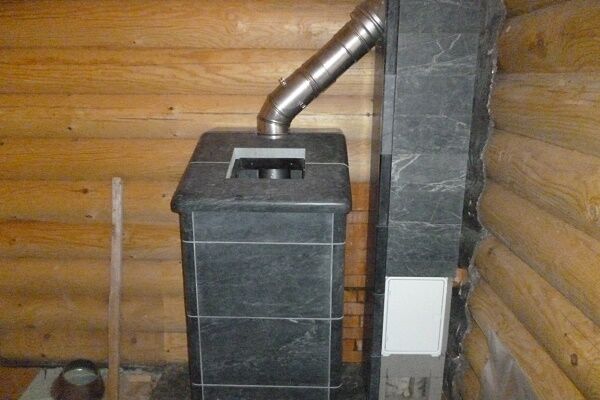
Chimneys of this type consist of separate blocks, which are assembled like a construction set.A special heat-insulating layer is mounted on top of the ceramics, and the whole thing is enclosed in a lightweight concrete frame.
In addition to the main blocks, for the installation of such a structure, other elements are necessary, without which not a single chimney can do:
- base for chimney;
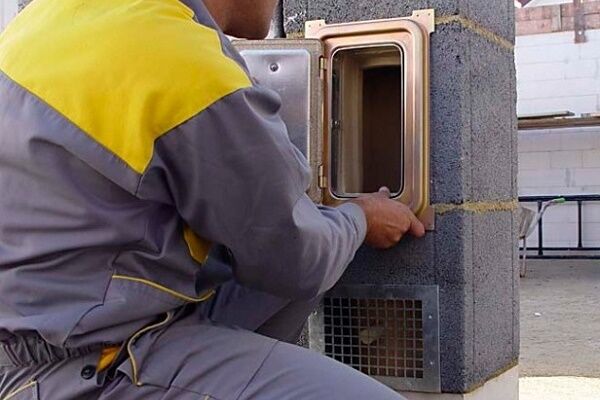
- tee for inspection and cleaning of the structure;
- adapter for connecting a heating device;
- device for collecting condensate.
The chimney must be high enough to create good draft. The optimal height is five meters or higher. Even if the pipe turns out to be much larger, there is no need to worry about an excessive increase in draft. At high altitudes, the gases that move through the pipe will already cool down a little, and this will increase their weight and the speed of movement will slow down.
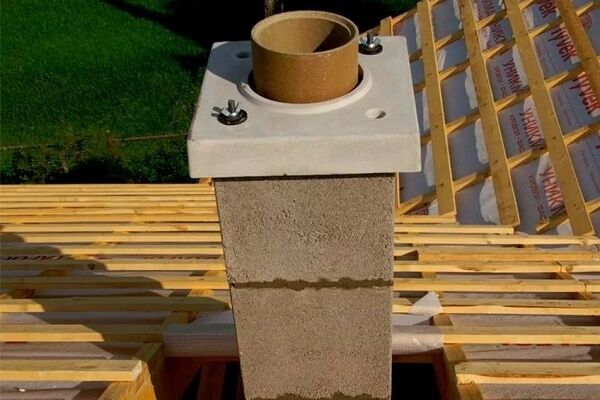
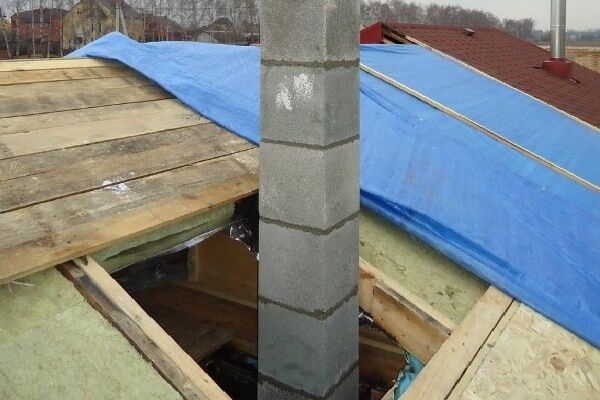
Above the ridge of the roof or its parapet, the ceramic chimney must rise at least 50 cm. To accurately determine the maximum length of the pipe protruding above the roof, a conditional straight line is drawn from its ridge at an angle of 10 degrees down from the horizontal guide.
The chimney must be above this conditional level. If the pipe goes onto a flat roof, it should rise by 120 cm.

Regarding the adapter that connects the chimney and the heating boiler, it should be remembered that its diameter must be the same as the dimensions of the chimney or larger. Narrowing of the structure at the connection point is unacceptable.
When installing a container for condensate, remember that a siphon about 15 cm long is needed to create a ten-centimeter water seal.
Chimney installation procedure
The high fire safety of ceramic chimneys allows them to be successfully used in buildings made of natural wood. In this case, it is necessary to take into account the possibility of shrinkage of the structure. Therefore, in such buildings, for example, in residential buildings or bathhouses, there is no need to rigidly attach the chimney to the roof or ceilings.

If the fastening is rigid, this may cause damage to the chimney structure in the future. When installing any chimneys, the manufacturer’s recommendations should be followed, but special attention is paid to compliance with fire safety rules.
During the installation process, you will have to perform the following steps:
- Carry out a number of preparatory activities.
- Install the base under the chimney.
- Install an adapter for connecting to the boiler and a tee for servicing the structure.
- Install the chimney pipe.
- Cover the structure with heat-insulating materials.
- Secure and decorate the outer part of the chimney pipe.
Accurate adherence to the technology for installing ceramic chimneys will make them reliable, safe and resistant to external influences. But negligence and flaws can lead not only to damage to the structure, but also to a fire.
The optimal time for installing a chimney structure is before the start of decorative finishing of residential premises, as well as before the installation of the roofing pie is completed.
Preparation and installation of the base
Before starting work, you need to purchase all the necessary elements and materials. To do this, it is necessary to calculate the length of the chimney according to the rules outlined above, as well as determine the parameters of the base of the structure.
The connection point between the boiler pipe and the adapter must match exactly.If this point is not thought through, you may have to completely redo all the work in the future.

Confusion in calculations may arise if the finished floor at the boiler installation site has not yet been laid. When calculating the height of the connection of the boiler to the chimney, it is necessary to accurately determine the height of the so-called “floor pie” in order to take this data into account when determining the height of the base for the chimney.
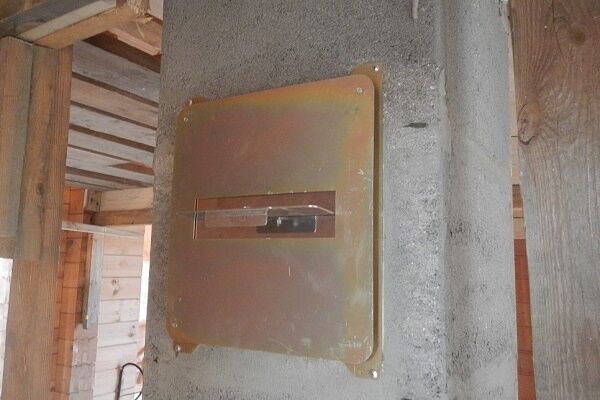
The base for the chimney is made of a cement-sand mixture, onto which an adapter is installed to connect the heating device. This element has a groove through which condensed moisture will subsequently be removed. It is necessary to pay attention to this point so as not to damage an important component during the installation process.

The position of the adapter must be strictly adjusted horizontally using a building level. In addition to the condensate container, there is also a supply air grille at the bottom, through which the structure is ventilated.
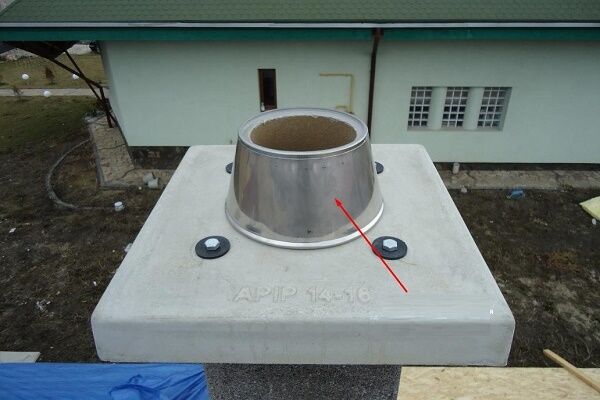
The foundation for a ceramic chimney is made in much the same way as any other foundation. It is poured with concrete, and the structure must be covered with a layer of waterproofing, for example, roofing felt.
Installation of tee and pipe
For further installation of ceramic chimney elements, you will need a special solution that is resistant to acid.It is prepared from a special dry mixture, which is mixed with water in a ratio of 7:1 and thoroughly stirred until smooth. The solution should be used within one and a half hours, no more.

Adding water to an already prepared mixture is strictly prohibited. A tee intended for servicing the structure is installed on the connection pipe to the boiler, and the joints are thoroughly coated with this solution. Next, the remaining chimney elements are sequentially installed on the tee.
The lower part of the next element is always inserted into the upper part of the previous structural part. All joints are sequentially coated with the solution. Excess adhesive is carefully removed with a damp sponge. During installation work, the position of the structure is constantly checked using a plumb line.

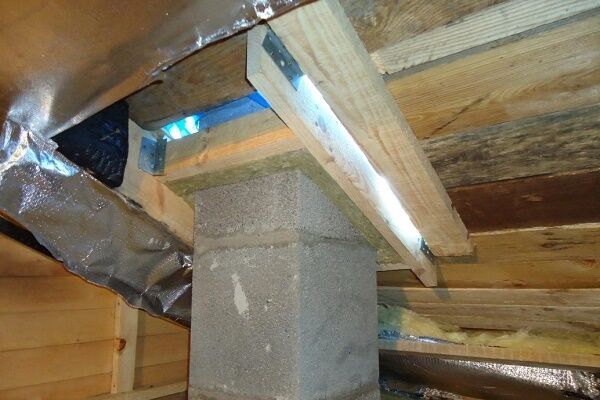
An important point of fire safety when installing a chimney is the position of the joints of individual elements. It is extremely undesirable for the connection point to be located in the thickness of the ceiling. Unfortunately, it is not always possible to avoid such an arrangement. In this situation, additional measures will be needed to prevent a possible fire.
The junction of the ceramic chimney elements, which falls into the ceiling, should be additionally hidden using non-combustible materials. The part of the chimney that runs through the attic also requires special attention.If there is no heating in this room, it is necessary to additionally insulate this section of the chimney pipe.
Insulation and concrete blocks
To insulate the ceramic structure, special sleeves are made of heat-insulating and fire-resistant material. The cladding should be installed in parallel with the installation of ceramic elements. The parts of the material are connected using sealant.
To apply it, it is most convenient to use a special gun. The sealing compound is applied to both the edges of the insulating material and the top edge of the ceramic element. As installation proceeds, excess sealant will protrude from the outside. It is best to remove them before the sealant has completely cured.
For additional insulation of a ceramic chimney, you can use cement-bonded particle boards, fire-resistant plasterboard boards, etc. It is important to take into account the characteristics of the room in which the structure is located.
For example, some materials, such as the already mentioned fire-resistant plasterboard or glass magnesite, when heated, can release substances that are hazardous to humans. The use of such materials is not recommended in baths, steam rooms and other similar premises.
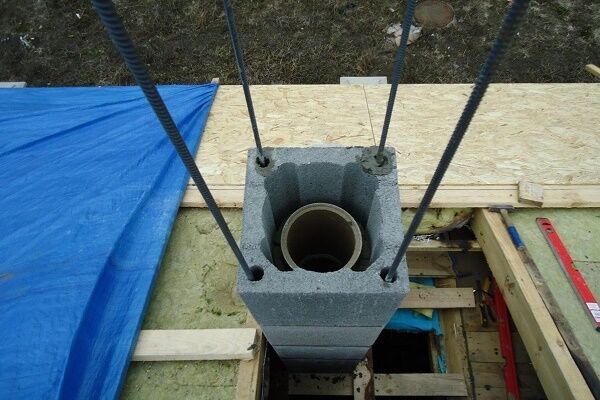
Lightweight concrete blocks are installed on top of a ceramic core with an insulation sleeve. Lightweight concrete, which encloses a ceramic pipe with an insulation sleeve, needs additional strengthening.
It is performed using metal rods, which are inserted into special holes inside the blocks and filled with liquid cement mortar.
The holes for the reinforcement are made in such a way that not one, but two rods can be placed inside. One of them must protrude from the block by at least 100 mm.
This protruding part is mounted into the next block; this overlap can significantly increase the strength of the structure. Before installation of the ceramic chimney, the rods are cut into 150 cm pieces and inserted as needed.
Fastening and decorating the outer part
The outer part of the ceramic chimney pipe should be reinforced, especially if the structure rises more than one and a half meters above the roof. Some manufacturers of such chimneys supply special rods for which, as already mentioned, holes are provided in the design.

The rods are simply inserted into these holes and filled with liquid solution. If such rods are not available or it is not possible to purchase them, you can use a 10 mm steel rod for the same purpose.
In this case, it is necessary to monitor the quality of the grout filling so that there are no voids inside the holes.

As an alternative, external reinforcement is used. To do this, you need to make a welded “case” for the chimney from a steel angle and tape. Finally, you can reinforce it with a layer of reinforced concrete.
The outer part of the pipe must not only be strengthened, but also insulated. To decorate a chimney that rises above the roof, you can use any non-combustible materials: brickwork or its imitation, tiles, slate, etc.
Helpful installation tips
One of the main rules for installing ceramic chimneys: only whole elements are suitable for installation. The presence of chips, cracks or any other damage is unacceptable. You should not try to repair the damaged area with sealant or anything similar.
This is a dangerous solution, since damage hidden inside the structure can fail at any time and cause a fire.
Therefore, each element must be checked at the time of purchase, as well as immediately before installation. If even minor damage is found, a replacement should be made. The base for the adapter must be perfectly flat and horizontal.
To achieve this, experienced builders use a level, and the surface of the base is finished with some smooth material, for example, tiles, porcelain stoneware, etc.

Maintenance of chimneys of this type is not difficult. You need to check for traction clear soot from pipes, monitor the integrity of all structural elements.
Typically, these operations are performed twice a year, but if there is reason to doubt the normal functioning of the chimney, maintenance activities can be performed unscheduled. Although, if installed correctly, problems practically do not arise with such structures.
Conclusions and useful video on the topic
This video clearly shows the process of installing a ceramic chimney: from unpacking the factory kit to finishing the outer part:
If you need to add to an already finished design install gate, this master class will help you perform all operations correctly:
Here is a detailed video installation instruction from the manufacturer of TONA Tec Iso systems (Germany):
The quality and reliability of ceramic chimneys explain the growing popularity of structures of this type. However, we should not forget that each stage of installation of such a system must be performed correctly and as carefully as possible.
It is better for novice amateur stove makers to delegate this important task to specialists, so as not to damage expensive components and endanger your home.
Would you like to tell us about how you installed a ceramic chimney in your own home? You can do this by leaving a comment in the block below. There you can ask questions about the topic of the article.


I liked the idea of a ceramic chimney. Firstly, it is perfect for any heating system, secondly, no one has canceled its resistance to corrosion, and thirdly, to install it yourself, you don’t need to have any special equipment and you can do it yourself. Ceramics also accumulate heat, which means it will cool more slowly. But, of course, there are also disadvantages to such a chimney. Ceramics is a fragile material, it can be dropped, and the construction is also very heavy. There is no such universal material; they all have their pros and cons.
Yes, how fragile it is. I used to think that this was an exaggeration; after all, a chimney is not a ceramic dish. But in the end, when it was just delivered, it immediately turned out that a piece of one pipe was chipped (at least they replaced it), and after some time the soot ignited and the whole pipe began to crack.