Homemade gas boiler for heating a private house and cottage: manufacturing three proven designs
Buying expensive equipment for organizing heating in a rarely visited country house, bathhouse or small house is not always advisable.It is especially unreasonable if the country property is not constantly supervised and a security alarm is not installed. What to do if heating is still required from time to time?
A homemade gas boiler, assembled from scrap materials or used household units, can handle heating quite successfully. A device made with your own hands can become the pride of the owner. Building a gas-powered structure will show off your craftsmanship.
The article we have proposed describes in detail the steps for assembling and modernizing gas units that can adequately heat private buildings. We have given as examples the most popular, practice-tested homemade options. Our advice will ensure home craftsmen success in a difficult task.
The content of the article:
Is it worth designing a gas boiler yourself?
Let’s begin our analysis of options for making a gas boiler with our own hands with the fact that the fuel they process is classified as toxic and explosive substances. Gas is highly flammable. The slightest miscalculations in the design and implementation of homemade products can result in serious destruction, damage to health, and loss of property.
Therefore, we do not recommend developing a model of a gas boiler for people who do not have a technical education with a specialization in the design of gas equipment. Yes, often even experienced gas workers will not take on such a project.
The optimal solution is quite reasonably considered to be:
- Converting a solid fuel model into a gas boiler by installing a gas burner in the firebox;
- Improvement of an old but functional unit with a focus on use in a heating circuit. Supplementing the factory model with devices for heating and stimulating movement coolant;
- Manufacturing of a pyrolysis boiler - equipment that generates gaseous fuel as a result of processing solid fuel at the initial stage. At the secondary stage, the gas released during the combustion of wood is burned in an additional firebox.
If you still have a desire to thoroughly study the issue and invent a version of a homemade gas boiler for autonomous heating in a private house, get ready for a literal “walk through agony.” You will have to obtain permits and confirmation of the safety of the invention from a number of government supervisory authorities.
An independent craftsman will need:
- Check the boiler for compliance with safety requirements, and then receive a confirming or refuting document.
- Obtain permits from GosTechNadzor, Fire Inspectorate of the Ministry of Emergency Situations and GorGaz.
- Apply for patent and certificate, allowing production in one-time or continuous production.
This list, although not numerous, is quite impressive and can discourage any folk from inventing documents. However, it will not be able to quell the desire to modernize an existing unit by installing factory-assembled burner modules. The improvement easily combines operational safety with increased efficiency.
The most important working part in gas equipment is the burner. Installing it will turn any boiler into the type of coolant and hot water heater we require for sanitary purposes.
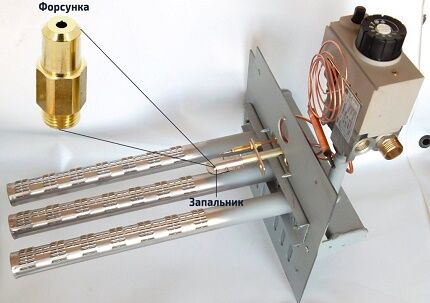
Depending on the method of supplying the combustion air required for combustion to the combustion chamber, burners are divided into two main groups:
- Atmospheric. They are installed in open combustion chambers atmospheric boilers. In them, air is drawn freely from the room in which the boiler is located.
- Fan (also known as blower). Such models are equipped with closed combustion chambers into which air is forced in a forced manner and captured from the street. To remove flue gases, they require a coaxial chimney and a fan.
Blowing designs are too complex for home creativity. They are easier and more profitable to buy. After all, purchasing all the adjustment and safety devices for operating a fan burner can be more expensive than purchasing a module ready for installation.
It is also advisable to purchase an atmospheric burner, but you can make the simplest version with your own hands. Below we will consider how and from what it can be assembled.
The manufacturing process of an atmospheric gas burner
An atmospheric burner is easier to build, since it is structurally much simpler than its fan counterpart. The most typical example known to most Russians is the burner block in old-style geysers. There are no energy-dependent elements in its design that force gas and air to mix in the required proportions.
Air is drawn into the chamber with the atmospheric burner module spontaneously as needed. Blue fuel processing products are eliminated naturally through standard chimney thanks to the presence of traction. All the work consists of constructing a manifold with gas nozzles through which gas will flow at the required speed.
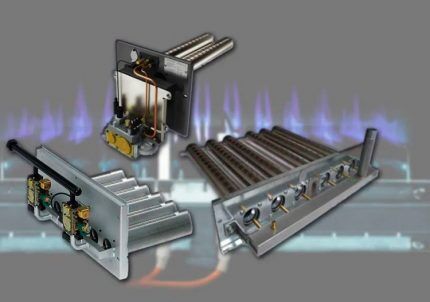
To make a burner with your own hands to equip a gas heating boiler, you will need:
- Valve series VK-74. Typically used on oxygen cylinders, designed for a maximum pressure of 20 mPa. The package should include a 3/4″ union nut, with which you can tightly connect to the gas supply pipe or hose.The valve will serve as a support base for fixing the nozzle.
- Nozzle cap. The device will hold the gas supply dispenser and form a narrowly directed jet. A hole is drilled at the top of the cap into which the nozzle is to be placed. The base screws onto the valve.
- Nozzle. It is better to buy it ready-made with the expectation of supplying main gas or a liquefied gas mixture. The injectors have different outlet diameters. Instead of nozzles for boilers, you can use a jet from a gas burner.
- Homemade injector. It is constructed from a steel tube with a wall thickness of up to 2 mm. You will need a piece of pipe approximately 10 cm long.
- Piezo element. It is installed at will, although you can do without it. Homemade products can be set on fire with matches.
All of the above elements are assembled mainly by welding. Therefore, skills and minimal knowledge in welding will be very useful for an enterprising “do-it-yourselfer”. However, where it is possible to use threads, it should remain a priority.
The gas supply channel must be impeccable and sealed, because safety depends on its condition. A distance of 10 cm must be maintained between the gas inlet into the device and the nozzle, which is necessary for mixing fuel with air.
The home craftsman just has to figure out how to secure a homemade gas burner in the combustion chamber of a used water heater or in the firebox of a former wood-burning boiler. Please note that you need to leave room for air flow. Air must be regularly supplied to the chamber, for which round or longitudinal holes must be cut in the door.
Do not forget that the above option can hardly be called a safe gas supply device. The design does not have automatic equipment that interrupts the operation of the boiler in case of blowing out or unstable flame. Owners will not have the opportunity to adjust the pressure and gas flow, so there can be no talk of either convenience or savings.
Installing a gas burner in a solid fuel boiler
After sound reflection and a real assessment of their capabilities, most home craftsmen still give preference to modernization solid fuel boilersthat previously processed firewood or coal. A factory-made gas burner is simply placed in their firebox.
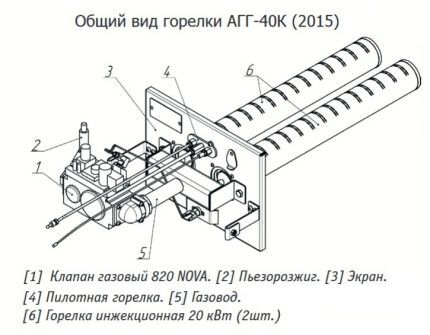
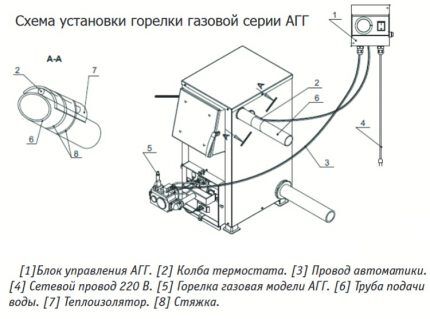
Let's consider the stages of installing a Teplodar AGG burner device:
- Dismantling the firebox door, the ashpan damper (or the ashpan itself, if it is made in the form of a drawer with a solid door), the bumper and the grate.In short, you need to remove all structural parts located within the firebox and ash pan.
- Fixing the burner device. A burner block is mounted in the firebox channel freed from the above elements. If the Teplodar stove is designed for changing fuel, then the burner module is fixed in the channel through standard ears with screws and nuts threaded into them.
- Connecting automation to the remote control. The devices included in the design of the burner block that ensure automatic operation of the boiler are connected to the control panel.
- Thermostat sensor mount. It is installed on the supply pipe, wrapped in insulation to protect against external mechanical and temperature influences, and on top with ties.
- Putting it into operation. It is carried out after checking the draft and burst ventilation of the room with a modernized boiler. Using a simple handle, you select the most suitable mode.
We remind you that in accordance with the requirements outlined in the “Safety Rules for Gas Distribution and Gas Consumption Systems”, all work on installing equipment, replacing burners, servicing equipment and connecting to the network supplying blue fuel must be carried out by gas workers.
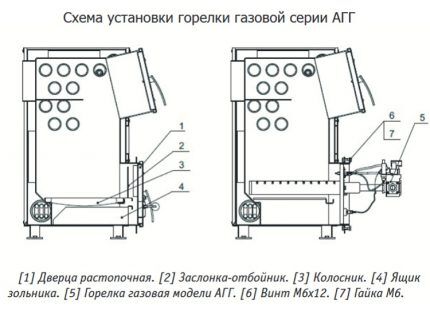
In accordance with federal regulations and standards, you must speak with gas service representatives. enter into a contract for the supply of gas and related services. It is clear that not all remote settlements will be able to be served by employees of gas organizations. However, it is advisable to adhere to the requirements in order to avoid catastrophic consequences.
Should you take risks or value and protect your health with the well-being of your loved ones? It's up to you to decide. It is wiser to refuse threatening measures, but knowing about the process of their implementation is very useful in order to monitor how efficiently and honestly the gas workers work.
Options for homemade gas boilers
In fact, all the homemade products we present are modernization of gas equipment for the purpose of operating them as coolant heaters. We present only ideas; we strongly recommend not to take risks, but to install an atmospheric or fan burner in the solid fuel unit.
#1: Homemade product based on a gas water heater
If you have replaced an outdated gas water heater with a new generation boiler with automation and a closed burner, do not rush to part with old equipment. It will also serve perfectly in a country bathhouse or garage. Improvement will not require a lot of money and effort.
The whole alteration in this case consists of changing the nozzles or the complete burner block, if you plan to burn a liquefied gas mixture outside the city. You will need to buy an atmospheric burner unit of appropriate dimensions for the combustion chamber. Then it will need to be secured inside the camera.
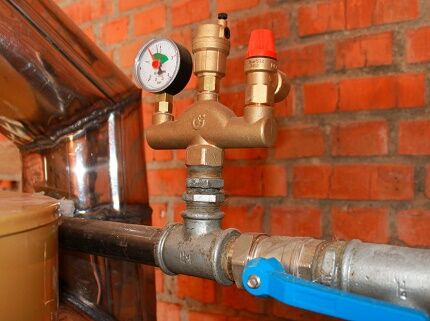
Those who want to install a ventilation burner will have higher costs. They will also need to purchase a security group that includes safety valve, pressure gauge and device for automatic air bleeding. You will need a small membrane tank, a circulation pump and coaxial chimney to supply fresh air to the burner and remove combustion products.
#2: Device based on a gas stove
The old gas stove does not require any special modifications, because converting it into a gas boiler is simply unrealistic. You can only place a metal tank on one of the burners, the volume of which is selected depending on the load-bearing capacity of the stove and the volume of coolant in the homemade heating system. Usually it is 100-150 l.
In the lower third of the metal tank, a pipe for connecting the return pipe is welded into it, and in the upper third - a pipe for connecting the supply. When heated, the water will spontaneously rise up and flow into the main line, which moves the heated coolant to the heating devices.
Such a homemade system will not require either a safety valve or an air vent. Excess heated water will evaporate naturally, bubbles will be released through a loose tank lid.
#3: Making a pyrolysis boiler
Pyrolysis boilers are first loaded with wood or coal through the top door. In this case, the throttle on the smoke exhaust duct is fully opened and the fan is turned on to stimulate combustion. The process at this stage takes place in the traditional mode for a solid fuel unit.
After waiting until the coal and wood are completely ignited, the choke on the chimney is closed to limit the access of oxygen to the place where solid fuel is processed. Due to poor air supply, it begins to smolder, i.e. the pyrolysis stage starts - the decomposition of fuel into coals and pyrolysis gases.
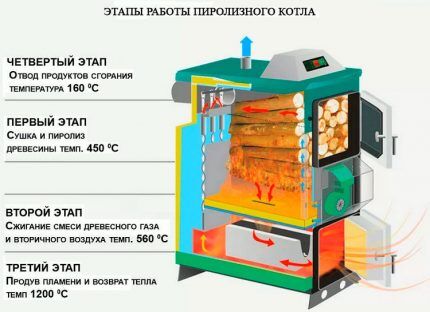
Pyrolysis gases move through the nozzle into the combustion chamber. Heated secondary air is pumped into it, which is required for the oxidation of pyrolysis gases. Under such conditions, pyrolysis gases quickly ignite and burn at a temperature of 1100º C.
Heat exchanger pyrolysis boiler They are located above the combustion chamber of gases of the same name, which promptly heat the coolant flowing through the tubes. For those who want to understand how best to make an efficient and economical gas boiler themselves, we offer a proven pyrolysis design.
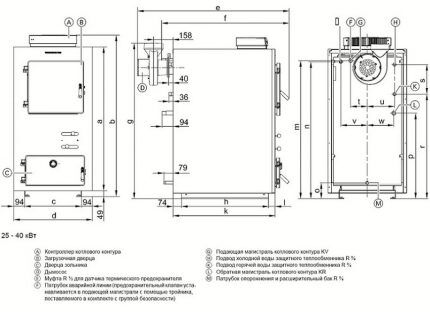
The main thing is to understand the principle of the design and operation of boilers that use gases obtained during combustion. In each structure of this type, the structural elements are repeated. Well, the body can be either welded or made of a metal barrel, large-diameter pipe or an empty gas cylinder.
To manufacture a pyrolysis-type boiler, it is better to use an already proven development. You will need welder skills and a welding machine, an inverter, a drill with a set of various attachments and a drill for drilling large holes. You also need to prepare the usual plumbing tools and clamps.
You will need to stock up on materials, the list of which is given below:

If you do not have all the tools required for cutting parts, it is better to order this work from a workshop. Without experience, and even using only an angle grinder, you cannot achieve an even cut. There may also be problems with cutting accuracy.
We begin the construction of a pyrolysis boiler by assembling the body:
Now you need to make a heat exchanger, then install it and the throttle valve into the housing:
The internal part of the boiler body is assembled, the throttle device is welded.Let's check how well the welding was done using the simplest method - light a flashlight inside the boiler and see if light penetrates through any segment.
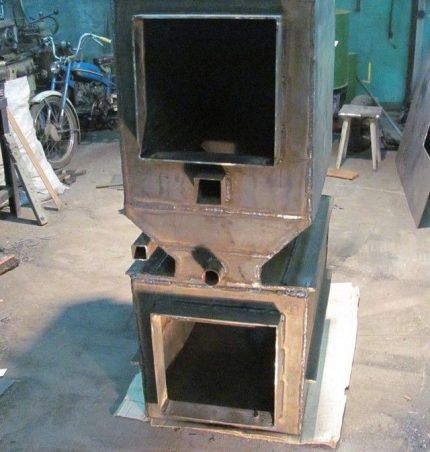
The outer lining of a homemade boiler is made on all planes except the top panel. It is welded after the installation of control tunnels, with the help of which the condition of the air ducts will be monitored.
Now, before carrying out further work, we check the quality of the welds in the simplest way - by pouring water into the formed “containers”. Then dry the structure and lightly clean the welded joints with coarse sandpaper or a grinding disc.
But now you can start installing air flow and movement control systems:
All that remains is to line the chambers with sawn fireclay bricks. We make the cut using a grinder with a stone cutting disc. We refine the cuts with a grinding stone.
Before putting a home-made boiler into operation, it is imperative to check the tightness of all systems conducting blue fuel and flue gases.To do this, pressure testing of the boiler is performed by placing sealed plugs in the return pipes with the supply. The unit must freely maintain a pressure of 3 bar.
Conclusions and useful video on the topic
The following video will introduce you to the interesting development of a gas heater:
Gas burner design for installation in a solid fuel unit:
The design features and manufacturing process of a pyrolysis boiler are clearly presented in the video:
Useful homemade products are an excellent option for solving the problems of arranging a country property. They will provide heat to buildings that need heating, while having almost no effect on the family budget. A skilled owner's dacha, garage, and bathhouse will be in perfect order.
It is important to remember that gas heating equipment poses a potential danger if it is not assembled correctly and operating rules are not followed.
Tell us about how you made a boiler to equip your country property. Share manufacturing options and interesting design solutions. Please leave comments in the block below, post photos related to the topic of the article, and ask questions.


