Do-it-yourself folding stool: drawing, materials, creation instructions
For residents of a country house or lovers of outdoor recreation, a small piece of seating furniture is an irreplaceable thing.A folding stool will become a faithful assistant in household chores. The stool does not take up much space; it can be stored in the hallway, garage, or utility room. If the owner often goes fishing or on vacation, such a folding item can easily fit into a car trunk.
The content of the article:
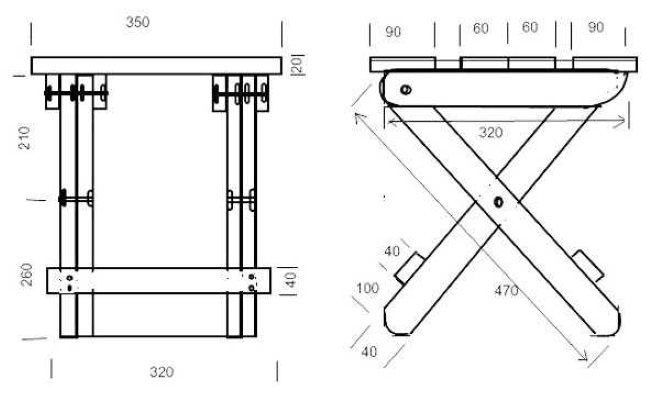
Stool chair drawing
For assembly you will need a detailed diagram of a folding stool. Having carefully studied it, you should get a reliable, beautiful piece of furniture.
What materials and tools will be needed
Before you start making a stool, you need to prepare materials and tools. To create a folding stool, you should cut or buy wooden blocks in the required quantity.
The best material for the production of such folding furniture is wood. Recommended use:
- beech;
- larch;
- birch;
- oak.
The named tree species are massive, resistant to light and humidity. Painted folding products made from them can be left outdoors for a long time, in the rain or in the sun, and will last for many years. These characteristics are especially important for the manufacture of furniture that will not be used indoors.
To make a folding stool with your own hands, you can also use plywood. The choice depends on the preference of the craftsman and the intended purpose of the invention. Experts do not recommend using pine raw materials when producing furniture of this type due to the characteristics of the wood.
After the choice of wood type has been made, you need to prepare the tool:
- self-tapping screws;
- bolt – 4 pcs. 40x6 mm;
- electric sawing tool;
- tool for screwing in screws;
- drill;
- nails;
- hammer;
- screwdrivers corresponding to the screw heads;
- putty for working with wood;
- sanding paper;
- acrylic varnish.
Step-by-step creation instructions
You should prepare the details of the future folding stool using wooden blocks of size 40x20 mm. It is necessary to create blanks for assembling the product. To make it foldable DIY chair, need to cut (pcs.):
- crossbars under the seat – 4;
- legs – 4;
- seat yards - 6;
- transverse drawer – 1;
- small supports for legs – 2;
- large supports for legs – 2.
Step-by-step instruction:
- On all 4 crossbars, at a distance of 2 cm from the edge, drill a hole in each for screwed-in bolts.
- On the proposed legs in the very center it is worth making a mark with a pencil.
- After 3 cm from the middle, drill through the rock.
- Give the bases of the leg blanks a rounded shape using a jigsaw.
- Treat all prepared components with sandpaper (after putty if necessary).
- Apply acrylic varnish.
- Leave for a while to allow all parts to dry.
Assembling the base
Assembling the stool is the main stage in the entire manufacturing process. Step-by-step instructions:
- Fold the legs crosswise and connect them with axial bolts through the holes drilled through.
- To make the use of a folding stool more comfortable in the future, it is recommended to place additional washers between all parts secured with bolts.
- After this, screw the upper end of the leg to the crossbar under the seat of the stool. This is best done in the following way: attach one crossbar to the inside of the chair, the other to the outside. Attach each leg according to this diagram.

If during the manufacturing process you want the wooden stool to be higher than the originally conceived sample, you can take another beam and place it in the center between the seat mount. This way the stool will visually change its height.
Tsarga
This is the crossbar that connects the legs of folding chairs (and tables too). The strength and stability of the entire structure in the future depends on the correctness of its fastening. Use self-tapping screws under the seat, between the internal crossbars, to secure the drawer. Next, proceed to fixing the supports under the legs of the stool:
- Fold the chair.
- Step back 8-10 cm from the bottom of the leg.
- Secure the supports from the inside with self-tapping screws.
Identical manipulations are performed from the outside, having first turned the product over.
Making the seat of a folding stool
Step by step execution:
- Connect the first 3 beams with nails to attach the future seat to the internal crossbars. Fastening is done moving from the edge to the middle.
- Then take 3 more slats and attach them to the crossbars from the outside. To prevent the details of the nails from being too noticeable on the seat, you can use wood putty.
- Drill the caps of material as deep into the rock as possible and rub them with putty.
A self-made folding stool is almost ready - it is easy to assemble and disassemble.
It is recommended that the place where the chair legs will be attached be placed not in the very center, but slightly shifted upward.This must be done so that the stool does not wobble and stands firmly on any surface.
How to treat or paint a stool
An ordinary wooden stool looks ugly and too simple. You can add visual interest to it by changing the color, for example. As one of the design options for country furniture, it is recommended to use one method. Wet and dry each part 2-3 times. This way the relief of the rock will change and it will become more open.
Dry elements should be sanded with fine caliber sandpaper. The finishing touch will be the decorative and protective covering of the stool. Do not skimp on consumables by varnishing the chair 2-4 times. Each layer must dry thoroughly before applying the next one.
Original ideas
Some craftsmen want to add comfort to the use of their product and cover the seat with tapestry-like fabric. If there is some image on it, you can embroider the case with a pattern or stick on an applique.
A folding stool paired with a table made using the same technique will look original. You can make country accessories for your chair from leftover wood and fittings for outdoor recreation or work in the country:
- a box for carrying and storing tools;
- thermos stand;
- country lamp.
You need to “awaken” your imagination, and then you can create a whole collection of interior items made of wood.
Having previously studied the drawings of stools, you can create furniture that suits the taste of the summer resident. There is nothing complicated in manufacturing, especially since step-by-step instructions are included with the drawings. A folding stool can be used for its intended purpose, for example, taken with you for a picnic.Or you can find a more practical application and use the product as a step stool.
What material did you make the stool from, and what did you use to cover the final product? Share the link on social networks and bookmark the article.


If I'm doing it in the garage, I usually paint it with floor paint. For the house, of course, I buy a good varnish, plus I go over it with putty.
We make all the furniture from beech. We have a forest nearby. My wife paints the patterns before varnishing, it turns out very beautifully.
Oak stools are timeless. If they are also varnished in 2-3 layers, they will last longer than any famous furniture brand.