Do-it-yourself garden swing made of metal: popular homemade options + assembly instructions
Are you tired of the city bustle? Do you want peace, tranquility, peace? The best option for relaxation is the open spaces of a suburban area. One of the elements of comfortable relaxation is a garden swing. In specialized stores they are not cheap, but making a garden swing from metal yourself is not so difficult. The main thing is to have an idea of the correct design and methods of its manufacture.
We will tell you where to start and what you will need to build a homemade product in our material. Next, we will figure out how to assemble a garden swing with our own hands, starting from drawing up a drawing and ending with installing the swing on the site.
The content of the article:
Advantages of a metal swing
The variety of homemade garden swings on the Internet is simply impressive. What they are made from - metal, wood, tires, forging and many other materials.
We will look at one of the most popular models - a metal swing.
The advantages of a metal garden swing are many:
- Durability. The metal does not naturally rot, does not crack, and does not dry out.
- Reliability. This is the strongest material used for this type of structure.
- Availability. Good metal costs much less than wood of a suitable quality level.
- Design options. Any of your preferences and wishes can be realized with the help of such material.
As you can see, the advantages of metal structures are impressive, so you can safely give preference to this option.

Tools and materials for work
To manufacture metal structural elements you will need: steel corners, square profiles, round profiles, I-beams.
In addition, you need to prepare material for seats and a canopy if you plan to build an option with a canopy.
For work you will need to prepare: a welding machine, an angle grinder, a screwdriver, a level, a tape measure, a shovel, a construction bucket, brushes, sandpaper. Also, for bending a profile pipe, you may need pipe bender.
The base is the main structural element
The stands of the garden swing must be reliable and strong. They ensure the stability of the entire structure. When making a swing from metal, it is best to choose an A-type or P-type base. Both options are quite stable, but at the same time easy to manufacture.
Option 1 - A-type base
This design consists of two racks in the shape of the letter A, connected by a jumper. To assemble them, you need to draw a drawing indicating all dimensions, this will help to correctly calculate the required amount of materials.

The structure can be welded or secured with bolts.We recommend welding the parts because the bolts have sharp corners and it is advisable to further process them to prevent injury.
This is especially true for those owners of suburban areas who have small children. Also, the fastening with bolts will develop play over time.
We have figured out the connection method, now it’s time to start drawings. It is necessary to determine how many seats will be provided on the swing. The optimal option is 3. For a three-seater swing, a seat width of 150 - 160 cm will be sufficient. Then we add at least 40 cm of clearance between the seat and the supports - 20 cm on each side and get a swing width of 200 cm.
We weld the supports. They must be identical. To do this, we will take four pipes 300 cm long (50 cm pipes will be dug into the ground for the stability of the structure).
The contact angle of the pipes in the upper part is determined as follows: we place two pipes on the ground in a horizontal position in the form of a triangle. We spread the lower part of the pipes until the distance between the ends of the pipes is 230 cm. We measure the angle at the top between the pipes, this will be the best option for welding.
Once you have connected the top, you need to add a spacer in the middle of the part that protrudes above the ground. It turns out that if the length of the whole pipe is 300 cm, we subtract 50 cm for the recess, the outer part will be 250 cm. Somewhere at a height of 120 cm we weld the pipe to improve the reliability of the structure.

Some craftsmen do not provide such a spacer, and their swing support resembles the letter L.But in order to protect yourself and your loved ones, we recommend that you do not neglect this detail.
After making two A-shaped elements, you can begin to connect them using a central crossbar, the length of which is 200 cm.
Option 2 - U-shaped base
This frame is also reliable. The only caveat is that the base must be concreted to a depth of at least 50 cm. Otherwise, the reliability of the structure will be in doubt. The advantage of such a frame is the minimum material used.

To build such a structure you will need only three pipes or three profiles. Two side supports at least 230 cm long, so that 50 cm can be lowered into the ground and concreted. The horizontal crossbar for a three-seater swing must be at least 200 cm in length.
It is enough to weld two supports at an angle of 90° to the horizontal crossbar along the edges and the frame is ready. All that remains is to paint the metal to prevent corrosion.
Seat design options
Once the structure support is ready, you can begin making the seat. Below we will talk about how to build the most popular options.
Option number 1 - classic
The optimal seat option is a metal frame covered with wooden slats. First you need to decide on the sizes.

Let's say the seat width is 160 cm, the depth is 46 cm, and the back height is 52 cm. Let's figure out how to assemble a seat of this size.
The seat manufacturing process consists of the following steps:
- Preparing the metal base. For this it is necessary using a grinder cut three pieces of profile pipe 160 cm long, two pieces of pipe 52 cm long, and two pieces 46 cm each.
- We connect the base elements. We form 2 pairs of side pipes. We connect the side support of the seat (46 cm) and the side support of the back (52 cm). To do this, we cut the ends of the profiles that will be welded at an angle of 45°. Then we connect them by welding. We do the same with the second pair of side pipes.
- Forming a metal frame. We weld three 160 cm long profile pipes to the edge of the seat, in the corner between the seat and the back, on the upper edge of the back.
- Paint the base. In order to give a beautiful appearance to our product and protect it from corrosion, it is enough to cover it with paint.
- Attaching wooden beams. The bars should be chosen either 40x40 mm or 50x40 mm. Length – 160 cm. We install wooden crossbars in increments of 2 cm.
- Painting or varnishing. To maintain the strength of the seat, the wooden beams should be varnished or painted. It is best to do this before installing it on the frame. It is enough to go over it with sandpaper of the appropriate grit, then paint it with the chosen coating.
Despite the right angle between the parts, the seat will be quite comfortable for users. Convenience is ensured by installing the seat at an angle.

All that remains is to prepare the seat for mounting.To do this, you need to drill holes on four sides of the frame for mounting the hangers. Bolts with eye nuts will be inserted here.
Option number 2 - modern
If you want to add some flair to your garden swing, you can use regular pallets as the seat material.

For work we will need: 2 pallets, beams, screws, screwdriver, jigsaw.
This seat is much easier to make than the previous version. Let's consider a method for making a classic seat from pallets in the form of a bench:
- Choosing pallets. They must be free of damage, rot and cracks. In fact, there are several types of pallets, but for making a seat it is better to opt for Euro pallets.
- Mounting the lower part. To do this, cut the pallet in length. After all, with a seat depth of 80 cm, the swing will not be comfortable to use. We cut along the edge of the central lower jumper. The result will be a base for a seat 47 cm deep.
- Making the back. Similarly, we cut off a part of the pallet 47 cm wide. Attach the backrest to the seat with self-tapping screws.
- Forming armrests. Using a jigsaw, cut 2 pieces of a block 47 cm long, and two pieces 23 cm long. We connect pieces of different lengths in pairs at an angle of 90°.
- Attaching the armrests to the seat using long screws.
- Paint or varnish ready product.
We recommend assembling the seat with armrests. They are not a mandatory attribute of such a seat, but they give it a complete look and add convenience.
By the way, not only a swing seat can be assembled from pallets. A selection of furniture made from pallets can be found in this material.
Option number 3 - seat in the form of a bed
This is the simplest option, which requires the following materials: 2 pallets, 3 beams 160 cm long, self-tapping screws, a screwdriver, paint or varnish, sandpaper.
The manufacturing process involves joining pallets with the wide side facing each other. This is done using 3 bars that are attached to the bottom of the pallets, two at the edges, one in the center.
We connect the beams to the pallets using self-tapping screws. Next, we go over the surface of the pallet with sandpaper to remove small irregularities. The last stage is varnishing or painting.

Attaching the seat to the frame
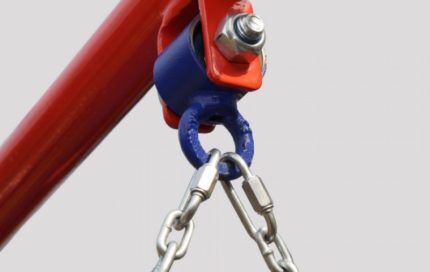
It's time to start attaching the seat to the frame of the garden swing. There are two possible options: chains and ropes. The most reliable material is chains. The corresponding thickness of the metal section is 4 mm or 5 mm.
First you need to attach the chains to the 4 edges of the seat. We will do this using bolts and eye nuts. We attach carabiners to the ends of the chain. Next we connect the eye nuts with the carabiners. We attach chains to the top crossbar using rings welded to the central crossbar.
Another reliable, but more complex way to install chains is to use hidden bearings on an additional center beam. Then we will need more materials, plus the design will become more complex.Often this mount is used on industrial children's swings.
To simplify the fastening method, it is enough to use a carabiner for fastenings. You need to drill a through hole in the central crossbar and secure the carabiner in this hole.
The method of attaching a rope or cable to the central beam is no different from the method of attaching chains. But, to attach them to the seat, it is enough to thread the ends through the drilled holes on the 4 edges of the seat and tie strong knots there.
Building a sun canopy
The canopy over the swing is not a mandatory element of this structure. But this is a very good solution for protection from the scorching sun.
If you decide to add a canopy to your garden swing, you will need instructions on how to make it. The canopy is based on a metal rectangle with jumpers. It must be built based on the size of the swing frame.
We weld a rectangle from a profile 20x40 mm or 30x30 mm. The length and width should cover the dimensions of the swing. Add spacers for reliability. Two or three will be enough; we place them approximately every 70 cm. We attach the canopy frame to the base of the swing using a welding machine.

In addition, it is very important to correctly combine the size of the swing and the size of the canopy. Some awnings are sold with a mosquito net attached. This is a very good solution for summer evenings.
Preparing the installation site
The final stage of work is installing the swing. It is best to concrete the posts.This will definitely guarantee the safe operation of this accessory for your garden plot. Concreting needs to be at least 50 cm deep.
If you prefer a mobile installation, then you need to weld a metal frame around the perimeter of the swing. The metal profile to strengthen the installation must be chosen with the same diameter as for the frame.
Conclusions and useful video on the topic
Many craftsmen take a creative approach to the process of making a garden swing from metal, adding elements that will make its use more comfortable:
Summarizing everything written above, we can say that making a garden swing from metal is a painstaking, but very interesting task. The main thing is to build a reliable frame, add a comfortable seat, and decorate the swing with pleasant textiles. We support the article with a useful thematic video and hope that by following our instructions, you will be able to make a swing that will delight you for decades!
Have you ever had to deal with installing a swing in your garden? Share your experience with our readers. Leave comments, add photos of homemade products - the communication block is located under the article.


