Connecting a gas hob: instructions for safe connection
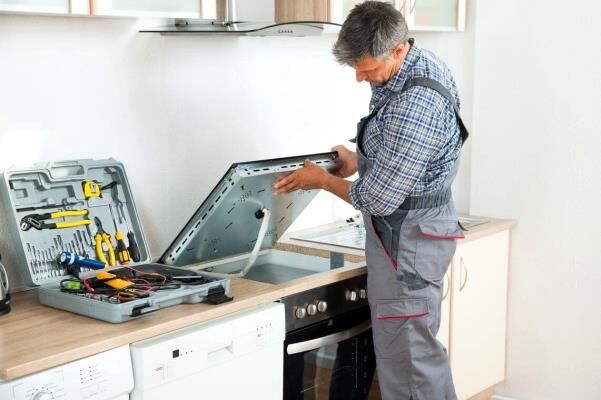
The stages of installing separate gas equipment - a hob and an oven - are similar to installing a conventional gas stove, but they also have their own characteristics. Sometimes users only connect a gas hob because they do not use an oven or prefer an electric model.
If you decide to carry out the installation work yourself or want to supervise the work of specialists, we suggest that you take a closer look at how to connect a gas hob with your own hands.
The content of the article:
Steps to connect a gas hob
The equipment installation process takes no more than an hour, the bulk of the time is spent on preparatory work and calling a specialist to obtain an opinion.
There are four stages:
Behind each stage there are many preparatory activities: purchasing gas equipment and related materials, coordinating the time to call a specialist, preparing kitchen modules for inserting appliances. We will analyze each stage separately to prevent possible errors.
Stage 1 - preparing equipment and tools
We recommend purchasing the hob in advance. If this is not possible, then you need to find out the exact dimensions. Typically, all 4-burner models comply with the standard 50*60 cm (+/- 2 cm), 3- and 2-burner models, respectively, are smaller in width.

In addition to gas equipment, you will need to purchase the following materials:
- dielectric insert;
- flexible gas hose (1 or 2);
- linen thread.
Mounting hardware is usually included in the kit, so there is no need to purchase them.

The tools you will need are a standard set that every home craftsman usually has: a pair of gas wrenches, a screwdriver, and pliers. If it is necessary to cut a metal pipe, then this is the concern of the representatives of the service organization - you cannot carry out any actions with the gas supply pipes yourself.
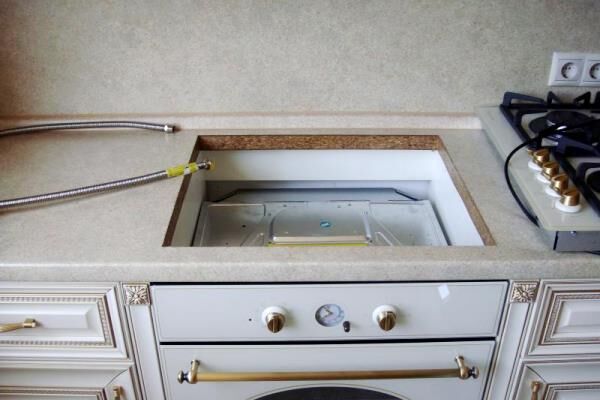
Stage 2 - cutting a hole in the tabletop
Knowing the exact dimensions of the hob, you can make a hole in the countertop in advance. Of course, the factory would have handled this more professionally, because it is very important to cut out a neat rectangle with right angles and straight sides.

The help of furniture makers will come in handy when the tabletop is made not of chipboard, MDF or wood, but of a more durable material - artificial stone.
If you decide to make a hole yourself, then use a lightweight and productive tool - for example, a jigsaw.
Procedure:
- Check the panel dimensions again and study the installation diagram.
- Make a mark on the countertop with the recommended distance from the wall.
- Apply paper tape around the perimeter, and use a pencil or marker to draw the outlines of the fragment that needs to be removed.
- Use a jigsaw to cut a hole. It is recommended to make the closest cut first, then at the wall, and last - the side ones.
- Remove the cut piece from the table top.
- If the panel is at hand, immediately try it on.
If the tabletop material crumbles at the cut points, you can treat the edges with any adhesive, but first you need to sand and vacuum it. Sanitary silicone is used for chipboard - it additionally protects the edges from moisture.

You can also use thermofoil or aluminum tape reflector to prevent the countertop from being exposed to high temperatures.
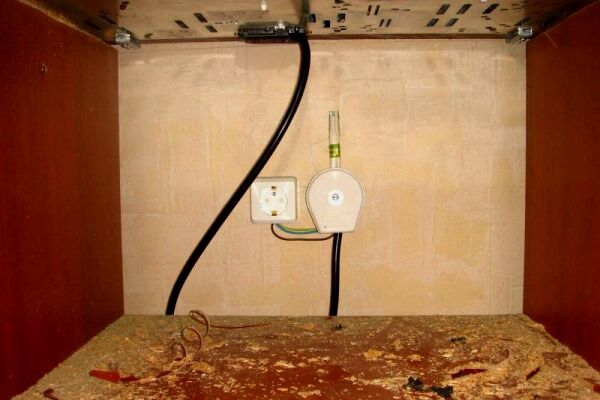
Stage 3 - connecting the panel to electricity
Modern hobs are equipped with an electric ignition function, therefore, you will need to install a power outlet.
Often an electric oven is installed along with a gas hob. To connect a device with a power of up to 3.5 kW you will need:
- three-core cable VVG-P 2.5 mm;
- 16 A socket with grounding;
- if the kit does not include a connecting wire, then a 3*2.5 mm PVC cable and a plug.
A more powerful oven will require a 3.5mm cable and a 40A socket.
According to the standards, the installation height of the socket is no higher than 90 cm, and it should not be at the same level as the hob.

For protection, a separate RCD or automatic circuit breaker is installed in the electrical panel - separately on the line of gas cooking equipment.
The socket is installed in the standard way: first, the mounting box is fixed in the wall, then the terminals are connected, and the decorative panel is fixed on top. More details about installing sockets for electric stoves can be found in this material.
Safety regulations:
- the manufacturer recommends using the services of a professional electrician;
- on the bottom side of the device there is a plate with the technical characteristics required for the electrical network, from which you cannot deviate;
- the electric cable must not be twisted, pinched, or laid near sharp corners;
- After installation work, it is necessary to insulate all conductive elements and provide protection from accidental contact.
Subsequent repair work should only be carried out with the device disconnected from the power supply.
Stage 4 - connecting the panel to the gas main
To properly connect the hob to gas, you need a flexible adapter - a hose no more than 2 m long. Often, due to the inconvenient layout, longer hoses are used, but this is prohibited according to the rules for operating gas equipment.
On sale you can find various gas connections with fabric, rubber and metal braiding. Bellows hoses, which are characterized by wear resistance and a longer service life, are becoming increasingly popular.

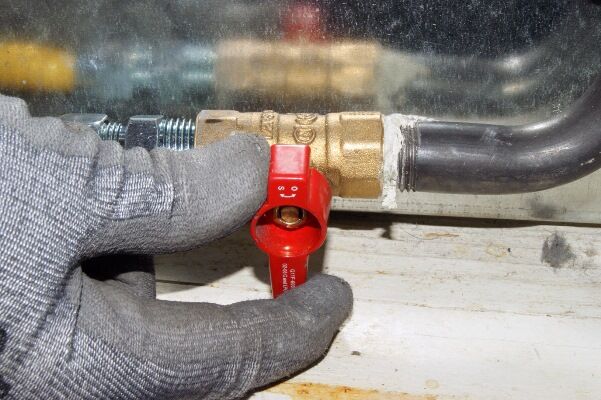
In addition to the hose, you will need a dielectric insert. It is installed on the pipe in front of the shut-off valve.
The dielectric serves as a safety feature - it protects both equipment and users from stray currents.

Let's assume that the coupling is already installed, then we proceed in the following order:
- We connect the gas hose to the dielectric. If not, then to the metal pipe immediately after the tap.For the tightness of the junction we use flax or fum tape.
- On the bottom side of the panel we find a small threaded pipe and screw on the hose in the same way.
No further actions need to be performed.
If you want to connect a gas hob and oven at the same time, you should use two connections. But keep in mind that connecting through a tee is not welcomed by all representatives of Gorgaz! For example, MosGaz employees issue an order and insist on installing a gas pipe.

This connection method is considered more correct for two reasons:
- the number of threaded connections is reduced, thereby increasing tightness and safety;
- shut-off valves are installed on both outlets - in the case of using a tee, one common valve is retained.
We remind you that all actions, if you decide to connect yourself, must be coordinated with employees of Gorgaz or Oblgaz - and then unpredictable situations will not arise that end in expensive repairs.
Stage 5 - Leak Check and Testing
You can check the tightness of threaded connections yourself. To do this, you need to arm yourself with a brush and cover them with soapy water.
But the final conclusions will be made by the inspection employee - he will also check the line for leaks, and then draw up a conclusion, which will indicate the date of the visit, brands and serial numbers of gas equipment, and the type of line.
It is not recommended to start operation before the arrival of a gas service employee; in case of an accidental leak, all responsibility falls on the shoulders of the homeowner. But the main thing is the safety of family and friends, so there is no need to rush and take risks.
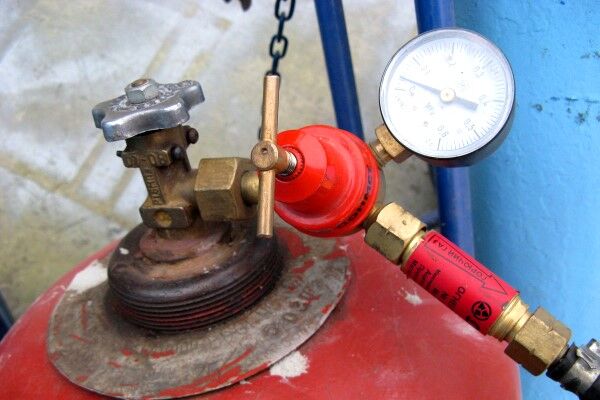
The nuances of connecting to a gas cylinder
If in cities and large villages residential buildings and apartments are connected to natural gas, then in villages and holiday villages they often use liquefied fuel cylinders. This is explained by the fact that there is no gas pipeline laid near the settlements.
Connection steps gas hob to the cylinder the same as for a regular connection to a pipe. The difference is that when using cylinders, the devices are modified so that the combustion process occurs more efficiently.
When the cylinder is connected, increased pressure is observed, which causes a lack of oxygen. The result is a yellow flame unusual for gas combustion and a large amount of soot. The problem can be solved by replacing nozzles designed for natural gas - methane, with analogues for LPG.

The process of replacing jets is simple; instructions can be found in the device installation manual.
All work on modifications to the equipment is carried out with the cylinder disconnected - it is connected last.
What else do you need to remember when connecting the hob panel to LPG?
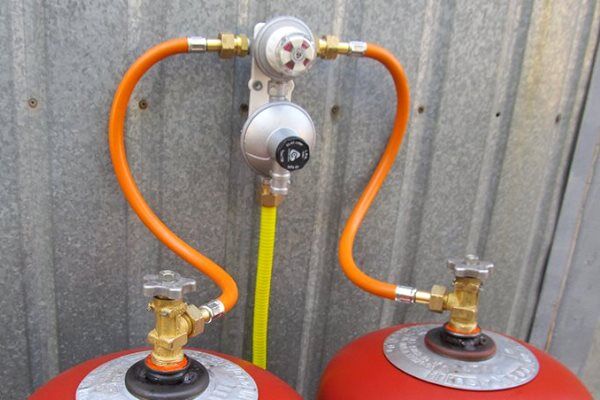
When using several cylinders, use connecting ramp, which reduces the volatility of the fuel and reduces the risk of freezing in the gearbox.
After installing all the elements, you need to check the operation of the hob. First, test for leaks using a soap solution. Then unscrew the valve on the cylinder and make adjustments gearbox. If the flame is yellow or there is a lot of soot, you need to lower the pressure by tightening the valve a little.
And finally, you should invite an Oblgaz employee to confirm and register the fact of connecting the new equipment. In the future, maintenance will be carried out by the appropriate organization.
Conclusions and useful video on the topic
Preparing the countertop and the nuances of installing the hob:
Video instructions and useful tips:
Rules for connecting to a gas pipe:
Whatever actions you perform with gas equipment, they must meet installation requirements and safety regulations.
Before starting work, we recommend that you study the provisions of SNiP 42-01-2002, and then the manufacturer’s instructions. Any deviations from the norms will remove the equipment from warranty and threaten with troubles with gas workers, the smallest of which is a fine.
Please tell our readers about your experience with connecting or replacing a gas cooktop. Leave your comments, upload photos, ask questions - the contact block is located under the article.


