Replacing jets in a Hephaestus gas stove: a detailed guide to replacing nozzles
Have you noticed yellow flames when the burner is on? Has soot started to appear on the dishes? Do you absolutely not understand what is happening? The problem is widespread and the solution is simple. We will tell you how to replace the jets in the Hephaestus gas stove and reveal the technological subtleties.
In the article we present, you can familiarize yourself with the operating principle of gas equipment, as well as the purpose and specifics of the nozzle design. To understand why problems arise, let’s figure out what the jets are generally intended for. Let's look at what types of nozzles there are.
Our recommendations will help you easily change devices that supply gas for the cooking process. You will learn how to care for household equipment. After reading, you will be able to independently assess the situation and understand whether it is worth changing or whether it is better to just clean it.
The content of the article:
The principle of operation of a gas stove
From the gas main or from a cylinder under pressure, gas is supplied to the gas pipeline, which is an integral part of the gas stove. Next, the fuel passes through the nozzle, enters the body of the burner, where it mixes with air and only then ignites, passing through the dividers.
Main gas differs from bottled gas in terms of pressure parameters - this is the main and most common reason why nozzles need to be replaced.In other cases, most often you can limit yourself to simple maintenance without resorting to replacement.
What is a jet?
The jet is one of the main components of a gas stove. It ensures the supply of blue fuel to the burner in sufficient volume and the required pressure. Without a nozzle, the operation of a gas stove would be impossible.
The shape of the nozzle resembles a bolt, in the head of which there is a passage hole. The diameter of the hole must correspond to the pressure of the supplied fuel and the power of the burner.
It must be taken into account that the pressure of the main gas and bottled gas is significantly different, therefore the diameter of the nozzle for these types of fuel will be different.
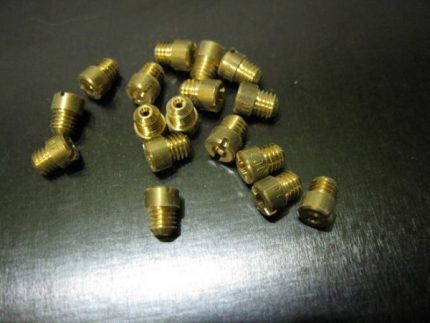
To ensure the most efficient operation of the stove, eliminate the release of harmful products, the smoking factor, and normalize fuel consumption, you need install injectors, the dimensions and diameter of the outlet hole comply with the requirements of the gas stove manufacturer.
Types of jets and their main characteristics
Jets or nozzles with a hexagonal head, external thread and a longitudinal internal hole. The vast majority are made of bronze.
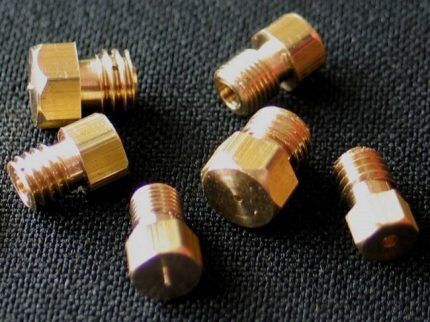
There is a marking on the end part that displays information about the throughput of the nozzle.Units of measurement are the volume of gas in cubic centimeters that the nozzle can pass in 1 minute.
Jets can be of two types - for natural gas (differing in larger hole diameter and shortened body), for liquefied gas (differing in smaller hole diameter and elongated body, which is associated with higher pressure).
The pressure in the cylinder exceeds the pressure in the gas line, which explains the smaller diameter in the head of the corresponding nozzle. The power of the burner is determined by its size, therefore the diameters of the holes in the corresponding jets will be different.
The diameter of the hole in the nozzle must correspond to the gas pressure:
- Large burner - 1.15 mm (20 Bar); 0.6 mm (50 Bar); 1.15 mm (20 Bar); 0.75 mm (30 Bar).
- Medium burner - 0.92 mm (20 Bar); 0.55 mm (50 Bar); 0.92 mm (20 Bar); 0.65 mm (30 Bar).
- Small burner - 0.75 mm (20 Bar); 0.43 mm (50 Bar); 0.7 mm (20 Bar); 0.5 mm (30 Bar).
- Oven burner – 1.2 mm (20 Bar); 0.65 mm (50 Bar); 1.15 mm (20 Bar); 0.75 mm (30 Bar).
It must be taken into account that incorrect operation of the jets may not be caused by a change in the type of fuel, but by a simple clogging of the outlet. In this case, you can clean the injectors without having to replace them.
Injector cleaning technology
From time to time it is necessary change injectors or clean them. The recommended frequency of performing the procedure is once a year.
Clogged nozzles impair the quality of the flame and lead to a decrease in the amount of heat generated. In addition, fuel consumption increases, which is undesirable for owners of liquefied gas equipment. This fact will not suit homeowners with installed gas meters either.
To clean the jets you will need:
- Universal products - soda or vinegar, dishwashing detergent;
- Dish cleaner;
- Toothbrush;
- Thin wire or needle.
Work begins with removing carbon deposits, soot and grease from the area where the nozzle is located. The nozzle must be unscrewed and soaked in detergent, soda or vinegar solution.
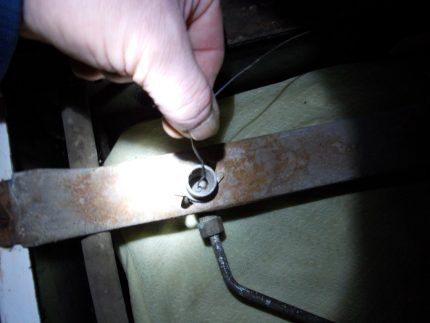
The outer surface can be cleaned with a toothbrush and regular household cleaning powder. The nozzle hole should be cleaned with a needle; sometimes blowing with a pump or compressor is justified.
The cleaned and dried jet must be reinstalled. Please note that if there is a sealing gasket under the nozzle, it must be replaced.
Instructions for replacing injectors
If cleaning the nozzles does not produce results, or you decide to switch from one type of blue fuel to another, then replacing the injectors is simply necessary. It must be taken into account that there are no universal nozzles. Each model has its own characteristics.
Therefore, if the task is to re-equip the Hephaestus stove, then you need to buy a set of jets specifically for a unit of this brand. You can purchase such a set at almost any specialized gas equipment store. If it is not available, you can always contact the official manufacturer or its representative.
Preparing the stove for replacing nozzles
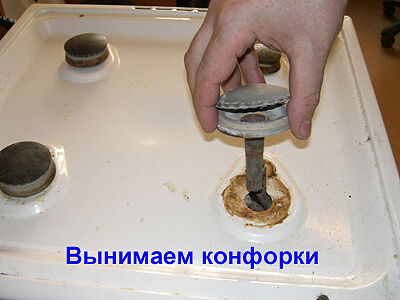
Preparation for work on replacing the nozzles in the Hephaestus gas stove begins with turning off the main gas supply valve or closing the valve on the cylinder.Next, you need to remove the grate and remove the burners. All this work is done simply and does not require any tools.
If we look inside the holes that opened after removing the burners, we will not see the jets themselves. This is due to the structural features of the slab. In most modern models, the jets are much easier to reach. But in our case, everything is a little more complicated - the stove table must be dismantled.
To dismantle the table, you need to remove the screws using a Phillips screwdriver. In different models of Hephaestus plates, the number of screws may be different. But they are all located on the top of the table, in the front and back. After removing the screws, the table simply rises.
Sometimes, due to grease, the table is not so easy to remove; it seems that it is stuck to the body. In this case, it should be pryed off with a screwdriver or a strong knife. After removing the table, the body and the table itself must be thoroughly cleaned of dirt.
After removing the cover, we will see two metal strips, which are a kind of guides and are called traverses. The housings of each of the four burners are attached to the traverse.
All nodes have the same device. The only difference is the length of the pipeline through which the gas is delivered to the tip and from there through the nozzle enters the burner.
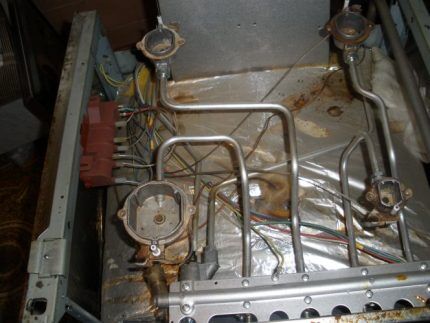
The burner body is rigidly attached to the pipeline, ensuring the reliability of the entire structure.The device is not complicated, but you need to understand it so that in the future there will be no problems with dismantling the injectors and their subsequent installation, as well as with repairing the Hephaestus plate if necessary.
How to properly remove the jet?
There is an opinion that you can change the jet without removing the table. This requires only a special tubular wrench. Yes, this is possible, but only in modern models with other design features.
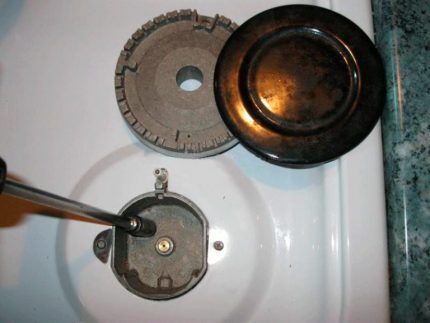
If we look closely at the design, we will see that in our stove the tip of the pipeline is fixed in the burner body, so it is impossible to get to the nozzle without removing the table.
What keys are needed to remove the jet?
An 8 mm open-end wrench fits the nozzle head; you can simply try to unscrew the nozzle. But this is a useless idea; usually the nozzle gets stuck during operation so that the tip simply rotates around the pipeline.
It makes you want to fix the tip nut with another 14 mm wrench. The train of thought is logical and correct, but this is impossible, since the burner body becomes an obstacle.
How to separate the tip with the jet from the burner?
To gain access to the tip nut, it is necessary to release the tip itself from the torch body. The only obstacle is the clamp in the form of a curved plate.
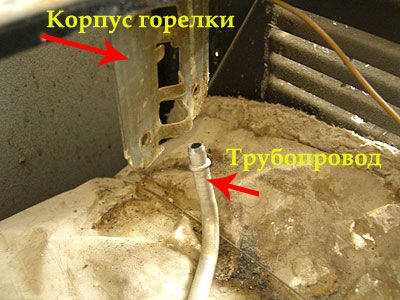
Simply squeeze the plate and pull it towards you with a little effort.After removing the retainer, simply press on the pipeline, so the tip will simply fall down, easily coming out of the burner body.
Methods for removing the jet
There are two ways to remove the jet from the tip. In the first case, it is enough to hold the tip nut with one key and unscrew the nozzle with the other. If for some reason you cannot easily unscrew the jet, then you can resort to the second method.
It is more comfortable to work if the nozzle and tip are in your hands and not fixed to the pipeline. Simply pull the tip towards you and it will be freed from the pipeline. Now you can make your work much easier. The tip nut can be clamped in a vice and the nozzle can be easily unscrewed without fear of damaging the pipeline.
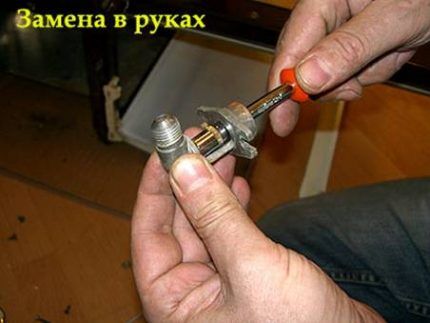
Each of the nozzles for the Hephaestus gas stove, like any nozzle for any other brand and model of stove, has its own marking. Therefore, it is not necessary to remember the location of the jets when removing them from the tips. There will be no problems with subsequent installation.
Pipe O-rings
The design of the nozzle and its connection to the tip does not provide for the use of any sealing tapes. However, a gas leak safety device still exists. Please note that after removing the tip from the pipeline, the rubber ring usually remains inside it.
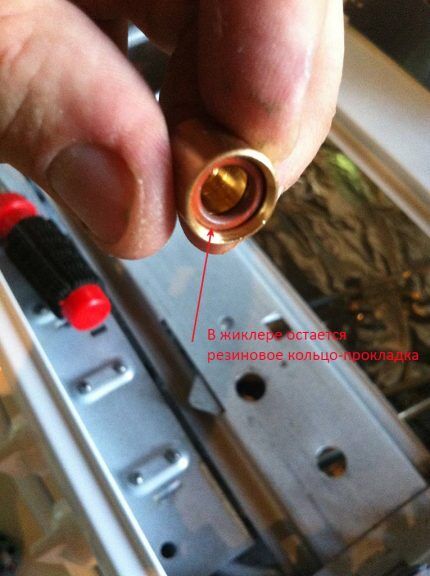
To prevent it from getting lost when removing the nozzle, it must be removed from the tip and installed on the pipeline.If the jets are being replaced, then it is advisable to purchase a set of rings along with them in order to replace them too.
Jet installation procedure
After completing the work of removing the jets from the tips, you can immediately begin installing them. All work is performed in reverse order.
First you need to screw the nozzle into the tip using a wrench. After this, put the tip on the pipeline, lift it to the burner body and install it, returning the fixing plate to its original place.
At this point, replacing the jets in the burners of the gas stove can be considered complete; all that remains is to install the table in place and secure it with screws.
Replacing an oven nozzle
Just as in the case of replacing nozzles in burners, you cannot do without preparatory work. Getting to the jets in the oven is also not so easy. And if in the case of the burners we had to dismantle the table, then to replace the nozzles in the oven we need to either disassemble the floor, or in difficult cases, remove the left side wall.
Let's go in order - the jet is located in the nozzle body behind the plate wall on the left side. To get to it, you need to open the lid of the bottom drawer, open the oven door completely and pull the floor towards you - it should come out easily.
Replacing the oven jet
The oven burner is a curved tube secured with two screws that need to be removed. The jet is located inside the nozzle body.
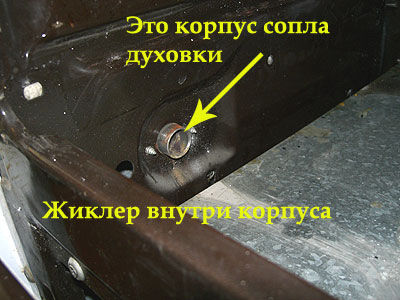
If it is not too stuck, you can simply unscrew it using a tubular wrench and install a new one in its place.
Replacing the jet after dismantling the oven wall
If you cannot unscrew the nozzle, you need to unfasten the left side panel, secured with three vertically located screws. After dismantling the wall, we will gain access to the pipeline secured with a nut.
From this position, you can try to grab the jet with an open-end wrench and try to unscrew it. If you still can’t cope with removing the nozzle, then you need to unscrew the nut, unscrew the two screws and separate the body with the nozzle from the oven wall.
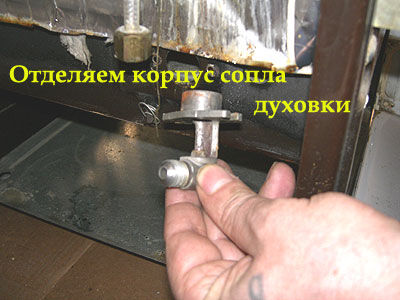
Now the stuck jet can be removed from any convenient position. It is best to treat the threaded connection with some universal product (for example, VD-40), leave it for a few minutes and only then unscrew the nozzle.
All that remains is to install the new jet in the nozzle and carry out the work of securing the housing to the oven wall and reassembling it in the reverse order.
Conclusions and useful video on the topic
Replacing jets in a Hephaestus gas stove:
Jets are the main element of a gas stove; they are responsible for the pressure and volume of incoming fuel, ensuring optimal combustion conditions.
In Hephaestus plates, it is not as easy to replace jets as in modern models from more popular manufacturers. However, if the instructions are strictly followed, the work will not cause any particular difficulties. And any person can do the replacement; there is no need for special knowledge or special tools - just attentiveness, accuracy and observance of basic rules.
Tell us about how you changed the nozzles in the stove with the Hephaestus logo with your own hands. Share the nuances of the process that you know.Please leave comments in the block below, ask questions, post thematic photographs.


The gas pressure on household equipment cannot exceed 300 mm. water Art., and the characteristics of the jets indicate 20 bar.
There are numbers written on the nozzles - what do they mean, how do you know which one to put where? Thank you
Hello. HEPHAESTUS, I can’t light the oven. You can hear the gas coming, it stinks. It does not respond to a match in the igniter. I can't find the nozzle in the oven. There is a pipe there that looks like an incomplete donut with holes, apparently for gas to escape. This is the whole picture. We haven't used the oven since new.
Hello! Thanks for the article, I needed to change the liquefied gas nozzles on an old Gefest 1100-07 stove, I was able to figure it out quite easily. The question just arises: is it true that when screwing the nozzle into the tip, no seal is required? Because when you remove the original factory ones, you can see that everything is covered in paint, including the carvings.
Hello! Give me some advice. I changed all the jets to natural gas on the gas stove Hephaestus-3200-06, when I turned on the oven, the following problems arose: when I open the oven tap to a low flame, the temperature in the oven should be 170 degrees, but it rises to 230 degrees. Second question: with the above position of the tap i.e. When the flame is low, the flame of the oven burner is interrupted, and when the tap is turned to the maximum flame, the burner goes out completely. It even happens that when ignited, the burner is covered in flame by 1/3 of its length and goes out. All jets are marked according to the markings in the instructions.According to the instructions, the VMRs are the same for natural gas and liquefied gas; there is no need to change them. What is the reason? I would be grateful for your valuable recommendation.
Hello. Please tell me what kind of jet is needed for the gas-electric oven Hephaestus 601-01 for reduced gas?
I still haven’t seen what SPECIFIC markings need to be placed on the burners on the Hephaestus panel. Natural gas panel