Do-it-yourself injection gas burner for a forge: a manufacturing guide
The operating principle of an injection burner for small forges is based on the suction of a gas stream into the burner body. You can buy it in the store. However, if you make an injection gas burner for the forge yourself, it will serve no worse.
We will tell you how to build an instrument according to all the rules. The main thing is to take into account all the manufacturing requirements. After all, you still have to deal with an explosive mixture of gas and air.
The content of the article:
Characteristics and types of injection burners
The design of the forge burner determines the degree of waste of the metal when it is heated for forging, the intensity of scale formation on the surface, and the total gas consumption. In closed forges, short-flame burners are used.
Their design guarantees rapid mixing of the combustible mixture, which ensures high efficiency. Combustion products are removed from the furnace working space evenly and as efficiently as possible.
Operating principle of burners
In burners of this type, propane coming from a gas pipeline or cylinder is burned. Here, a mixture of gas and air is formed due to ejection, i.e. the latter being sucked into the burner under the influence of the energy of a gas jet under pressure.
In the area where air is taken in, a vacuum appears, due to which the air itself moves in a given direction. Mixing in the burner body, the working mixture escapes from it under pressure, creating the desired temperature.
Quality of work gas burner depends on the constant ratio of the volume of gas and air. Changes in gas density affect the burner's ability to suck in air.
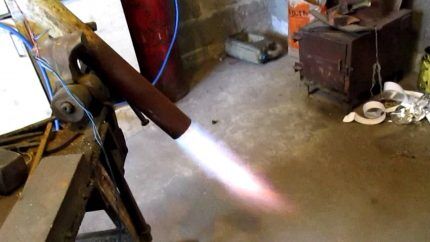
All changes in combustion temperature must be accompanied by similar changes in the air supply required for combustion.
If the indicators are unbalanced, the injection coefficient must be adjusted to achieve its stability. This is achieved by changing the gas pressure or adjusting the air damper.
Classification of burners according to main characteristics
They are classified according to different criteria. Based on the volume of primary air sucked in, a distinction is made between partial-mix and full-mix burners. The main characteristics of the former are the injection coefficient and the multiplicity.
The injection coefficient is determined by the ratio of the volumes of air injected and those required for 100 percent combustion of gas. The expression “injection ratio” refers to the relationship between the volume of primary air and the gas consumption of the burner.
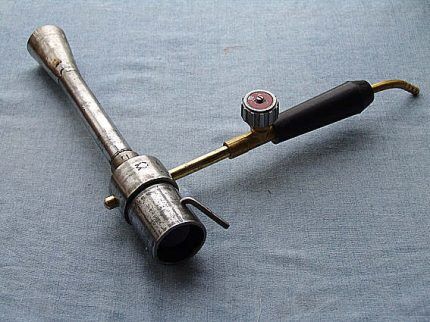
Injection burners used in home forges come in low (up to 5 kPa) gas pressure and medium - from 5 kPa to 0.3 MPa. When the gas in the burner is under a pressure of 20-90 kPa, the power of air suction remains practically unchanged, even when the gas pressure and vacuum in the furnace undergo changes.
When the pressure drops below this level, the injection coefficient increases, the pressure drops, and the vacuum in the forge increases. Depending on the presence of the distribution manifold, there are single- and multi-flame burners.
There is a division according to the number of nozzles: with one nozzle - single-nozzle, with several - multi-nozzle. These elements are placed in the center or scattered. According to this feature, there are burners with a central nozzle and a peripheral one.
Homemade injection burner
A homemade burner of a standard design is supplied with gas from a cylinder through a special hose, usually propane. There is no need for a reduction gear, since the flow of gas is regulated by the operating valve located on the cylinder.
Opening and shutting off the gas supply is carried out using a shut-off valve, other burner adjustments are made using the operating valve. Gas hose, through which gas flows, is connected to a special nozzle with a nipple.
This allows you to set the size and speed of the flame. The nipple and tube are placed in a metal cup. This is where propane is saturated with oxygen from the incoming air.
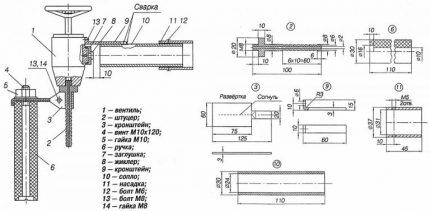
From a metal cup, the combustible mixture enters the combustion zone through a nozzle under pressure. To ensure the process is continuous, there are special holes in the nozzle that act as additional ventilation.
To make your own, you will need a drawing of a gas burner for the forge, as well as a set of tools and materials:
- pieces of pipes, hardware;
- Bulgarian;
- semicircular or round file;
- drilling machine, if not, can be replaced with a drill;
- semi-automatic welding;
- tap, blade, drill, metal brush, hammer, pliers;
- circles - cleaning, cutting;
- sheet iron with a thickness of 1.2, 3 mm;
- protective equipment for welding.
All work on the manufacture of a fuel-burning device consists of five stages.
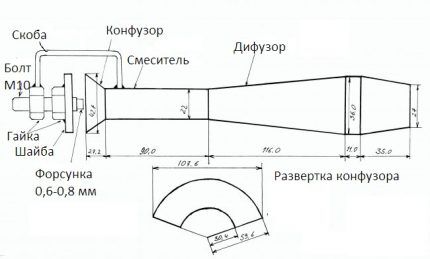
At the first stage, a diffuser is made. As a starting material for it, you can take a piece of pipe of a suitable diameter. For example, a stainless steel muffler or a water pipe.
Using a grinder, cuts are made along the pipe to the required length. A bearing cage with a suitable diameter is stuffed onto the tube. The same is repeated on the other side.
The cuts are welded, then a flap circle is taken and the surface is processed until completely smooth. Brew and clean all existing pores and uncooked areas. Using a round or semicircular file, burrs are removed from the inside of the part.
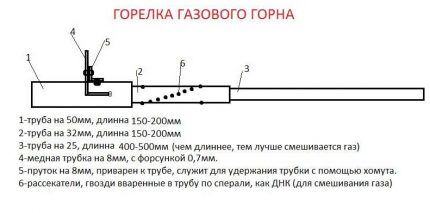
The next step is making the mixer and confuser. The first one looks like a tube. A water pipe with a diameter of about 2 cm and a length of 9 cm is suitable. The tube is welded to the diffuser, and a confuser is welded to it - a cone for air intake.
The blank for it can be cut from a sheet 1.2 mm thick.Next, it is bent, the seam is welded and the finished part is welded to the mixer. A plane is made at the end for the abutment of the adjusting washer. By decreasing/increasing the gap between the confuser and the washer, the incoming air flow is adjusted.
Next, they begin to manufacture the mechanism for supplying the components of the gas-air mixture. At this stage you will need a bolt with a long M10 thread. The cap is cut off, then a through hole of 5 mm in diameter is drilled from the end, and an M6 thread is cut.
To create a nozzle, you can use a tip for supplying welding wire from a semi-automatic machine. Since it is quite long, it needs to be trimmed. In this case, approximately 3-4 mm should remain after the thread. The remaining part is enough to make another jet.
For further work, you will need a washer with an outer diameter of 43 mm. You can purchase it or make it yourself from a sheet of metal. A hole with a diameter of 1.2 cm is drilled in the center of the washer. An M10 nut is welded to the finished washer.
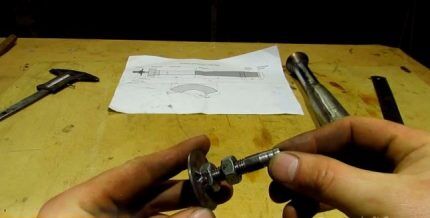
Before proceeding with installation, you need to make a fastening of the unit to the body in the form of a bracket. It can be cut from sheet metal. Without changing the position of the assembly, apply it to the confuser, attach the bracket and weld it to the nut and body. The welding location does not matter much, but it is necessary that the structure is rigid.
By screwing in and unscrewing the bolt, the degree of ejection is adjusted.As practice shows, the optimal result is achieved when the nozzle enters the confuser to a depth of about two mm. The amount of incoming air is adjusted with a washer.
The final stage is testing. To do this, put a hose on the bolt. The pressure indicator on the reducer is set to 0.2 kg/cm². You can experiment with this value, but you need to remember that with a large gas flow, the cylinder, especially with a capacity of 5 liters, can quickly freeze. In this case, a 0.6 mm nozzle is more suitable.
The washer must be completely closed before ignition or a small gap must be left. After igniting the gas, the air supply is gradually increased. The flame will acquire an increasingly rich blue color and gradually move away from the burner nose. A feature of the operation of a burner in an open hearth is that with further intensification of the air stream, the flame is separated from the burner and it extinguishes.
To avoid this phenomenon, a barrier (distributor) is placed along the flame path or the burner is used in a closed space. In this case, the fire escaping from the nozzle will ignite the gas and combustion will be maintained.
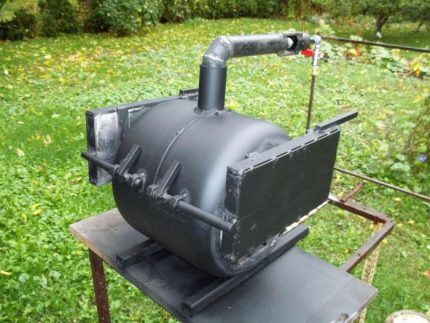
If the burner is powered by main gas, then under ideal conditions its flame should be bright blue. When the gas source is a cylinder filled with a propane-butane mixture, the flammable mixture looks like yellow tongues.
This injection type burner works great in confined spaces. If you tune it well, you can get temperatures up to 1200⁰.These conditions are suitable for forging blanks from files, annealing blades, and melting non-ferrous metals.
Gas is supplied to the burner from the network or a cylinder, and the process is controlled by a regulator. To check the adjustment and pressure, carry out a test run of gas or gas mixture, while monitoring the smell.
Pros and cons of an injection burner
Using a high-quality gas burner for blacksmith's forge has a number of advantages:
- use of gas energy for air injection;
- good mixing of air and gas;
- the ability to control the gas/air volume ratio when changing the burner temperature;
- ease of use;
- efficiency;
- simplicity of design.
With its advantages, there are also some disadvantages. Single-nozzle burners, taking into account the heat output, are quite long. It is necessary to ensure strict alignment of the axis of the nozzle and the burner. They make a lot of noise during operation.
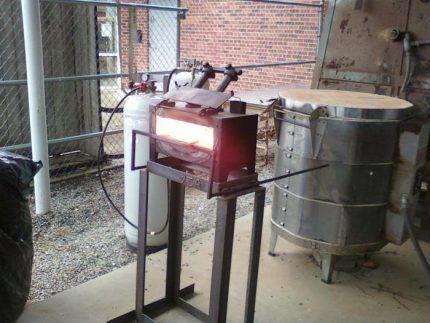
Significant disadvantages of low-pressure burners are the long flame length, as well as the dependence of the secondary air supply rate on combustion liquefaction.
He will introduce you to the types of gas burners for sauna stoves and methods of their installation. next article, which is worth reading for all owners of suburban areas with their own bathhouses.
Conclusions and useful video on the topic
The injection burner developed by Alexander Kuznetsov is especially popular. In this video, he explains what the structure consists of and how to assemble it:
Example of an injection burner operation:
Properly designed and made with your own hands exactly according to the requirements, the injection burner will become a reliable assistant for a long time. This device will replace expensive factory-made tools. With its help, you can solve many everyday problems without resorting to the help of professionals.
Would you like to tell us about how you assembled an injection torch for blacksmithing with your own hands? Do you have useful information on the topic of the article? Please leave comments in the block form below, ask questions, post photographs.


