Do-it-yourself supply valve in a plastic window: manufacturing procedure and stages of valve installation
Plastic windows are significantly superior in functionality to glass windows with wooden shutters. Stylish in appearance, with good sound insulation and the ability to maintain a comfortable temperature inside the room, regardless of external factors - all this has made plastic windows indispensable and mandatory in the construction of new houses.
However, they still have some disadvantages. In particular, this is the occurrence of difficulties in natural ventilation in the room, which can result in various consequences that affect the microclimate of the room and human health. But it is possible to prevent their occurrence without the help of professionals by providing additional air flow. Why you can install a supply valve in a plastic window with your own hands, using improvised means.
What you will need for this and how to perform the installation correctly - we will analyze all this in detail in our article. We’ll also talk about making a homemade valve and its effectiveness.
The content of the article:
Functions of the supply valve in the window
Air circulation in a closed room ensures not only a regular change of air saturated with carbon dioxide to fresh air enriched with oxygen, but also to prevent:
- condensation on windows as a result of the difference in temperature indoors and outdoors;
- education mold as a result of increased humidity indoors;
- presence of stale air, as well as an increase in the amount of microbes and toxic substances in it;
- physiologically perceived lack of oxygen, which leads to increased fatigue and headaches.
The stationary natural supply and exhaust system provided in each house must ensure continuous systematic air exchange.
Ventilation ducts, which are usually located in the kitchen, bathroom and toilet, draw out warm, polluted air by natural draft formed in them. The formation of draft is possible with open windows or through possible air filtration through cracks in the frames.

This is the main disadvantage of natural ventilation - it was developed at a time when there was no talk of the possibility of the existence of plastic windows.
Based on the physical laws of air intake and removal from the room, it is not able to work if:
- the ventilation system does not remove exhaust air in the calculated volume (for example, it is dirty and requires cleaning);
- there is not enough air supply from outside.
Plastic windows are sealed enough to provide natural air flow.Thus, the ventilation system is disrupted, which entails the formation of the above-mentioned side effects that affect health.
Ventilating rooms by opening windows is not always appropriate. So, in the spring-summer period, when cooling the apartment with air conditioners, opening the window leads to the entry of hot air, and can also cause breakdowns in the operation of the air conditioner.
It is worth noting that according to sanitary requirements, ventilation of premises should be carried out at times when there are no people in them.

Thus, providing plastic windows with means of additional ventilation is a necessary measure.
Ways to improve indoor ventilation
Despite the significant disadvantage - an obstacle to natural air circulation - the main advantages of plastic windows have ensured their widespread use.
They really make life more comfortable, so quite progressive solutions have been developed to eliminate the disadvantage:
- special fittings that provide limited window opening and low ventilation of the room;
- wall supply valve;
- window ventilation valve;
- flaps with an opening mechanism.
When choosing a method of providing ventilation, you need to choose the most convenient method of regulation - manual or auto.
Special fittingsbut does not provide constant air circulation, since it is based on opening the window and fixing a certain position. However, at sharply high or low temperatures outside the window, its use is not justified from the point of view of maintaining the thermal balance inside the room.
Dampers with opening mechanism (they are also called ventilation slats) have a wide variety of design options. Their adjustment is carried out manually, and the installation must be designed at the stage of preliminary measurements. Ventilation strips are separate parts that are built directly into the window structure. Their main disadvantage is considered to be a complete violation of the sound insulation of plastic windows.

Wall ventilation valves There are different designs and methods of air flow into the room. Simple ones have a ventilation grille on the outside and a special plug inside the room.
Existing electric options are equipped with fans, filters and air heating devices. These ducts provide a global solution to air circulation problems and are used in large offices and places where air conditioning is constantly running. The main disadvantage of this solution to the ventilation problem is the need to make a through hole of a sufficiently large diameter in the outer wall.And any intervention in the facade of the building requires permission from the management company and executive authorities.
And finally, the final type of organization of ventilation in a room is window vent valve. Usually, this ventilation system is thought about at the stage of ordering windows, but when building company houses, developers almost never think through these points, leaving the solution to the ventilation issue to future residents.
It is worth noting that building regulations provide for the presence of special ventilation valves in metal-plastic windows.
You can solve the problem of ventilation of plastic windows with your own hands. Further in the article the stages of independent implementation of ventilation in a plastic window will be considered.
Instructions for installing a ventilation valve in a window
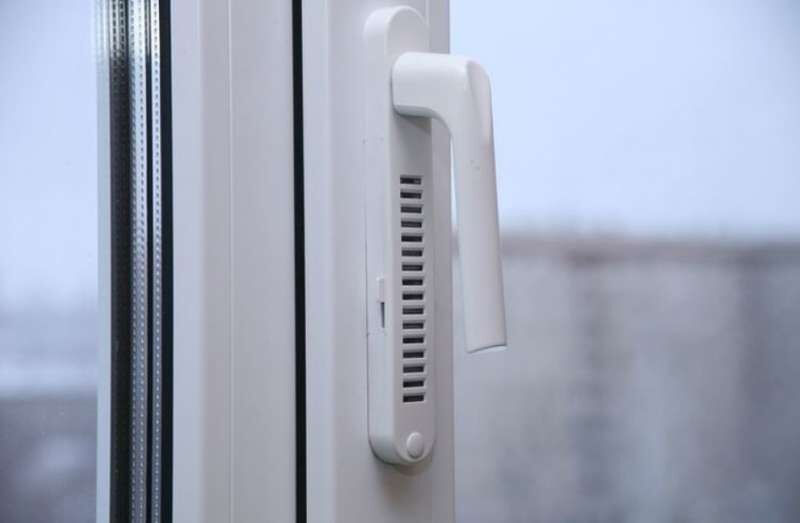
Modern supply valves have a very practical shape and are easy to install.
The developers gave them a modern design, which, combined with the small size of the structure, allows them to fit perfectly into a plastic window without disturbing the overall design.

The main advantage of a ventilation valve is that it provides round-the-clock air flow into the room without the need to open windows.
There are two types of valves:
- with manual control;
- with automatic control.
The difference lies in the presence of sensors in automatic valves.They independently regulate the volume of supply air entering the room, depending on the air humidity readings and the percentage of carbon dioxide in the room. The ventilation valve independently opens the doors more or less, releasing the required amount of fresh air into the room. Automatic valves also have manual control.
The main advantages of a ventilation window valve are:
- absence of noise with large volumes of air intake, its presence does not affect the sound insulation of the window;
- filtering the air entering the room;
- possibility of adjusting the volume of supply air;
- air distribution throughout the room occurs in a vertical plane;
- Possibility of installation on any type of window profiles;
- ease of installation of ventilation in a plastic window with your own hands.
You might be interested to know how adjust the plastic window yourself if it's blowing from the window.
Installing a valve in a window requires minimal construction skills and a small number of working tools. It consists of five stages.
Next, we will consider the step-by-step process of installing a valve in a window.
Stage #1 - preparing tools and materials
The first stage includes preparing the necessary tools and materials for work and determining the location where the valve will be installed.
When preparing, you need to select the following tools: a utility knife, a screwdriver or screwdriver, double-sided tape, a ruler.

Now let's talk about the materials that are necessary for the manufacture and installation of the supply valve.
For this you will need:
- a plastic fitting that will play the role of a valve (or a purchased valve, the price of which is around 1000 rubles);
- three sections of seal of different lengths (one along the length of the valve);
- self-tapping screws;
- three plugs for attaching the valve.
After the materials and tools have been prepared, it is necessary to determine the installation location of the ventilation valve. So, the valve should be located at the top of the sash and approximately in the middle. Using a ruler, the further location of the valve is marked.
It is worth noting that when choosing a location for the valve, you should try not to catch the window fittings during installation.
Also at this stage you need to prepare the plastic window for installation. Why carefully remove the rubber seal. Why use a utility knife to make neat cuts and further remove the sealant layer.
Stage #2 - attaching the valve to dowels
The second stage begins with installing mounting dowels in the grooves where the rubber seal was located. This is necessary for further fastening the valve in the window sash.
Two fastening dowels are installed at the edges, and the third is installed in the center between the first two.

Next, the valve is installed directly. To secure it, double-sided tape is first applied, after which the valve is installed on the window in the desired position.
After this, the valve is secured to the window profile using self-tapping screws. They are screwed into already installed dowels.
Stage #3 - installation of the seal
At this stage, it is necessary to replace the removed seal with two seals prepared or supplied with the ventilation valve.
The functioning of the valve ensures the flow of air. To do this, the standard plastic window seal must be replaced with the seal from the kit. Its length is 35 cm, so it will be necessary to remove the same piece of seal from the window. Removal is carried out on the frame located opposite the installed valve.
At this point, the process of installing the valve in a plastic window can be considered complete. All that remains is to adjust it.
Stage #4 - setting and adjusting the valve
After installation, it is necessary to adjust the volume of air entering the room using a special slider provided in the valve design. The power level increases from the far left to the far right.
It is worth noting that the air supply regulator (motor) should be in the extreme left position only when carrying out routine maintenance.
This valve position is not allowed for daily use. Also, it cannot be closed in this position.
Instructions for making a valve yourself
Despite the rather complex design, the supply ventilation valve can be made by hand. Later in the article we will look at the simplest manufacturing method.
The main function of the valve is to ensure free flow of air into the room. The homemade product is based on the physical property of air - when heated, its flows move upward.
To make a homemade valve you will need:
- stationery knife;
- a small piece of plastic lining;
- double sided tape;
- cotton wool or foam rubber.
When opening the window, pay attention to the stationary rubber seal, which is applied along the perimeter to the window and frame.
In order to create the necessary air draft, you need to perform the following steps:
- in the lower part we cut off a small piece of sealing from the window frame (size from 5 to 10 cm);
- in the upper part we cut off a piece of stationary rubber seal of the same length, but directly from the window.
Thus, getting from the street into the space between the frame and the window, cold air will warm up and gradually exit through the upper hole into the room. The simplest device for ensuring the supply of air from outside is ready.

Many people stop there, however, with such ventilation, dust and dirt from the street will get inside the room, settling on the frame, window and penetrating inside.
To avoid this, you can do the following:
- carefully cut the plastic lining across the section, making a strip a couple of millimeters wide;
- fill the spaces of the plastic compartments with cotton wool or foam rubber;
- Use double-sided tape to secure the resulting structure at the cut site of the stationary rubber seal.
The resulting device will not be inferior in functionality to supply valves manufactured in production, and will be much cheaper in price.
If this method of organizing air flow seems complicated to you, we recommend that you read the instructions for creating window sill ventilation.
Conclusions and useful video on the topic
This video shows how you can install a ventilation supply valve with your own hands:
And this video describes in detail the steps to make a supply valve with your own hands:
Installing an inlet valve will eliminate the problems of fogging of plastic windows, mold formation, and the appearance of an unpleasant odor in the room. At the same time, you will not need to worry about ventilation by regularly opening windows - ventilation will be provided around the clock at any time of the year.
Manufacturing and installing a supply valve in a window is not particularly difficult - you can handle the work yourself with a minimum set of tools and no skills. The entire process of installing the ventilation valve, if you follow the instructions above, will take about 40 minutes of your time.
If you still have questions about installing a window valve or its manufacture, you can ask our experts and other site visitors - the feedback form is located below.Also here you can share your personal experience of installing a supply valve in plastic windows, add unique photos of installation or making it yourself.


