Laying paving slabs on sand: technology and main stages, rules, recommendations
One of the materials for arranging paths and platforms is paving slabs. It is used on a production scale and in domestic conditions. Before laying paving slabs on sand, you should prepare the base and the necessary tools and materials.
The content of the article:
Types of tiles
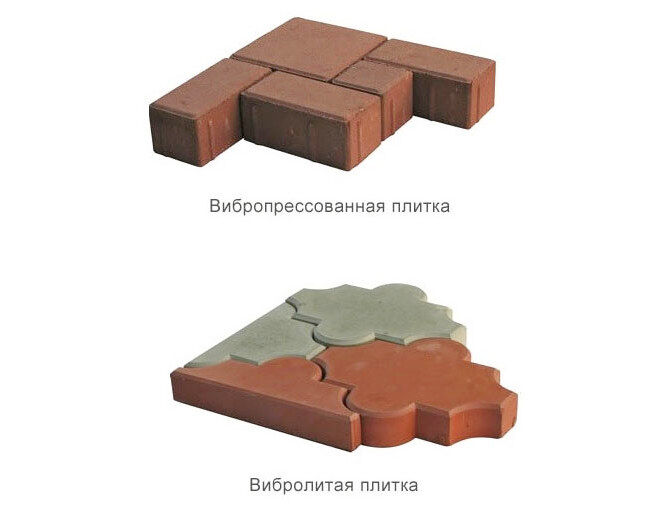
You can lay tiles on sand that are at least 40 mm thick. Thinner panels are mounted on cement-sand mortar. This makes it possible to create a single fabric that is resistant to mechanical damage. Paving slabs are divided into 2 groups of products.
Vibropressed parts
The technology involves pressing the concrete mixture. In this case, the composition has a minimal amount of moisture.
In production they use specialized press. This makes it possible to obtain products that are resistant to temperature changes, the negative effects of moisture and mechanical damage.
The vibrocompression method is common on an industrial scale. This is due to the need to use specialized equipment.
Vibrocast products
The method involves the production of parts from cement-sand mortar. The production of tiles of this type is possible in domestic conditions. The work is carried out in the following sequence:
- Prepare forms. The internal surfaces of the formwork are moistened with lubricants. This makes it easier to remove the finished part.
- Pour in the solution. For the outer layer, use a mixture with fine filler. Dye is added to change the color. The inner layer is made from a solution with coarse filler.
- Place the molds on a vibrating table. Under the influence of vibration, air bubbles come out of the mixture. This increases the strength of concrete.
- Wait for the mixture to harden.
- Remove the panels from the molds.
You can lay paving slabs of any group on the walkway. A person independently determines which type of panels to choose.
Working tools and materials
You can lay paving slabs on sand yourself. This does not require specialized education. The work will be performed by a person with minimal technical skills. To lay paving slabs, you need the following tools and materials:
- Tamping. To speed up the process, specialized machines with an internal combustion engine are used.
- Rubber or wooden hammer. A metal tool can damage the panels.
- Angle grinder. Use a disc on concrete. The diameter of the circle is selected separately for each case.
- Level. Necessary for leveling the site in a horizontal plane.
- Shovel. Use bayonet and shovel tools.
- Putty knife.
- Rule. You can use a long, flat object - a wooden block or a piece of profile pipe.
- Beacons and twine.
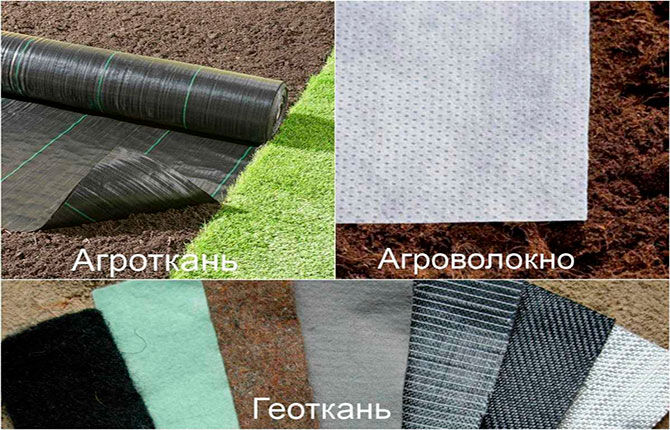
- Agrofibre or geotextile. Protect the site from grass germination.

- Crushed stone of different fractions.
- Coarse and fine sand.
- Cement.
- Paving slabs and additional elements (gutters, curbs).
The list of tools is different for each case. A person independently determines the need to use a particular tool.
Laying technology
At the initial stage, a detailed plan will be required. To determine how to correctly lay paving slabs on sand, the plan is supplemented with a drawing. It indicates the boundaries of paths and sites. When carrying out the calculation, the location of the trees is taken into account. Their roots will interfere with the construction of the pit.
The plan describes the sequence of actions. When working, they adhere to a pre-prepared plan. This makes it possible to lay paving slabs in a technological order.
Preliminary work
At this stage, the prepared drawing is transferred to the area. Beacons and twine are used for marking. Rods, pieces of wooden slats, pieces of profile pipe, etc. will do. To make it easier to drive the beacons into the soil, their edges are sharpened.
Pegs are installed around the perimeter of the tile laying site.
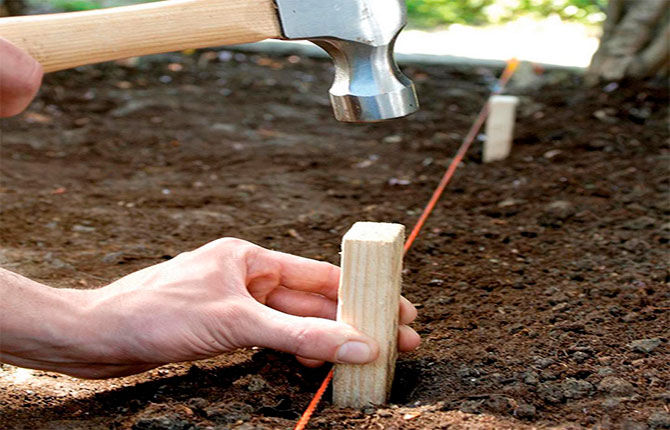
The distance between the beacons depends on the configuration of the finished canvas and is selected separately. When marking straight lines, the distance is 2-3 m. To make the surfaces of complex geometric shapes, the distance between the beacons is reduced.
The twine is pulled at a distance of 10-15 cm above the soil. A low-lying cord touches the soil in places where it is elevated. This prevents the normal layout of the markings.
After installing the beacons, the work site is cleared of debris, bushes, etc. At this stage, materials and tools are prepared. Paving slabs are laid around the perimeter in small batches. This way, when working, you will not need to waste time on transportation. After the preparatory work, a foundation pit is prepared for installation.
Soil development
The technology involves preparing a pit. It is necessary to place a cushion of sand and gravel.To determine whether it is possible to lay paving slabs on sand when creating a parking lot, take into account the pressure on the ground.
For passenger cars, paving slabs can be laid on a pad with a thickness of at least 250 mm. For heavy vehicles, the layer of bulk material is from 300 to 500 mm.
To make a pedestrian path, build a pit 200 mm deep. When digging, pay attention to the verticality of the walls. Their displacement in the lower part towards the center of the trench will lead to difficulties in installing the curb. At the trench digging stage, the roots of trees and shrubs encountered are removed.
To prevent plants from growing through the seams of paving slabs, agrofibre is laid at the bottom of the pit. Additionally, the soil is treated with chemicals that block the growth of vegetation. The method of using such substances differs. The instructions supplied by the manufacturer must be followed.
Before installing the canvas, clean the surface of sharp objects. These are stones, plant roots, etc. Its damage leads to the spread of vegetation.
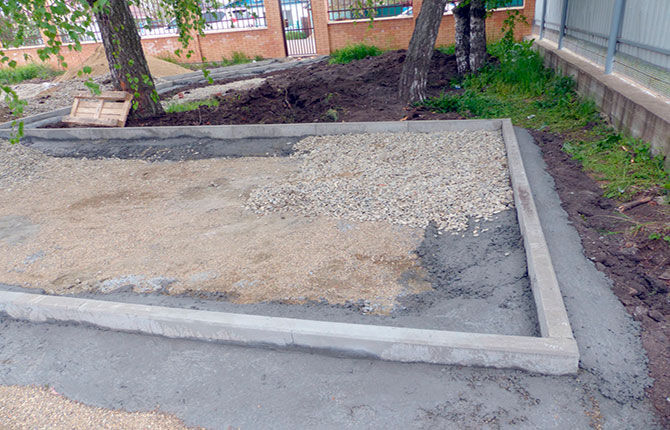
Installation of curbs
Additional elements separating the path and the rest of the surface are mounted on a cement-sand mortar. The work is carried out in the following sequence:
- Mix the cement-sand mortar with a ratio of 1:3. To ensure the stability of the elements after installation, the solution is made thick.
- Install the curb dry. Check its correct location in the vertical and horizontal planes. To do this, use a building level.
- Dismantle the additional element.
- The solution is laid along the plane of contact between the part and the soil.
- Install the products in place.
- Check the correct location.If necessary, adjust the position of the part with a rubber or wooden hammer.
- Install metal or wooden spacers. They are necessary for immovable fixation of the product until the concrete mixture has completely hardened.
- Wait until the solution dries.
It is necessary to put the solution after trying the curb in place. Spreading the mixture around the entire perimeter will lead to difficulties when changing the position of the part in the vertical and horizontal plane.
Support-drainage backfill device
Before laying paving slabs on the sand, create a drainage layer. It is necessary to remove moisture. For this purpose, fine crushed stone is used.
To eliminate the possibility of damage to the agrofibre, about 30 mm of sand is poured onto the bottom of the pit. Before backfilling, the material is sifted to remove stones. The lower sand layer is leveled and compacted.
The next stage is the production of the support-drainage layer. Fine crushed stone is poured into the bottom of the pit. The thickness of the pillow is 100 mm. If you need to lay paving slabs on a car lot, increase the thickness of the pad. The drainage layer is made as follows:
- pour crushed stone;
- level the material with a rule or an even beam;
- compact the surface using manual or mechanized tamping;
- cover the pillow with coarse sand;
- water the resulting coating with water;
- repeat compaction.
Before the next stage, wait until the surface dries. Moisture leaves the material in 1-2 days. After drying, they begin to arrange the substrate for the paving slabs.
Sand layer for laying tiles
Before laying paving slabs, make a sand cushion.There are no standards defining what kind of sand to lay paving slabs on. It is important to choose a material that has a minimum number of stones. Before laying the slabs, sift the sand.
A layer of purified sand 50 mm thick is poured over the drainage pad. After this, the surface is leveled with an even beam. The correct location in the horizontal plane is determined by measuring the distance from the edges of the curb.
The substrate is made in 2 stages. The first step is to pour a layer 20-25 mm thick. Wet the surface with water and tamp.
After compaction, pour out the remaining material, level it in a horizontal plane and compact it. This makes it possible to obtain a sand substrate that is resistant to mechanical stress.
Tile laying
It is necessary to lay the tiles on the sand in the direction away from you. This way a person will not violate the integrity of the sand substrate. The parts should be placed on the sand in a certain sequence:
- Install the element in accordance with the picture indicated in the drawing. The first part is installed near the curb. A gap of 2-3 mm is left between the tiles and the trim.
- Check for correct positioning in the horizontal plane. Use a building level. If necessary, the product is dismantled and sand is removed or added.
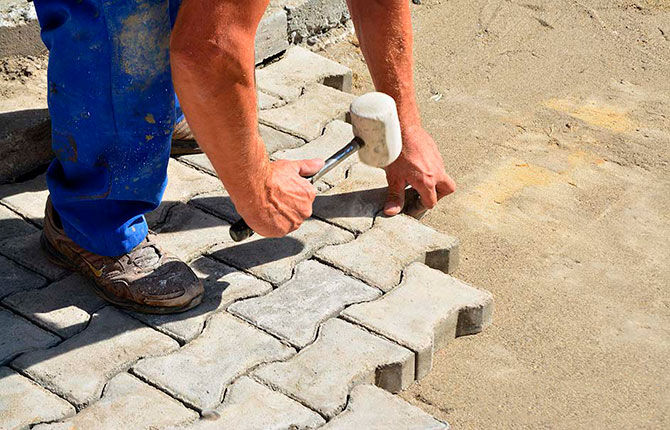
- Place the tiles on the sand using a rubber or wooden hammer. Its size is calculated separately for each case. For large slabs, you will need a hammer weighing 700-800 g. To lay thin slabs, use light hammers.
The next slabs must be laid in the same sequence. In this case, there must be an equal gap between the side surfaces, so plastic crosses, wooden pegs, etc. are used.
During the installation process, the slabs will need to be trimmed where they abut curbs or vertical surfaces. The part is cut using an angle grinder with a cutting wheel for concrete.
Sealing joints between tiles
To prevent contamination from getting between the side surfaces of the slabs, the seams are rubbed down after installation. To fill them, dry sifted sand or a cement-sand mixture is used. In the first case, water will seep through the seams, in the second it will be possible to seal the coating. The procedure is carried out in the following sequence:
- Prepare bulk material. The sand is sifted to prevent the ingress of stones. When making a cement-sand mixture, the ratio is 1:3.
- Pour sand or mixture in small portions over the entire surface area.
- Rub the seams with a spatula.
- The remaining sand is removed with a broom.
- Fill the seams with water. This makes it possible to compact the composition.
- After the mixture or sand settles, the procedure is repeated.
After completion of the work, the remaining sand is swept away from the surface. It may be necessary to repeat the grouting procedure after precipitation.
You can also read about the general principles of laying tiles in various ways link.
Some useful tips
You can lay paving slabs on sand yourself. It is important to follow the sequence of actions. To facilitate the procedure, several rules are taken into account:
- If the groundwater depth is shallow, a drainage canal is additionally installed. In this case, it is necessary to lay paving slabs on a slope.
- The material is purchased with a small reserve. This makes it possible to replace failed parts if necessary.
- Choose paving slabs with restrictive projections on the side surfaces.In this case, the gap between the plates will be the same. In this case, you do not need to use crosses.
Laying paving slabs on sand can be done by a person who does not have construction skills. At the initial stage, it is important to draw up an accurate action plan and stick to it during the work process.
Have you laid paving slabs on sand yourself? What type of tamper was used to make the pillow? Leave comments and share the article with your friends on social networks. Bookmark it so you can come back to the tile installation instructions later.
Below we recommend watching a selected video on the topic.
Laying paving slabs on sand:
Laying paving slabs on sand and the result after a year:
Plastic paving slabs - advantages and disadvantages, how they are produced and how they are laid? About it Here.


