Grinding a concrete floor: methods, step-by-step instructions, eliminating defects
Laying work concrete always required physical strength and patience.If the site was poured for a parking lot, warehouse or any other facility where people will work, then the concrete floor is always polished. This is a labor-intensive task; you will need a special tool, patience and accuracy when processing cement stone.
The content of the article:
Why is grinding needed?
Sometimes you can hear the opinion that the procedure of grinding concrete floors is necessary to give the surface a more sophisticated look. If we are talking about decorative floors backfilled with marble or limestone chips (crushed stone), then grinding the concrete can actually level the surface and prepare it for final polishing.
This scheme for installing concrete floors is often used in shops, on covered areas, wherever, according to SNiP standards, a certain quality of the concrete floor surface is required. Moreover, many shops and commercial enterprises, according to sanitary standards, must carry out regular wet cleaning of the floor. Grinding concrete will provide not just a smooth floor, but also a fairly high-quality coating.
At construction sites, warehouses and production workshops there is no question of any decorative type, where is the construction site and where is the interior. During the construction of a large warehouse, parking lot or workshop, floor sanding is performed for prosaic reasons:
- Pouring concrete over a large area is carried out in several sessions. The quality of the mixture, its plasticity, spreadability and shrinkage may vary. Therefore, after unloading 5-6 concrete mixers onto the base, after setting, protruding ridges, humps, joints and seams from the formwork will remain on the concrete surface. All defects will need to be sanded down.
- The top layer of a concrete surface is always of poor quality. The floor is covered with cracks and dust from sand and cement. Without sanding, all this will crumble under your feet and the wheels of vehicles. Therefore, the surface needs to be sanded.
- Customers of the facility, especially if it is a production workshop, include in their requirements a certain quality of the concrete floor surface. Sanding is required for subsequent dust removal and painting of concrete floors.
Many private owners of their own garages or workshops also prefer to sand the floor indoors. Even if no additional finishing is planned. This is not just a tribute to fashion, but compliance with safety regulations.
It is easy for your shoes to get caught on a protruding defect on a concrete floor and cause serious injury. Therefore, high-quality floor grinding is as important as laying concrete on the site.
Methods for cleaning concrete
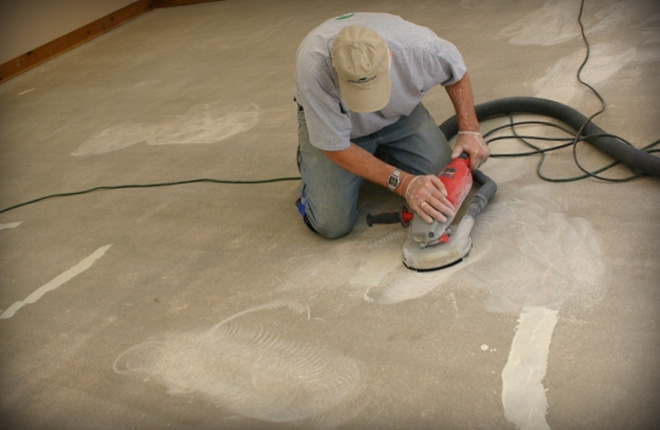
The choice of concrete floor grinding technology directly depends on the concrete, the requirements for surface quality and the capabilities of the grinding machine. In the simplest case, at home, a concrete floor can be sanded with an ordinary grinder with a grinding attachment. To avoid suffocation from concrete dust, grinding will need to be done with a side blowing fan, or use a construction vacuum cleaner.
On an industrial scale, manual grinding is usually used to eliminate minor defects in corners and hard-to-reach places. The main part of the work can be done in 2 ways:
- With the supply of water emulsion to the working area of the grinding wheel. This is a wet sanding option.
- Without emulsion, concrete surface grinding is carried out without water. This is the dry method.
- Combined processing option, pre-treatment - without water, final grinding is performed with emulsion.
The specific method is selected depending on the scope of work, the required surface quality and grinding speed. The combined method is usually used to grind very old low-quality concrete floors with a large number of potholes and repair patches.
Characteristics of concrete
The highest quality concrete floors are obtained using heavy, high-quality concrete. If the site is poured for further processing, then M200 grade concrete is used. If the project has additional requirements for the hardness of the floor, then it will be filled with M300 mixture. Such a coating is difficult to process even with a specialized tool, but the result is a fairly high-quality surface that can be brought to a smooth state.
Indoor areas and hangars for transport can be filled with concrete mixtures M150-M200. Grinding such concrete is carried out at a lower cost, but it will be necessary to give more time for the coating to set and harden, otherwise cracks and potholes may appear under heavy load.
In any case, before you start sanding the floor surface you need to:
- Check for cracks and areas with protruding reinforcement (if any).
- Treat with a special solution that makes the surface of a fresh concrete floor denser and harder.
These are so-called concrete hardening accelerators. There are many mixture options, but calcium chloride is usually used for ordinary concrete.
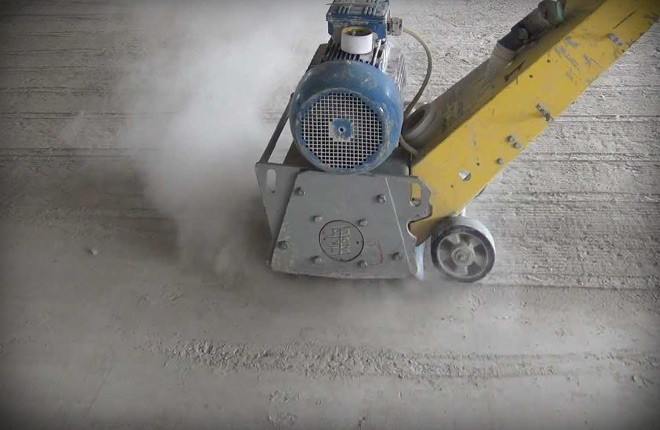
Dry sanding
The process is performed without water or emulsion. Therefore, the grinding machine tool throws up a huge amount of dust into the air. To get rid of the dust cloud, connect the exhaust arm of a construction vacuum cleaner to the grinding wheel lining.
Grinding concrete using a dry method is considered simpler and more convenient, since it is possible to control the quality of the surface directly during the work process. Different areas of the floor may differ in characteristics, so it is important to constantly check how deep the working tool cuts the concrete, whether there are risks or chips.
Light concrete, as well as floors with decorative filler, are sanded using the dry method. Sometimes, before the final stage of grinding, the concrete surface is slightly moistened with water. This is done in order to reduce the heating of cast iron cups or other cutting tools. As a result, the quality of the surface after grinding increases.
Processing with emulsion
The wet method involves the use of water with the addition of a small amount of liquid polymer. During the grinding process, the cutting edge becomes very hot, and the addition of water reduces wear and the risk of corrosion. In addition, there is a risk of overheating the concrete surface, which can lead to cracks on the floor.
Water is sprayed by a special nozzle inside the grinding machine. It is not recommended to spray the emulsion onto a cutting tool yourself.This will not improve the quality and may cause stains on the floor.
The rotation speed of the tool with the wet method is higher, so grinding can be performed either with maximum productivity, or the machine can be configured for improved surface quality. Even a slight gloss can be achieved on old, heavy concrete floors.
In addition, wetting slightly improves working conditions; grinding occurs with less noise and the amount of dust raised into the air.
The only disadvantage of the wet method is the appearance of a huge amount of viscous wet sludge - a mixture of concrete dust and emulsion. It has to be removed in order to evaluate the quality of grinding.
Tool
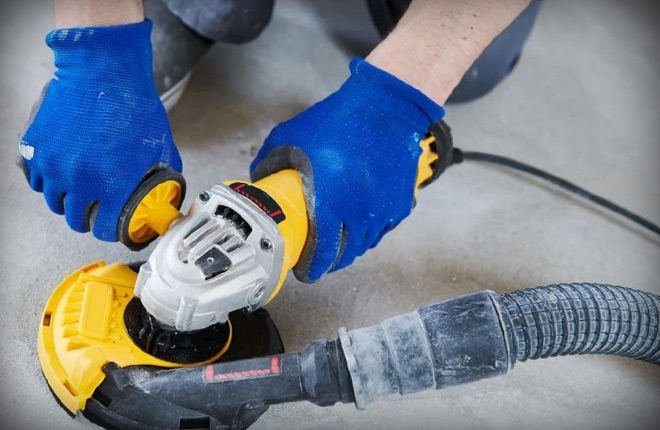
Selected depending on the required surface quality and the equipment used. The simplest option is replaceable grinding wheels for angle grinders.
The grinding tool can be simple, for example, in the form of petals mounted on a cast iron base. It is used for finishing grinding of concrete in hard-to-reach places.
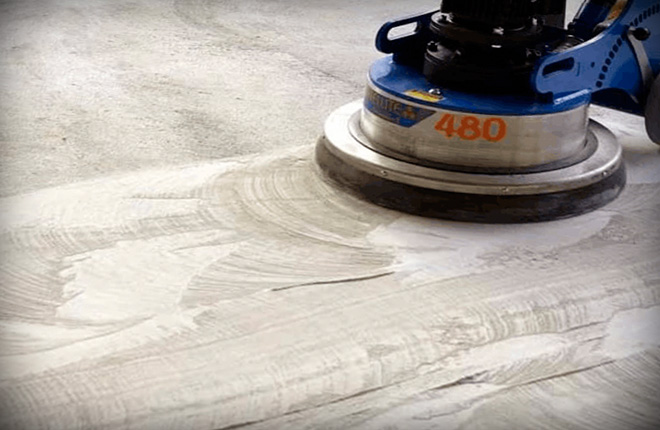
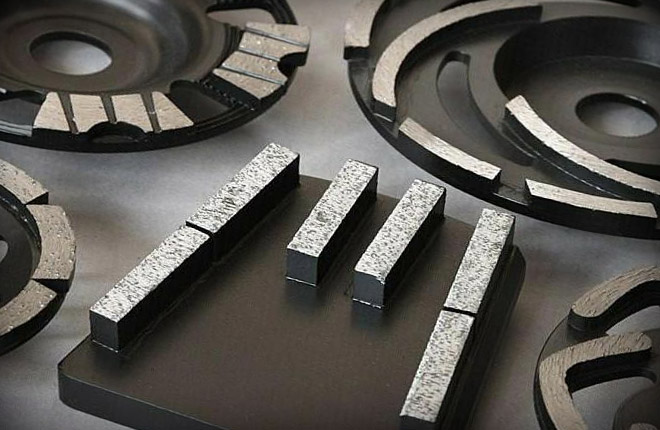
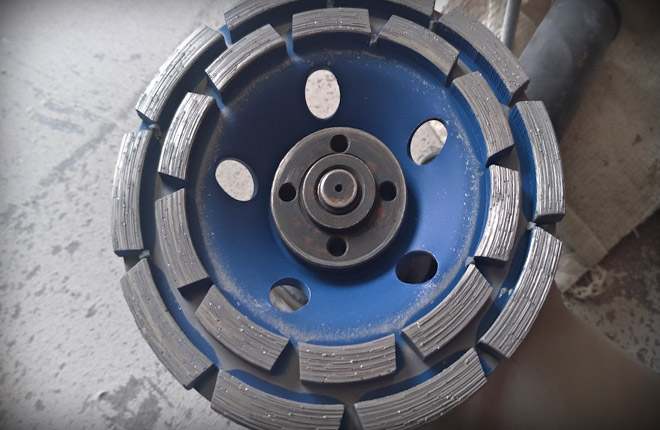
Most concrete grinding tools are made from bronze and cast iron. Typically, a circle in profile has the shape of a cup, which is why in everyday life it is called that – grinding cups. The cutting edge is formed by milling the wheel body.
The petals can be arranged in 1-2 rows and have the shape of a helical gear. Most often, the cutting surface is made in the form of a two-row chain of sectors.
Powerful grinding machines are equipped with wheels or “stones” with a round cast iron base, the cutting edge is already made in the form of oblique blades or trapezoids - Frankfurt.This tool makes it possible to grind a concrete floor at a higher speed, capturing the material to the maximum depth.
Preliminary grinding is performed with cutters with carbide plates or abrasive with coarse grains (No. 40-No. 60). With this tool, rough peeling of “humps” and protruding rubble is carried out.
Next, cast iron cups with grain 400 units are used, at the last stage - 800-1300 units.
For finishing grinding, cast iron cutters with diamond chips are used. This tool can be used to process heavy concrete with granite or basalt filler.
Equipment
Several types of equipment can be used for grinding. The most affordable option is an angle machine, but its capabilities are enough for a maximum of a few square meters of concrete floor.
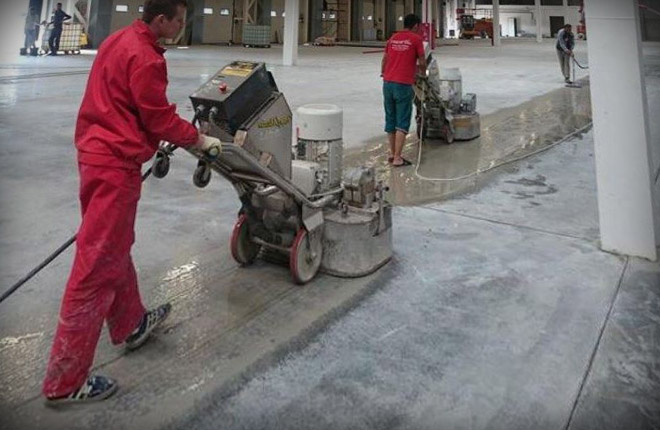
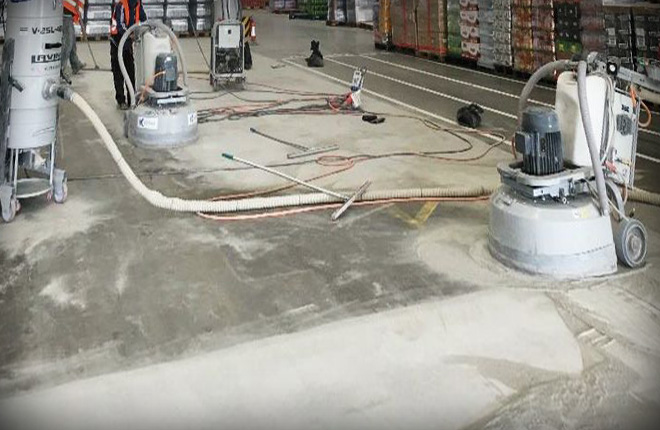
Complete grinding of a concrete site is carried out with electric or, more often, gasoline machines. As a rule, the floor is treated with 3-4 cups at a time. If you grind with one wheel, scratches will remain on the surface, and the processing plane may be slightly uneven. Three simultaneously working wheels cut off more concrete mass, but the main thing is to level the grinding plane.

With each pass on the concrete floor, its quality improves, the surface plane is leveled, and slopes and waves are eliminated. For fine grinding, heavier machines with air-cooled tools are used.
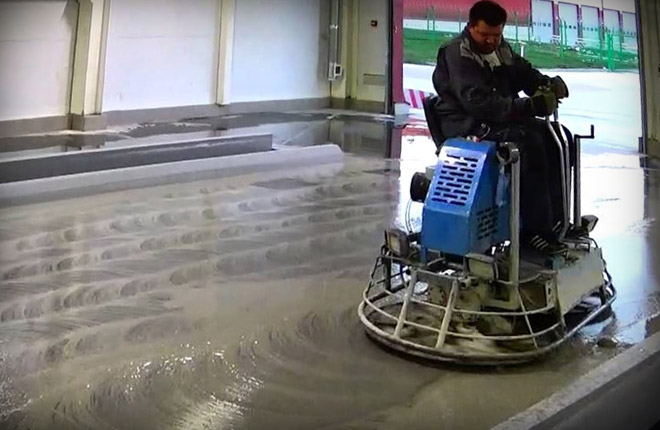
At the final stage, light ironing or polishing machines are used, in which the heavy cast iron Frankfurt is replaced with a soft circle. The rotation speed increases, grinding turns into smoothing. In this case, the defects are not cut off, but smoothed into the surface of the concrete floor.
Sanding instructions
After pouring, the concrete floor must gain the necessary strength and hardness. This process goes on in concrete for decades; only after 60-70 years of operation does the material begin to degrade.
The first stage of hardening ends after 6-7 days. If heavy concrete was used, then after a week you can begin preparing the concrete floor. Ideally, rough sanding can begin 20-21 days after pouring. There is no point in going out with the tool earlier.
For the most impatient, we can advise you to take measurements during this time and apply markings on the surface - where there are humps and holes. Depending on the location of defects on the concrete floor, the appropriate grinding scheme is selected.
Preparation
A fresh concrete floor will typically have minimal defects, but that doesn't mean cracks and chips won't appear in the future. The main shrinkage (70-80% of the total) ends after 3 days. But the beginnings of future cracks will be visible immediately. At the same time, it is necessary to check the places where the reinforcement mesh could rise. They need to be marked, but cutting or knocking out random debris from the frozen floor will not be necessary until the concrete floor reaches full strength.
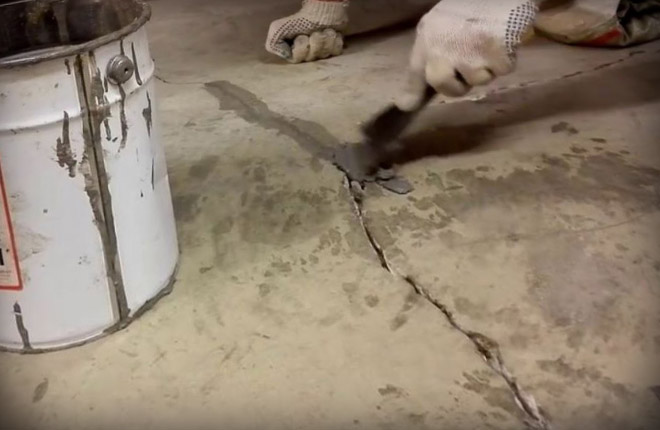
The exception is metal objects. They need to be cut out with a grinder with a cutting disc for concrete immediately, immediately. If no more than a day has passed, then you can fill in the repair patch.
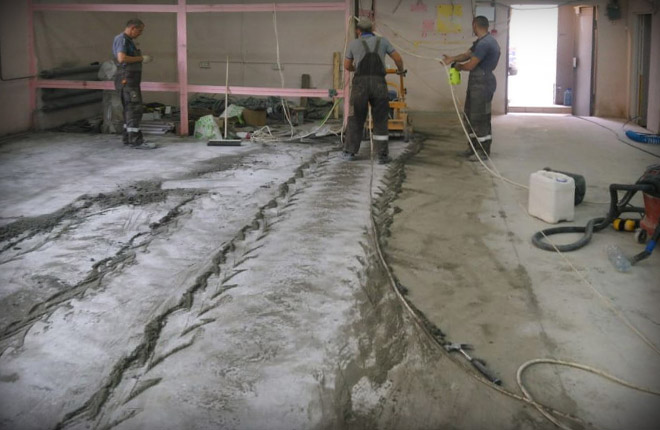
On old concrete floors, cracks, potholes, and chips are cut out with a grinder so as to remove at least 5 mm of intact concrete from the walls. In this way, it is usually possible to remove damage to the concrete mass, from which cracks and chips could continue to develop.Before pouring the repair mixture, it is advisable to coat the crack with a deep penetration primer. The repair mixture is poured liquid; a “top” will need to be left on top, which should compensate for the shrinkage of fresh concrete.
After a week, it needs to be cut off with a grinder and sanded to the level of the main floor surface. In the same way, you will need to rub and sand all other cracks and defects on the concrete surface.
It doesn’t matter whether it’s an old concrete floor with a painted surface or a fresh screed, there are always defects and slopes on the site. On old concrete, for example, on the floor of a garage or warehouse, the surface is abraded by the soles of shoes or the wheels of vehicles.
If you wish, you can even see the tracks from the workings on the floor. The height difference usually does not exceed 7-8 mm, but on very old sites the concrete floor can wear down to the reinforcement grid. Before grinding, such surfaces must be restored by laying a metal mesh, the ends of which are tied with old reinforcement.
Checking the concrete floor before grinding
The next stage is considered the most difficult in the entire process of preparation for grinding. It is necessary to determine the actual geometry of the surface of the concrete screed. This must be done in advance in order to draw up a grinding map. This will help you choose the right starting areas for grinding at the initial stage.
You can check the profile of a concrete floor in a small room using paint cords stretched across the room between the baseboards. The baseboards themselves will need to be removed, and the position of the tensioned cord adjusted to the building level.
A laser level with 1-2 beams is considered more convenient to use.Typically, the lowest point on the concrete floor surface is selected before measuring. This will be the supporting surface. From here you can start grinding if the plane does not have a clearly expressed large slope in one direction. This defect often occurs when pouring a concrete floor by hand inside a finished room.
After installing the laser level, you need to use a ruler to measure the distance from the beam along the concrete surface every 50-70 cm in the longitudinal and transverse directions. If you transfer the measurements to the floor plan, you will get a map of the surface of the concrete site.
The day before grinding begins, the concrete floor must be cleared of debris, wiped dry and treated with a strengthening suspension. It is better to apply the solution to the surface using a paint roller. It works faster this way. Moreover, the liquid will need to be applied several times.
This is usually done before changing tools:
- Before rough sanding, leveling, filling defects and cutting slopes.
- Before final grinding of the concrete floor, the Frankfurts are replaced with cups of abrasive.
- Semi-finish floor grouting.
- Before polishing the concrete floor to a glossy finish.
You can also save on the impregnation solution. For example, when grinding a concrete parking lot or parking space, or if it is planned to lay additional flooring on the concrete. But for interior spaces, where the concrete floor will be finished, polishing with a suspension is considered mandatory.
Grinding the concrete base
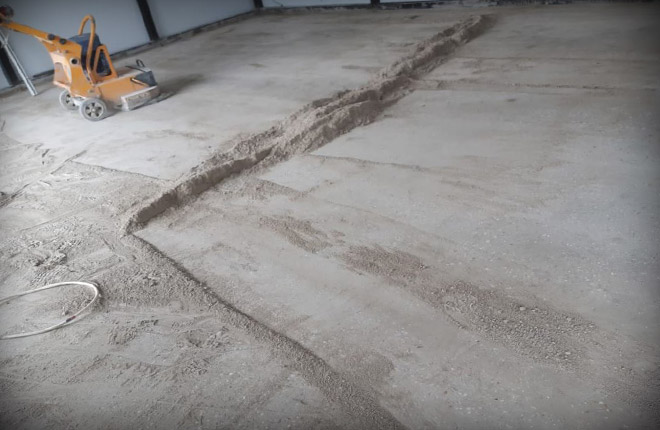
As a rule, work on fresh floors does not begin with rolling out the sander. At the first stage of grinding, you first need to cut off rough spot defects and humps. The largest defects can be knocked out with a hammer and chisel.If there are a lot of them, for example, there is a whole strip of “ridges” left after the formwork boards, then it is better to use an electric jackhammer. Defective areas often have to be sanded manually, using a grinder and a pair of abrasive discs.
You can try to immediately cut off the defective area with a grinding machine, but this is not always convenient. The powerful device has a wide gripping band to remove defects of a couple of centimeters. Often, because of the protective skirt, the master simply cannot see the place where the “bump” needs to be cut off.
The cutting tool provides high quality grinding only if the load is stable. It doesn’t matter whether 1 circle is used or 3. Cutting a defect on a concrete floor using the “poke” method is dangerous; you can easily pick holes and chip the concrete.
If this is your first experience in grinding concrete, then it is better to start working with a grinder from an area where the floor surface is as smooth and flat as possible. The machine needs to be adjusted according to the load on the floor and the speed of movement. Since grinding will remove concrete from the entire surface of the site, there is no fear of damaging the floor. You will need to remove from 5 to 10 mm over the entire area, so a small check of the machine on the most even area will not spoil the results of grinding the concrete floor.
After setting up, the grinding machine is taken to a corner or to the edge of the highest “hump” and sanding is performed in continuous continuous stripes, as in the video:
Periodically, every 15-20 minutes, the machine is stopped to remove sludge or dust, check the quality of the surface of the concrete floor and allow the tool to cool.
Before you start sanding, it will be useful to inquire about the duty cycle of the machine, how long the machine can run continuously, and how often it needs to be stopped to cool down.
If you plan to process large areas, it is better to rent industrial equipment. With its help, you can not only sand faster, but also with a higher level of surface quality.
Common mistakes and how to avoid them
According to the masters, the understanding of what exactly was done wrong comes after the completion of the work. Grinding a concrete floor is difficult and takes a long time; you have to return to the already treated surface to eliminate defects.
Tool overheating
The cutting edges of the wheel are subject to enormous abrasive load, so even a powerful tool can become very hot during the floor grinding process. Even if the car has a built-in fan. Therefore, mainly small areas are sanded dry, while large surfaces are treated wet.
In addition to the tool, the motor and gearbox overheat. The power and rotation speed are reduced, which means the quality of concrete grinding decreases. Therefore, you need to look in the instructions to see what area the grinder can process without reducing quality. If the equipment has overheated, it is advisable to turn it over on its side and let it cool for 10-15 minutes.
Grinding with worn tools
Experienced craftsmen work on the concrete floor with several sets of circles. The tool gradually wears out, and productivity decreases accordingly. Putting pressure on the machine to increase the grinding speed is pointless, as is loading it with additional ballast. This will damage both the apparatus itself and the surface of the concrete.
In addition, in the first stages of grinding, when it is necessary to cut off the thickest beads and humps, the tool may wear unevenly. As a result, spirals and snakes appear on the sanded surface. If a picture appears indicating that the circle cuts concrete with only one working edge (instead of 4-5), then a replacement needs to be made.
Practical skill in handling a grinder is of great importance. Experienced workers can determine by the force and sound the moment when the tool is badly worn and needs to be replaced.
Incorrect grinding path
Pre-sanding always starts on a level surface, near the largest hump or highest point of the concrete floor. The main task is to cut off protruding surfaces and bring them to the same average level.
Therefore, at the preliminary stage, grinding is performed in circles around such a “hill,” gradually approaching the top. If you sand in successive strips, the defect will not disappear. Periodically you need to turn on the laser level and check with a ruler how level the concrete floor has become.
If the surface of the concrete site does not have a pronounced slope, but is dotted with small “holes,” then it is better to use the “mower” scheme. In this case, grinding begins in the far corner, and the trajectory of the machine resembles periodic movement along an arc. Approximately the same way they use a hand scythe when mowing grass.
The last step is to make the concrete floor flat. Grinding is done in strips, much like a lawn mower would work on a lawn. At the end of the work, you will need to check the level of the floor surface, and you can proceed to decorative finishing.
How to eliminate defects after sanding
The most common problem is marks and marks from the tool. The easiest way to remove defects is to sand them with a finer finish. If the site is matte, then it will be enough to modify the concrete with a diamond tool so that a satin sheen appears. After which a primer is applied to the floor, it usually hides defects, and in general the concrete looks quite smooth and flat.
If there are defects on the surface for further polishing, then the finishing technology needs to be changed. Instead of polishing for gloss, several layers of varnish are laid on the floor with intermediate polishing. As a result, deep risks can be completely closed.
Sanding a concrete floor yourself requires patience and attention to the results. There are no technological secrets in the concrete processing procedure, so if you handle the equipment carefully, the result will always be rated “good.” Delicate work - polishing a concrete floor is best left to professionals.
Tell us about your experience sanding floors - what problems arose and how were they solved during the work? Save the article in your bookmarks so as not to lose important information on the topic.


Isn’t it easier to take good concrete with a plasticizer, level it at the moment of pouring and lightly rub it with some water until it sets; you can add emulsion to make it smooth. Then polish as much as you like until it shines. And this is monkey work.
It’s not easier if you need to cover an area of 1000 square meters and there are mixers in line, who will wait while you level your 10-meter piece. This is an industrial method, proven over decades of construction.