How to make a beautiful plasterboard ceiling - instructions from design to installation
Suspended ceiling structure It turned out to be easier to install and cheaper to manufacture. It has been used for a long time and has become an alternative to leveling ceiling surfaces with plaster or putty solutions.
If previously, mainly wooden building materials were used for this - boards, plywood, fiberboard - today they have not been replaced by cheap drywall (gypsum plasterboard). Before you make a plasterboard ceiling, you need to understand the technology of its formation.
The content of the article:
The nuances of installing a plasterboard ceiling
A suspended plasterboard ceiling got its name because it does not touch the base ceiling surface, but is located at a distance from it. On the one hand, it is attached to the walls of the room, on the other, on stands or special fasteners, which themselves are fixed to the base ceiling.
The next nuance is the choice of drywall. Behind the scenes, this sheet material is divided into 2 groups: wall and ceiling. They differ from each other in thickness. The first group includes sheets with a thickness of more than 12 mm, the second 12 mm or less. But there is one point.
If the construction of a plasterboard structure is done with your own hands, and moreover alone, then it is better to choose a material with a thickness of no more than 9.5 mm. This will not only make the installation process easier, it will also save a lot of money.
The third nuance concerns the type of plasterboard ceiling. It can be single-level or multi-level. The first one is simpler than the second one, but the last one is not so complicated either. You need to learn how to first make a single-level one, and then move on to more complex structures.
There are many nuances to installing a plasterboard ceiling. This applies to the assembly of the frame, the laying of plasterboard sheets, their fastening, and the application of putty mortar.
Pros of plasterboard ceiling
It was said that there is no need to repair the base ceiling. Drywall covers it completely. The only thing that is recommended to do with the base surface is to repair large and serious defects with repair mortar and cover the entire ceiling area with primer. This will take little time, and the financial costs will be minimal. But the ceiling will not crumble, and there will be no debris left on the drywall.
Between the plasterboard and the base ceiling, a space is formed where communication engineering networks can be laid: pipes, cables, wires, etc. There is no need to ditch building structures for them; they can be positioned in any direction. However, they will not be visible.
Drywall has a good service life. Manufacturers give a life of up to 30 years, but with proper use it will last longer. It is easy to repair - just putty and paint. Can be covered with wallpaper.
It is easy to embed lamps into it. From it you can make various decorative elements of any shape on the ceiling - this will decorate the room.
Cons of plasterboard ceilings
The biggest drawback of drywall is that it is susceptible to high humidity, and especially water. Under their influence, the material becomes unusable. It is impossible to repair such a structure. It must be replaced with new sheets.Therefore, it is better not to install drywall in damp rooms, such as the bathroom or kitchen. Moisture-resistant materials are suitable here: plastic panels, suspended ceilings and others.
The suspended structure reduces the height of the ceilings. Therefore, if this parameter is small, then it is not worth doing.
If you decide to build a plasterboard ceiling structure in new buildings, then it is not recommended to do this right away. The natural shrinkage of a multi-storey building will take some time - usually a year. If a plasterboard ceiling structure has been erected, it will be damaged within a year: cracks, widening of gaps, widening of joints between the walls, etc.
Preparatory stage
This stage is important because it includes all the procedures that precede the installation process. The better the preparation, the faster, better and without additional costs the installation will take place.
Preparing the room
Ideally, the room should be completely vacated. This will make it easier to move on trestles or scaffolding and flooring, or carry large sheets of drywall. Free space increases the speed of construction operations.
If this is not possible, then you will have to move the furniture from one corner (side) of the room to another. Some craftsmen group furniture in the middle of the area and work around it. But all these options create inconvenience. Therefore, the advice is to take out things and furniture.
It is important to prepare the surface of the base ceiling. The lamps are removed, the exfoliated parts of the plaster or other decor are removed. If mold-infected areas are present, they are treated with special compounds. Colonies of microorganisms must be dealt with seriously.They should not be left under a suspended plasterboard structure.
Design
There is no need for any complex project here. It is necessary to create a plan on paper on which the structures of the new ceiling will be clearly visible. This mainly concerns the frame with the location of all its parts and components.
Here it is necessary to indicate the locations of the lamps, because electrical wiring must be laid to them. Accordingly, indicate on the diagram how the cable will be laid. Maybe the ceiling will be illuminated, then this point should be taken into account and indicated in the project.
Calculations for required materials
If you decide to make a single-level ceiling, then the amount of drywall will be equal to the ceiling area. Therefore, you need to measure the length and width of the room and multiply the resulting values. Now the number of gypsum board sheets is calculated. Their standard size is 1.25x2.5 m. Therefore, the area will be equal to 3.125 m².
For example, the area of the room is 18 m². This means that to cover it you will need: 18:3.125 = 5.76 pieces of plasterboard sheets. We increase this indicator to a whole larger number. That is, you need 6 sheets of drywall.
The number of frame parts is calculated:
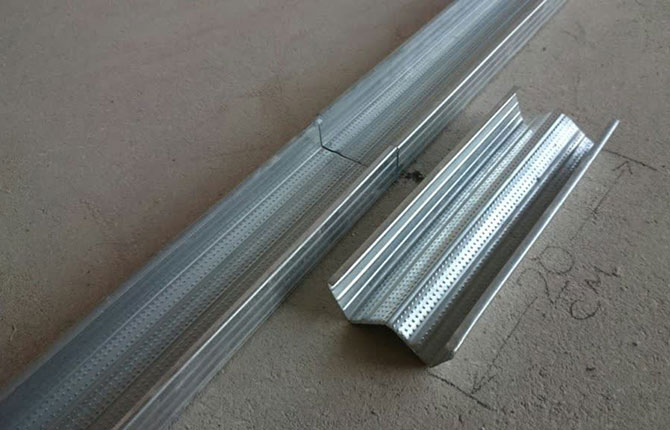
- Guide profiles that are installed around the perimeter of the room. Their number is equal to the sum of the lengths of all sides of the room.
- Ceiling profiles form a grid on which gypsum board sheets will be mounted. Typically, a lattice is created with cells of 60x60 cm, this is the same as 0.6x0.6 m. For example, if the lengths of the sides of the room are 6 and 3 m, then in the longitudinal direction it is necessary to lay 4 rows of 6 m in length, in the transverse direction 9 3 m long. If you sum up all length values, the total length will be: (4x6) + (3x9) = 51 m.Typically the length of the ceiling profile is 3 m, which means you will need: 51:3 = 17 pieces.
- Direct hangers. They are located only under the longitudinal ceiling profiles and at a distance of 50-60 cm from each other.
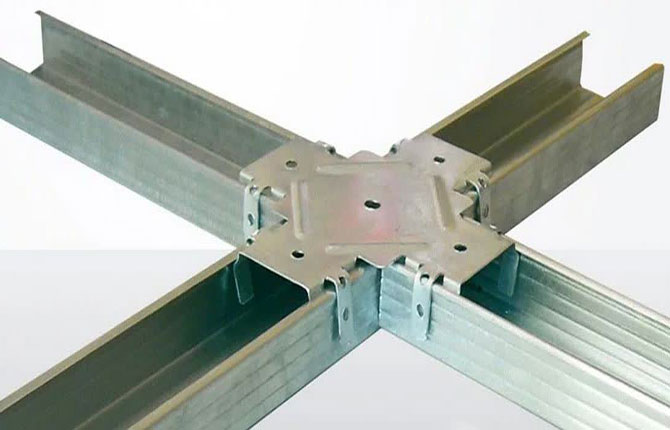
- If the longitudinal and transverse profiles are connected by crabs, then their number is equal to the intersection points of these profiles. This can be calculated by looking at the project.
Marking the ceiling and walls
First of all, the installation location of the guide profiles is determined. To do this, you need to measure the height of the ceilings in the corners of the room. Select the smallest size and lower it down 5 cm from the ceiling. This point is a guideline for drawing a horizontal line along all the walls, for which a laser level is used.
Now, in accordance with the plan on paper, it is necessary to draw the location lines of the longitudinal ceiling profiles onto the surface of the base ceiling. Marks for direct hangers are placed on them every 50-60 cm. At this point, the marking is completed, and accordingly the preparatory stage is completed.
We suggest you read the article - DIY plasterboard fireplace.
Ceiling installation process
There are 2 stages:
- frame assembly;
- installation of drywall.
Frame assembly
Guide profiles are laid along the lines marked on the walls and secured to the walls using dowels and screws:
- attached;
- every 25-30 cm, holes are drilled in the wall directly through the metal with a drill;
- dowels are inserted;
- Self-tapping screws are screwed into them.
Next, following the marked marks on the ceiling, direct suspensions are mounted in the same way as guides. The fasteners are the same - self-tapping screws on plastic dowels.
The longitudinal ceiling profiles now need to be installed and secured to the hangers. Since the length of the room is 6 m, you need to connect 2 profiles together.This can be done in different ways. One of them is shown in the photo below. Here an insert is made from the profile, which is inserted inside and secured from the outside with small self-tapping screws, which among craftsmen are called “bugs”.
First you need to insert the ends of the ceiling frame element into the guides. Secure them here with bugs - 2 fasteners on one side. Then lift it to one of the hangers and temporarily secure it to it. This is done with all longitudinal elements.
Next, 3-4 rows of strong threads are stretched across the room along guides on the walls. They will indicate the horizontal plane along which the installed longitudinal frame elements will need to be aligned.
The latter are removed from the temporary fasteners, lowered to the tensioned threads and attached to straight suspensions along the entire length. It is difficult to do this alone, so you will need an assistant.
The next stage is the installation and fastening of the crossbars. To do this, the prepared profiles are cut into lengths equal to the side of the frame cell. They are installed in designated places and attached to the longitudinal elements with crabs, as shown in the photo.
Strengthening heat and noise insulation
It is necessary to insulate the ceiling or make a soundproofing layer on its surface at the stage of creating the frame - before it is necessary to install the ceiling profiles. That is, the guides are installed on the walls, direct hangers are attached to the base surface.
Any porous or fibrous materials are suitable for insulation and sound insulation. Mineral wool in rolls or mats and polystyrene foam boards are most often used. The latter are easiest. They are simply glued to the ceiling with a special adhesive composition.To prevent direct hangers from interfering, through slots are made in the slabs, into which the hangers are inserted.
You will have to tinker a little with mineral wool. Slots are also made on it, but it cannot be attached to the ceiling in any way. Therefore, it is attached to the suspensions by inserting a pin or wire into their holes. After assembling the entire frame, it will lie on it.
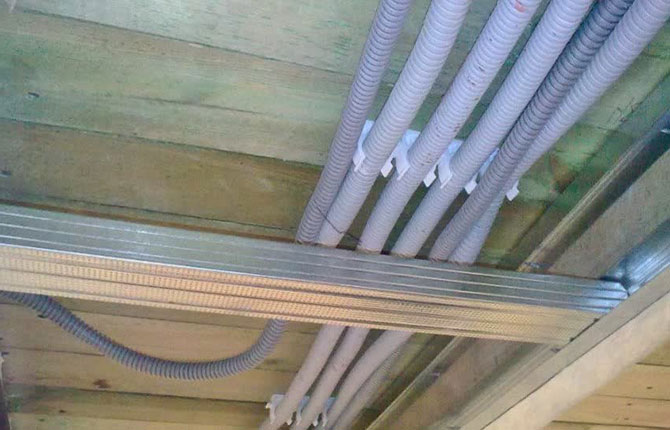
The electrical wiring is being laid right now. It should not remain under the insulation. The reason is that if you need to replace or repair wires, you will need to partially dismantle the plasterboard ceiling, without touching the thermal insulation material.
All wires and cables are laid only in plastic corrugation. The ends of the cable are routed exactly to the location where the luminaires are installed.
Drywall installation
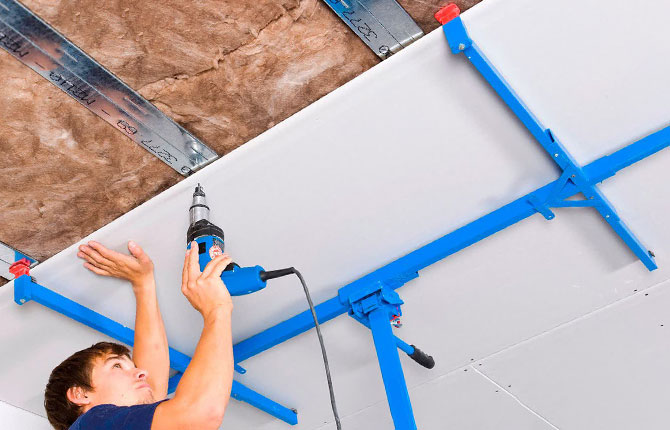
The next point in the step-by-step instructions concerns the installation of drywall. It is difficult to do this construction operation with your own hands, because you will have to lift a large sheet to the ceiling. That's why you need an assistant.
Installation of drywall can be started from any corner of the room.
The sheet is pressed against the walls and secured to the profiles with black self-tapping screws. Their length is selected taking into account the thickness of the gypsum board sheets. Please note that the material should be laid so that its edge, which is near the wall, should lie on the ceiling profile exactly in the middle. 2 adjacent plasterboard sheets will be joined on the profile.
How to properly attach drywall:
- screws are screwed in around the perimeter of the drywall every 10-12 cm;
- on intermediate profiles - every 30-40 cm;
- the screwing point should be located from the edge of the sheet at a distance of 1.5-2.0 cm;
- the head of the fastener should be recessed by 0.5 cm, then it will be covered with putty.
All drywall is laid and secured in this way. If necessary, if the free area on the frame is smaller than the area of the plasterboard, the latter is cut to the required size and shape. Fortunately, this is easy to do with a sharp knife. This completes the installation of the plasterboard ceiling.
Completion with finishing touches
Drywall sheets today are produced with a chamfer. This is an oblique cut along the edges. It is necessary so that when 2 panels are joined, a groove is formed between them. It is filled with putty using a spatula, and either serpyanka tape made of polymer or perforated paper tape is applied on top. Both perform the functions of a reinforcing frame.
The tape is laid on fresh putty, that is, wet. They press it down a little and apply another layer of putty. It is the groove and tape that holds the thick layer of leveling material on the ceiling.
The drywall itself is a smooth material. But when installing on a frame, you cannot do without small distortions. And although they are not clearly visible, under certain lighting, especially from ceiling lights, the curvature of the surface will be clearly indicated.
Therefore, the plasterboard suspended ceiling is completely puttied, sometimes in several layers. But before that it is coated with a primer. After drying, each putty layer is sanded with fine sandpaper and treated again with a primer. This must also be done with the last front layer.
Now you need to wait for the putty on the ceiling to dry completely. The next stage is finishing. Usually the ceiling surface is painted, rarely covered with wallpaper.
The last operation is the installation of lamps.First, if these are built-in light sources, then holes are made in the drywall for them to suit their size and shape. If the lighting fixtures are of the overhead type, then small pinholes are made for the cable. The holes must be made before the ceiling is puttied.
Frame for a multi-level plasterboard ceiling
A multi-level plasterboard ceiling is a more complex structure in which one nuance must be taken into account. The frame is assembled in the form of a stepped structure. But there is a simpler option, although you will have to level, in this case plaster, a section of the base ceiling.
The frame is built along the edges, near the walls of the room, leaving the base ceiling in the middle, which will need to be leveled. Therefore, first they make the frame. The technology is almost the same as for single-level models:
- Guide profiles are installed on the walls along the marked horizontal perimeter.
- It is better to draw lines along which direct hangers will be mounted on the base ceiling. If a figured ceiling is being made, that is, with curved internal ends, then the line must exactly repeat the figure. If it is a straight line, then there are no problems with its application.
- Install direct hangers on the base ceiling.
- Ceiling profiles are attached to them in one horizontal plane.
Now you need to form the inner end of the level. The complexity of its manufacture depends on the height of the drop. The larger the latter, the more difficult it is - the more material will be consumed.
There are different technologies for forming ends. One of them is to use guide profiles. One is attached to the base ceiling, the other below at a certain distance using any mounting elements for drywall.
You can make lintels from direct hangers, or use ceiling or wall profiles. Here it is important to accurately maintain the distance between the guides and reliably connect them to each other. Subsequently, the end will need to be sheathed with a strip, cut from plasterboard leaf.
The rest of the frame structure is also covered with plasterboard. But the free area of the base ceiling will have to be leveled with plaster mortar. And this must be done before installing drywall. How to do it correctly:
- The base ceiling surface is freed from areas that do not adhere well to it.
- A primer is being made.
- The plaster layer is applied after the primer liquid has dried.
- After the plaster has dried, putty is applied in several layers, each of which is primed.
- The last putty layer is sanded and primed.
- Painting, wallpapering, installation of stucco molding, baseboards and other decorative elements.
Usually craftsmen carry out work in parallel. That is, they have built a frame and are moving on to plastering. While it dries, install drywall. Putty is applied to the entire ceiling surface, including plasterboard. The same goes for finishing.
There are a huge number of options for multi-level ceilings. There are simplified models that do not require large financial and time investments. For example, you can make a square of plasterboard or any other shape on the ceiling in the middle of the room. For this purpose, the frame is assembled specifically for it. The rest of the base surface is leveled and finished.
Although working with plaster is not easy. If you do this for the first time, then, for sure, nothing will work.Therefore, if the task is to make a plasterboard ceiling with your own hands, then it is better to choose a single-level design.
The complete absence of wet operations associated with plastering is already a big plus. Applying putty is much easier. It is easily attached to drywall and applied in a thin layer.
Sanding is also a simple process. In addition, the single-level model is suitable for any room in the house. And this is not just the bedroom or living room. But more often such ceilings are made in corridors and hallways.
That is, in small rooms where there is no place for pretentiousness, where the ceiling should not put pressure. A multi-level design in this regard is complex - it occupies a certain space, which is already lacking in small rooms.
Dear readers, I would like to hear your opinion about plasterboard ceilings in the comments. Maybe someone has already made it with their own hands. Share your experience.


I always dreamed of doing small construction jobs myself. So one day I decided to try making a ceiling out of plasterboard. I didn't dare do this at home. I think I'll try it in the pantry. I did everything according to the instructions I found on the Internet. The frame was assembled quickly - it turned out to be easy. I only tinkered with setting up the longitudinal profiles horizontally. But lifting a large plasterboard sheet to the ceiling was beyond my strength alone. That is, it is not heavy, but it is large; I couldn’t lift it, press it to the frame and screw in the screws at the same time. I had to call for help in the amount of two friends. After which things moved quickly. But the putty didn’t work for me. All the time, curvature appeared under the light bulb. Apparently it's not mine.
My friends, if you have never done repairs or construction, you should not assemble a plasterboard ceiling without a mentor. There are so many nuances that affect the quality of the final result. One mistake, one miscalculation, and you will have to redo something, buy something more. So learn from a master first, and that will take some time.