How to make a floating bed: diagrams, drawings, step-by-step instructions
A sleeping place is sometimes considered an important element of the interior of an apartment.A floating bed is an unusual and innovative solution that will add originality to even an ordinary renovation. Such a sleeping place will definitely attract attention. The floating structure is made by hand, thereby selecting a combination of colors to suit a specific interior and adding exclusivity.
The content of the article:
Choosing a model and design of a floating bed
Difference classic bed and floating in that in the first version the sleeping place is located on 4 legs, which are located in the corners of the frame. In the second there is only one fairly massive support of a square or rectangular shape.
Advantages of a floating bed over a standard one with legs:
- Originality. The effectiveness of a floating bed is difficult to dispute.
- Large sleeping place. Floating beds are made with a width of 180 cm.
- Strength. Due to the installation of the floating structure on 1 large leg, its stability increases. The frame is reinforced with additional fastenings to the floor and wall.
- Ease of cleaning. Most of the floating bed is above the floor, making the space easy to clean.
- Backlight. When making or purchasing a bed with lighting, an additional source of lighting appears.
Each specific model of a floating bed differs in the structure of the base:
- Secret legs. There are supports, but they are reinforced and located deep in the bed on supporting beams.
- Reduced base.The upper part of a floating bed is located on a square or rectangular base smaller than the bed frame.
- "Underframe". The floating model resembles the tables that are often placed in small cafes or eateries. They only have 1 metal leg. The bed has a similar design - 1 reinforced metal support.
- Mounted. L-shaped design, which is complemented by chains attached to the ceiling from the bottom.
- Transparent base. This model is essentially the same as with a rectangular or square base. The difference is that the large leg is made of high-strength glass.
When choosing the final model, much depends on the width of the bedroom allocated for the bed, the material of the body and the complexity of manufacturing. The need for additional storage space must be taken into account.
If it is not needed, choose any of the listed models. If you need hidden drawers, then from the list of suitable designs there will only be one left - with a rectangular or square base, of course with lifting mechanism.
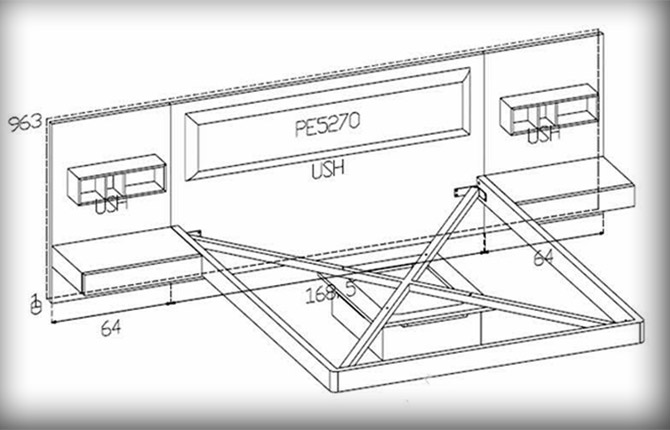
Schemes and drawings
When making a floating bed with your own hands, the choice often falls towards a model with a large drawer leg with a lifting mechanism. This structure is made mainly of wood with additional reinforcement, which simplifies the task of preparation and assembly.
Drawings of the bed of this model are available both with and without a mechanism. You can also choose lighting options. When choosing a ready-made floating bed design, it is important to pay attention to the presence of an additional drawer at the base of the bed.

There are 3 types of designs:
- Rack and pinion. A durable base frame consisting of transverse slats (convex or concave slats).
- Solid canvas.A solid sheet of DPS or other similar material is placed in the frame. Although this type of base is outdated, it is still often used in the manufacture of beds due to the simplicity of the design.
- Orthopedic. This type of base is similar to a rack base. However, the materials of the slats differ. This type requires more flexible ones, for example birch or beech (due to the increased load on the parts).
The bed base is an important part of a floating bed. Contrary to popular belief, the comfort of sleeping does not depend on the frame, since there is a mattress on top, which is precisely designed to create a comfortable sleep. As for the base, it affects:
- mattress location;
- unwanted sounds from the structure, for example, creaking;
- air permeability of the mattress;
- strength.
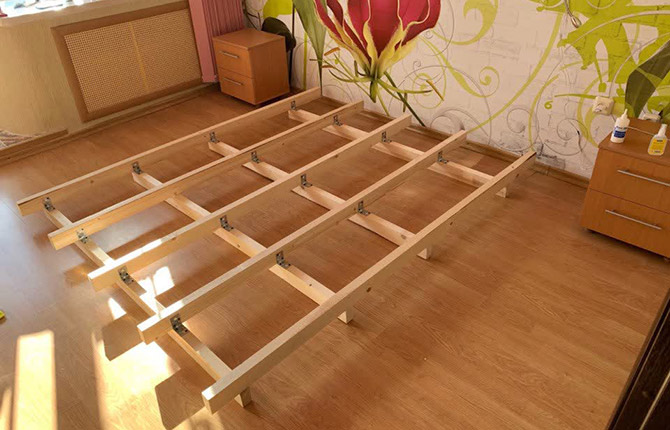
Slatted base
Since the orthopedic base is similar to the slatted one, when considering it, it is combined into one group. Main advantages:
- strengthening the mattress due to flexible slats;
- correct load distribution;
- increased service life;
- if the lamellas break, they are easy to replace;
- improved mattress ventilation.
Basically, for 1 bed with a length of 160 cm, 15 pieces are installed. flexible slats.
Solid base
It is a one-piece structure made for a mattress.
The advantages of such a foundation:
- simple manufacturing when constructing a floating bed;
- affordable price;
- help in the treatment of certain diseases of the spine (due to increased rigidity).
Compared to an orthopedic slatted base, this type has many disadvantages:
- poor ventilation of the mattress, even with special holes;
- all the distinctive qualities of an orthopedic mattress will not be felt on a solid base;
- in case of breakage or deformation, a complete replacement of the base is necessary.
Regardless of the chosen base, it is installed both with and without a lifting mechanism.

What tools and materials will be needed
The main material for making a floating bed is wood. However, each breed has properties that are taken into account when designing. For a floating bed, a wooden frame is often used.
Wood is divided into 2 main groups - hard (oak, maple, beech, birch, ash and walnut) and soft (spruce, thuja, pine, cedar, aspen, alder, linden). There is a separate subgroup “superhard”. It includes boxwood, hornbeam, dogwood and yew. The latter tree species are rare, the cost is higher than that of soft and hard ones combined.
The best wood for making a floating bed is solid wood. However, it is expensive. It is better to purchase this material with full confidence in your own abilities, because due to your own inexperience it is easy to ruin an expensive timber frame.
To save money, buy chipboard. However, this material will never compare in strength to natural wood.
If you focus on wear resistance, then pay attention to the following rocks:
- Pine. Due to the high resin content, this type is not subject to rotting, but is easy to process. This breed is soft but strong, so it will be a good material for making a frame.
- Spruce. This type of wood is similar in many ways to pine, but it is prone to cracks.
- Beech. A flexible type of wood that is often used for load-bearing parts.
- Oak. The best material that combines strength and resistance to rotting. It is used both for constructing load-bearing frame parts and decorative elements. Oak is difficult to process.
Almost any floating bed is not difficult to make, either from wood or metal. It is better to use specially prepared pipes with a cross section.
Regardless of the model and material of the frame, other components of the floating bed, prepare a list of what is necessary for construction:
- marking tools (tape measure, ruler, marker);
- drill-driver;
- clamps and special clamps;
- fittings for fastening;
- additional elements to strengthen the floating structure;
- a jigsaw for wooden parts or a hacksaw for wood;
- grinder for working with metal, if such parts are present in the diagram;
- facing materials.
In addition, use a jigsaw or drill. You need to stock up on spare bits and files, because with prolonged use they quickly become unusable.
Step-by-step creation instructions
Despite the visual complexity of making a floating bed, in reality everything is simpler. Already at the creation stage, you can understand many of the details and subtleties of the design.
Before you make a floating bed with your own hands, consider 3 models that even a beginner can make with step-by-step instructions:
- Bed made of pallets. The advantage is the availability of materials and a ready-made frame for support. But for a small structure, they do not use it, because the pallets will be visible when entering the room and will not create a floating effect.
- Floating bed made of metal. It will turn out expensive, beautiful, durable. Without skills in working with metal or welding profiles, the appearance of the furniture will immediately reveal the inexperience of the craftsman.
- Wooden bed with a lifting mechanism. It will turn out comfortable, environmentally friendly, with storage space.
Pallet bed
Pallets are made from pine, linden or birch.These breeds are well suited for making furniture. Each block has a high load-bearing capacity, making it a good bed building material.
Furniture made from pallets looks extraordinary and attracts attention. Quite often it is used in loft style design.

When constructing a floating bed from pallets, the drawing of podium furniture is taken as a basis, only the lower part is made so that there is one large leg made from a pallet. In addition to the previously indicated list of necessary materials, for production you will need:
- pallets (their number is calculated according to the diagram or drawing);
- primer for wooden surfaces;
- paint for wood finishing;
- sanding machine or sandpaper of different grits.
To begin with, the pallets are prepared, since they are sold without any treatment at all or with the most minimal treatment, for example, from internal small knots:
- Remove all dirt from pallets.
- Ventilate to remove excess odors.
- Dry the pallets on all sides.
Start processing materials:
- Using a grinder with a coarse attachment, remove any remaining knots.
- A more grainy nozzle or sandpaper is used to level the surface, giving it smoothness, so as not to be injured when the skin and wood come into contact.
- According to the drawing, each pallet is adjusted to the required size using a saw or jigsaw.
- Treat each pallet with a primer, leaving it to dry completely for 24-30 hours.
- The prepared pallets are painted with special wood paint.
After preparing all the materials, we begin to install the floating bed. Assembly is carried out from bottom to top:
- The base-leg is assembled first.The prepared number of pallets is fastened with self-tapping screws, or at the same time with them and special metal corners, which will further strengthen the structure.
- The base for the bed is being assembled. According to the diagram, it should be larger than the mattress that will be located on top. On average, for a double bed they take at least 4 pallets, fastened both to each other (this will be the base) and with an already prepared leg.
- The final stage is installation of the headboard. They make a floating bed without this element. However, in addition to additional strength, the headboard is used as bedside shelves. There are several options, but the most popular is that pallets divided lengthwise are attached to each other and to the finished frame. Thus, the floating bed takes on an L-shape.
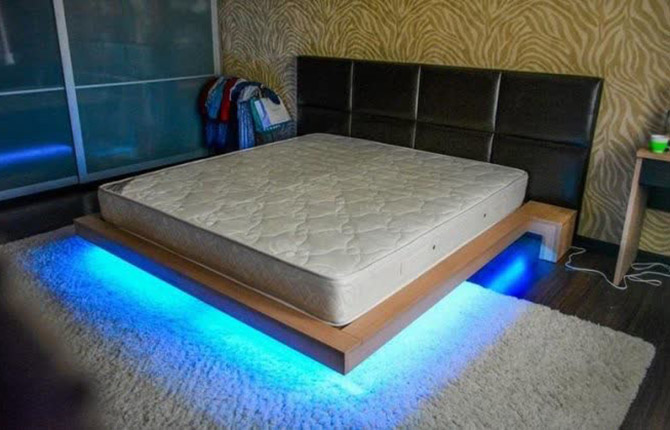
- Additional lighting. If desired, install an LED strip inside the base of the bed, visually enhancing the floating effect.
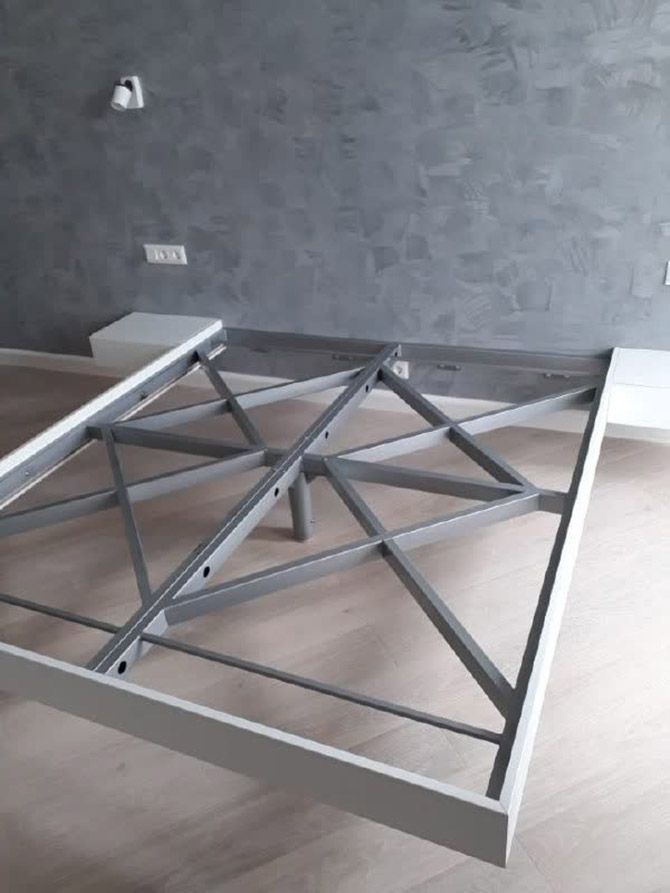
Metal bed
The model of a floating metal bed is a metal base for a sleeping place, installed on one reinforced leg, like geridon tables.
Metal is stronger than any type of wood, even the hardest. A bed made of this material will be more wear-resistant. However, when installing it yourself, you encounter some difficulties. To strengthen the fastening of parts to each other, it is better to use welding, when working with which safety precautions are observed. The work is carried out in a separate specially prepared room.
In addition to a set of tools and accessories for installing a floating metal bed, you will need:
- profile pipes, the number of which is calculated according to the diagram;
- facing materials for headboards;
- grinding machine with attachments for metal;
- anti-corrosion varnish;
- a sheet of plywood for making a solid base for a bed.
Metal is a durable material, so prepare spare bits, drills and discs for threading, as they can quickly become unusable or break.
After preparing the materials and tools, proceed to installation:
- Following the step-by-step instructions, make a frame using a welding machine or using special profiles and screws.
- Assemble the headboard in the same way as the base.
- The joints must be sanded and then treated with varnish to protect against corrosion.
- Connect the 2 finished parts.
- Make a central leg that will be located under the base.
- Assemble all parts of the bed.
- Install a solid sheet for the bed onto the finished frame.
- Complete the headboard with separately prepared facing materials.
During assembly, pay attention to protecting the floor. When working with metal structures, it is easy to damage the floor covering. To enhance the floating effect, select paint to cover the frame to match the color of the floor.
Wooden bed
The most popular material for making furniture is wood. It is often chosen because of its lightness, because, for example, metal beds require a welding machine, and few people can do it with models with a transparent glass base.
The best floating wooden bed is considered to be one with a rectangular or square base leg (it will serve as additional storage space). Less often it is supplemented with a lifting mechanism.
To make a floating wooden bed you will need:
- boards for assembling the frame, bed frame, headboard;
- plywood for the solid base of the bed;
- lamellas and fittings for orthopedic bases;
- facing materials;
- primer for treating wooden surfaces;
- varnish or paint for wood finishing;
- lifting mechanism.
Having selected the materials, we begin to assemble the floating product:
- First, assemble a base box that will serve as a storage box. Available in rectangular or square shape. But for a greater floating effect, it is better to choose the first one, because it will be narrower.
- Reinforce the box with metal corners and additional beams.
- Assemble the base. Prepare the boards according to the drawing, connect them together, not forgetting the box-box below.
- After assembling the frame, combine it with the sleeping area.
- Make a headboard for the bed.
- After assembling the individual parts, treat them first with a primer, then (after complete drying) with paint or varnish.
- After the final layer of coating has dried, assemble all the individual parts together, not forgetting to install the lifting mechanism on the frame of the sleeping sheet.
- Having completed the installation of individual elements, install facing materials for the sides and headboard.
The headboard is made both classic wooden and soft. To do this, additionally purchase:
- covering fabric;
- foam;
- furniture stapler.
The soft headboard is complemented with decorative elements in the form of matching buttons or large rhinestones.
How to light up a floating bed
Lighting can add uniqueness to any item in the apartment. But it is with a floating bed that it looks more impressive.
The illusion of floating itself is achieved due to the hidden legs and furniture finishing to match the floor covering. However, additional lighting in muted tones makes it as natural as possible.
Construction mass markets and online stores offer a selection of ribbons and garlands. Any can be used as bed lighting. For furniture decoration, they often choose either a single-color ribbon or one with the ability to switch to other colors. There are 2 main types of lighting for the interior and individual elements - LED and duralight.
LED Strip Light
LED strips are now popular for additional illumination. They are used to mark out zones in an apartment or house, or public places. This type of lighting has advantages:
- Flexibility (the LED strip is soft enough and can be easily bent in any direction).
- Safety (due to low voltage and lack of heating of diodes to dangerous limits).
- Convenient installation (due to the light weight of the tape, it is easy to install with double-sided tape).
- Remote control (most lamps and strips come complete with a special remote control).
- Compactness (LED strips are quite thin and easy to install at joints so that only their glow is visible, and not the diode base).
- Assortment (it’s easy to find a ribbon of the right size and color on any marketplace).
- Long service life (LED lamps last a long time, compared to classic lighting with incandescent lamps).
- Cost-effective (due to low energy consumption).
Of the minuses, one that stands out is the cost. She can't be called tall. But in comparison with other types of lamps, it is certainly larger. However, when purchasing lighting, the price is compensated by the service life. When buying an LED lamp instead of a simple one (incandescent), the next replacement will be required after at least 3 years.
Duralight
This type of lighting first appeared back in 1987.in Japan and almost immediately gained popularity throughout the world. It was often used to decorate streets and houses.
Duralight is a wire with small lamps inside. When this type of garlands first appeared, there were DRLs (mercury arc lamps) inside. However, over time they were completely replaced by LEDs. So now duralight is essentially an LED strip enclosed in a dense transparent wire.
Differences between such lighting and LED strips:
- increased voltage (for duralights the power supply is 220 V);
- reduced flexibility (due to the top sheath wire);
- safety (the safety level of LED strip is higher due to lower voltage).
Installing lighting on a floating bed
Having chosen the type of lighting, proceed to installation. For a floating bed you need:
- Determine the required length of the tape by marking the places for preliminary fastening.
- Select the connection option and location of the power supply.
- It is best to place the lighting under the side trim so that the light is directed downwards or slightly to the side, and the tape itself is hidden.
- Degrease the surface where the lighting will be attached. The composition of the degreaser is selected so as not to damage the coating of the finished product.
- Install the tape using double-sided tape or a special adhesive coating on the garland itself.
- Connect the switch to the power supply. You will need a soldering iron, however, this depends on the type of tape (sometimes the clips are already soldered in).
- In accordance with the selected tape, set a constant muted glow with classic colors or presented in RGB mode.
- If there are modes, check for frequent blinking or gradual fading.
Despite the visual complexity of a floating bed, even a beginner without special skills can make it. The result in any case will be better than all expectations. Such unusual furniture looks extraordinary, modern and attracts attention.
What did you use to make the stand in the floating bed, what did you use to cover the wood or metal? Share the link on social networks and bookmark the article.


Made entirely of varnished wood. Only in the center there is not a stand, but a kind of inverted pyramid.
I’ve made a bed 3 times, and I just can’t find a durable structure. After a week it breaks. Or I toss and turn a lot in my sleep.
The base was made of metal, but the perimeter was lined with wood. The central leg was made from a thick pipe.