How to make a comfortable school desk with your own hands: drawings, step-by-step instructions
Every student needs a comfortable desk.If it is difficult to organize this at school, then homemade furniture made by yourself is the ideal solution. You can create a workplace for your child yourself. After all, schoolchildren spend a lot of time doing homework, so comfortable furniture will protect their backs from early scoliosis.
The content of the article:
Why exactly do you need a desk?
A desk is different from a regular desk. This is what they use for a child at home. Advantages of the desk:
- selection of countertops by design;
- large work surface;
- fits into any room, as it is selected based on the interior;
- range of models by price.
However, almost all the advantages of the table lie in the price. If, when arranging a child’s workplace, you base it on his health, then the desk is certainly a favorite. After all, its ergonomics allow the student to take the most correct, comfortable position while working. The child will not hunch over, slouch, or be distracted by the fact that it is uncomfortable for him to sit. He will fully concentrate on the educational process.
The desk is ideal if the child is disabled. It will be adjusted to the structure of the body, will not create discomfort, but on the contrary, will allow you to exercise for a long time without inconvenience.
The best solution when arranging a workspace for a first-grader or teenager at home would be a transforming desk.
Its advantages for first-graders:
- The desk corresponds to the age of the child, as it grows, it is easy to adjust, thereby not disturbing the overall ergonomics.
- Depending on the type of activity, you can also change the angle of inclination.For example, for drawing and drawing, 45-90˚ is better. Thus, the working surface becomes like an easel. And for writing, 15˚ will be enough.
- Depending on the model, the desk most often provides space for storing office supplies and writing materials.
Desk design options
It is difficult to choose the perfect furniture in a store so that the material matches and the color does not stand out from the overall scheme of the room. Therefore, it is easier, and most importantly better, to make a school desk with your own hands. Such a piece of furniture will have certain advantages over what was purchased in the store:
- The design will be based on the child's exact height.
- There are many materials, the choice depends only on the established budget.
- Choose a color that matches the color scheme in the room.
- If desired, you can create decor, for example, painting. Or when working with a tabletop, use epoxy resin decor.
Determined by the general appearance of the workplace. What they make themselves:
- Classic rectangular table. The only difference with regular ones is that the height matches the required height.
- Ergonomic small table. As a rule, they are performed with an unregulated tilt of the tabletop, small in size, so the child can study in any part of the room.
- Transformer. In other words – a “growing” desk. In addition to the level of inclination of the tabletop, its height is also adjustable.
- Adjustable. This design provides for adjustment of the inclination of the working surface.
In addition to any workplace, it is better to install a separate cabinet for storing school supplies and hanging drawers. You can also make an entire student corner yourself. It usually includes:
- Table. BecauseSince the corner is one design, it is difficult to make an adjustable model. Most often they make classic rectangular ones, at most with a retractable lower part, which is used for the keyboard when working at the computer.
- At least one base cabinet with drawers.
- Wall shelves with 1-2 cabinets, built into the furniture.
- A small floor stand or drawers attached to a table.
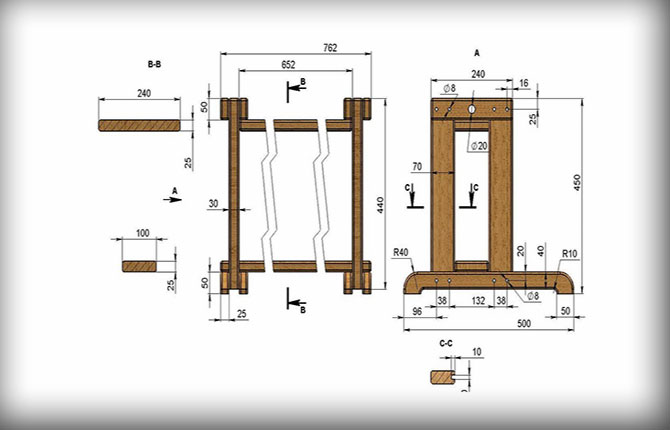
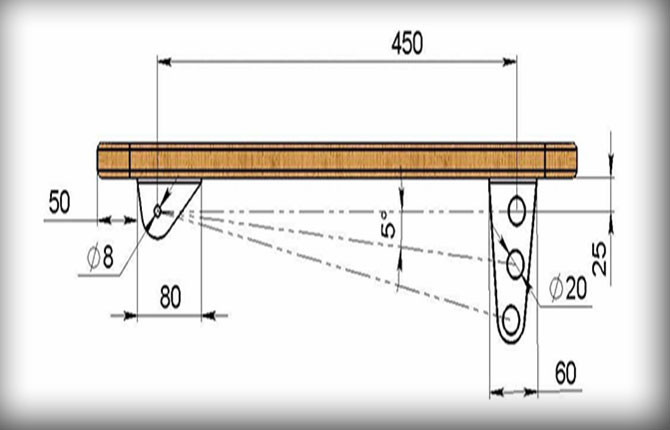
Blueprints
After determining the appearance and additional elements of the table, you need to choose the right scheme. If necessary, adjust it before starting work. There are many variations of drawings that are depicted in detail (for example, as below). There will be no problems when marking and then assembling.
When choosing a drawing, it is important to pay attention to some nuances:
- Is a chair included in the design?
- Are there connecting elements between the chair and desk?
- Are there additional storage spaces in the form of cabinets or drawers?
- Are all parts numbered and dimensions indicated?
- Is there a separate detailed drawing of complex elements (tilt mechanism, height adjustment).
- Attention must be paid to the parts that are welded together.
If the circuit contains parts that are welded, then it is important to take into account that welding of metal products must be performed:
- Strictly observing safety precautions.
- In a specially equipped separate room.
- In ammunition that protects against the harmful effects of scale.
Under no circumstances should you use welding if you are not confident in your abilities. In this case, a different design is chosen without the use of metal welded elements.
Step-by-step instruction
After choosing and carefully studying the assembly diagrams and drawings, you can begin making the desk itself.It is important to prepare all the necessary materials in advance.
What materials and tools will be needed
When calculating the necessary materials and accessories, it is better to take everything with a reserve, because defects during the work process cannot be ruled out. It is also important not to forget about safety precautions. When preparing individual elements and assembling, you should protect yourself from possible injuries.
A lot will be needed to make a universal desk with a lifting mechanism for height adjustment, as well as a special element for changing the angle of inclination of the working surface.
Prepare the necessary tools and accessories for work:
- An electric jigsaw or a wood saw (needed for cutting out individual components from wood).
- Screwdriver (they will need to connect various parts and accessories to each other).
- Consumables for electric tools (drills, saws, bits).
- Sandpaper for processing wooden surfaces.
- Marking accessories. In addition to a pencil, you need to take a large ruler or tape measure. Of course, the first option is better, because it fits tightly to the material and also does not bend, which can lead to inaccuracies.
Materials, accessories (select with reserve):
- processed board for tabletop, rectangular;
- boards for the base of the desk, as well as the height adjustment mechanism (flat, according to calculations from the drawing);
- rotary mechanism for changing the angle of inclination of the working surface;
- threaded rods;
- enlarged washers;
- wing nuts;
- wood screws.
Assembling the desk
Making a desk for your home will consist of 3 stages:
- Base.
- Table top lifting mechanism.
- Tabletop.
By the time you start assembling the desk, you need to cut out all the wooden elements using a jigsaw or hacksaw and first sand them with sandpaper.
Base assembly:
- Following the diagram, make grooves of the required size on the inside of the guide board.
- Round off sharp edges.
- According to the drawing, assemble the tabletop.
- Using fittings, fasten the individual parts of the legs.
Manufacturing the tabletop lifting mechanism:
- Make and process recesses in the end of the outer sides of the guide board.
- Make through holes in the center.
- Connect the wooden components.

Tabletop and final assembly:
- Attach the rotating mechanism to the tabletop.
- Insert into the grooves of the base.
- Using prepared fittings (nuts, studs, washers, which were indicated in the list of required elements), attach the tabletop to the mechanism.
A desk for a child with adjustable angle of the working surface and height adjustment is ready. You can supplement it with side drawers located on the inside or hooks, shelves specifically for storing various necessary accessories.
Children's desk decor
Now decoupage is often used to decorate desks for children. However, if you consider that this is a school design, then unnecessary drawings can only be distracting. It is better to highlight the desk in a certain color that will be pleasant to the child and will suit the interior of the room. Decoupage can be used on the sides or, for example, on drawers.
Decorate the desk with special interior stickers. They hold up well and can be re-glued. And the most important thing is that now there is such a large selection that it is easy to choose something original for a child.If stickers get boring, they can be easily removed without the use of additional products and leave no traces.
A DIY desk for schoolchildren is the best solution if you want your child to study while sitting at high-quality furniture with an exclusive design, made specifically for him. This ensures a perfect fit and ease of use. At the same time, you can choose the design and additional elements yourself. All this will not be a big blow to the family budget.
How did you decorate the desk after making it, what techniques and styles did you use? Share the link on social networks and bookmark the article.


