How to make a loft bed with your own hands: drawings, dimensions, detailed instructions
Most new apartments and private houses are built with high ceilings.This is the modern approach to ensuring a comfortable stay. Therefore, sleeping places are increasingly being raised to the “second floor”, and in most cases the furniture is made in-house. This solution brings a lot of benefits to the owners if you know how to make a loft bed with your own hands.
The content of the article:
Possible implementation options
Sleeping lofts have been in use for a long time. Typically, such beds had to be made in rebuilt communal apartments with high ceilings. With the advent of fashion for studio apartments, the owners tried to divide or zone the space using a loft bed. Make a study or a separate place to relax.
There are many options for building beds in the attic, but the number of truly successful solutions is enough for a short list:
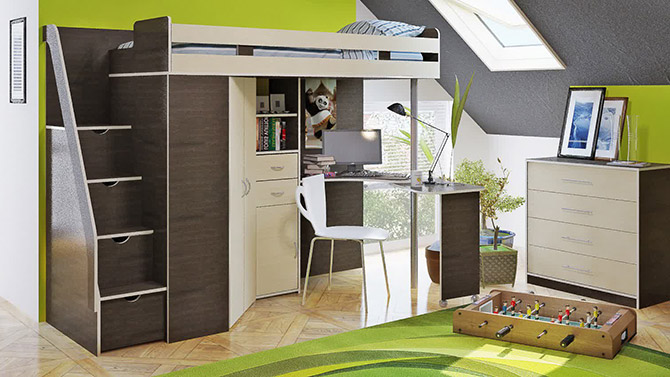
- Loft bed for teenagers with space for a computer.
- Furniture with a study area under the bed.
- Hanging bed models, such a loft is attached to a rod to the ceiling.
- Lofts with double bed.
- Loft beds on a steel frame in loft style.
There are also options combined with a wardrobe or drawers for storing outerwear and shoes, combined with kitchen furniture, with a furniture box for a home theater or a place for children to play.
In theory, everything looks great, but it’s still better not to store valuables, and certainly not to allow children to play under the second-tier bed. It must be taken into account that a loft bed always remains furniture, which can also break.
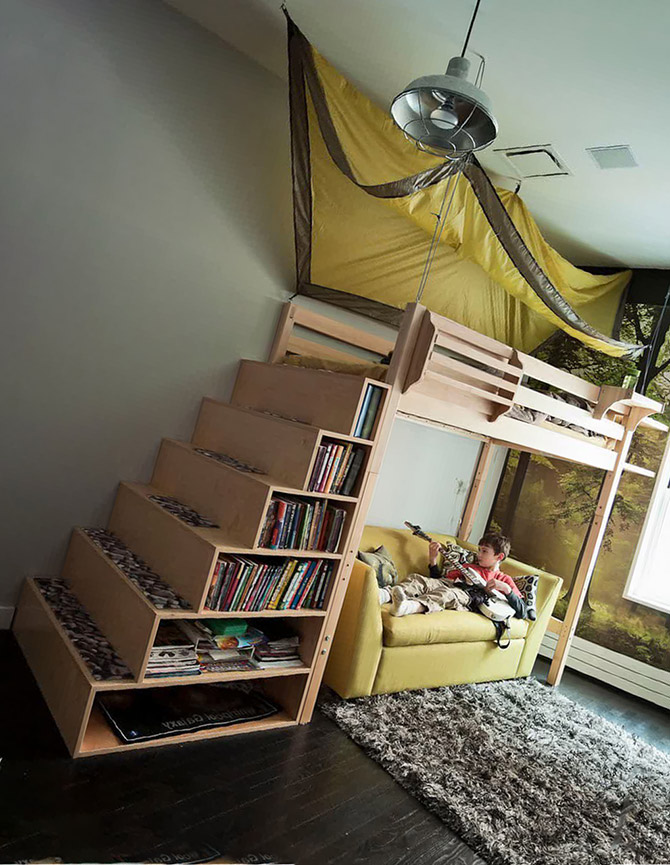
Loft bed for children
The “second floor” option for a child’s bed is assembled from oak timber and boards that have undergone additional heat treatment and polishing.
Primary requirements:
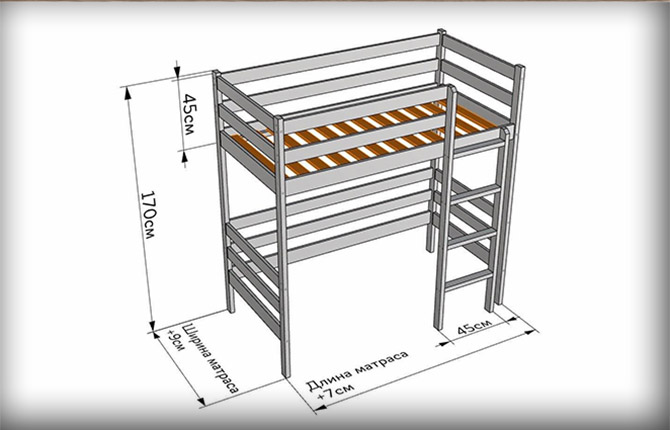
- A sleeping bag with a vertical ladder can be made no more than 150 cm high.
- It is necessary to have a fence, separate fastening of the frame and the ladder to the wall.
- The ceiling must be made of transversely laid timber. Any options with plywood backing or mesh are not allowed.
If possible, it is best to make a children's loft bed based on a ready-made kit. Very popular options with a house on the second floor. It is easier to strengthen or complete a finished product than to plan a design from scratch.
Moreover, the design of such a loft bed will be better than if you make all the elements yourself.
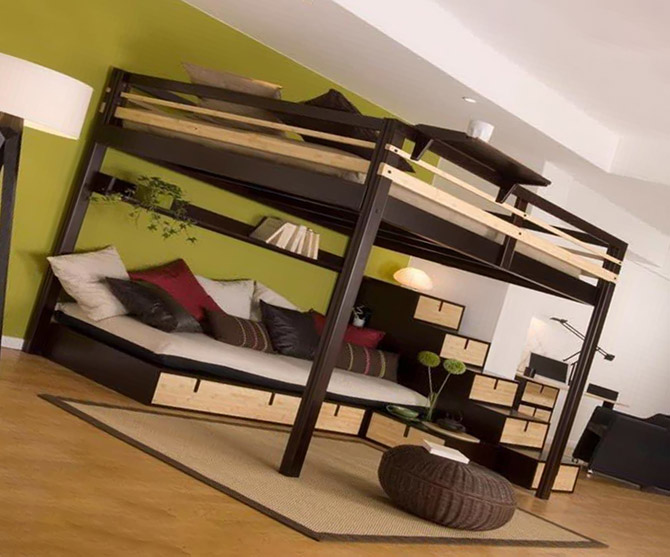
Attic with sitting area on the ground floor
To equip a sleeping area in the attic, combined with a mini-living room on the lower tier, you can use two types of structures:
- The frame is assembled on the basis of a square steel pipe with perforated walls for the installation of additional parts of the bed, attic fencing, ceiling, as well as load-bearing elements.
- The loft bed is assembled from heat-treated timber and slats.The height of the ceiling makes it possible for almost anyone to move under the attic without bending their head.
Dimensions timber frame allow you to make a double bed, there is still room for a small closet.
The area under the loft bed is large enough to accommodate a set of upholstered furniture or a sofa. Furniture can be made in the same colors as the sleeping area. Or buy a ready-made set for the living room.
The design of a loft bed made from a perforated profile, at first glance, does not look very comfortable. Here you need to take the correct measurements, fit the parts and assemble the structure. And the attic itself with the bed looks modest.
This is actually a unique design:
- The loft bed can be rearranged into any room of the house or apartment. The prefabricated design does not require attachment to a specific room.
- The sleeping place can be easily disassembled and transported to a dacha or country house in the summer.
In fact, this is an option for a huge and comfortable bed (folding bed), which can be made in half an hour to accommodate unexpected guests (mainly for children). In general, there are not many successful collapsible structures, and this is one of them.
Hanging models
Options for a loft bed with a suspension on a metal rod are considered one of the easiest to manufacture. The frame and vertical bracket are assembled by welding from a profiled pipe. The free corner received additional support in the form of a ladder.
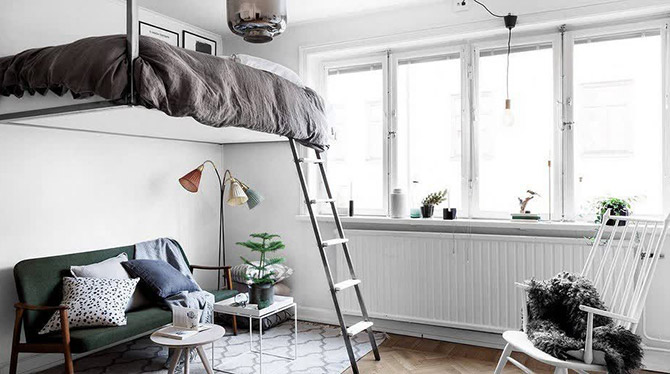
In general, the scheme can be recommended for small apartments, but under one condition. Mounting to the ceiling, walls and floor must be done using massive embedded elements. Typically a steel profile pipe of 40x40 mm, with a length of at least 100 cm, is used.
If you fasten the loft bed with anchors or dowels simply driven into the wall, then after a year and a half the frame will lose its load-bearing capacity.
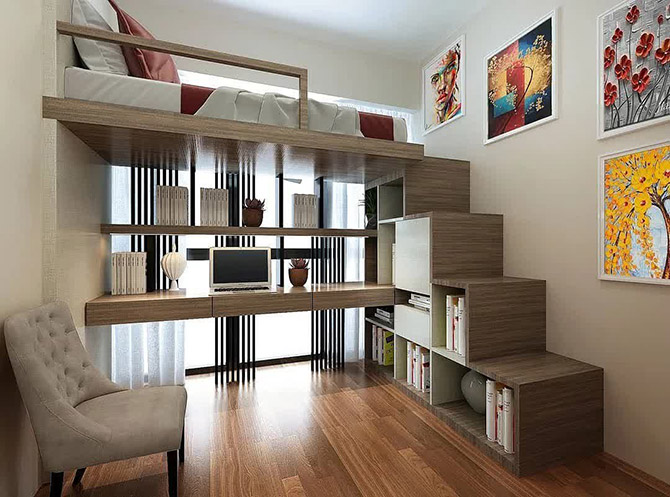
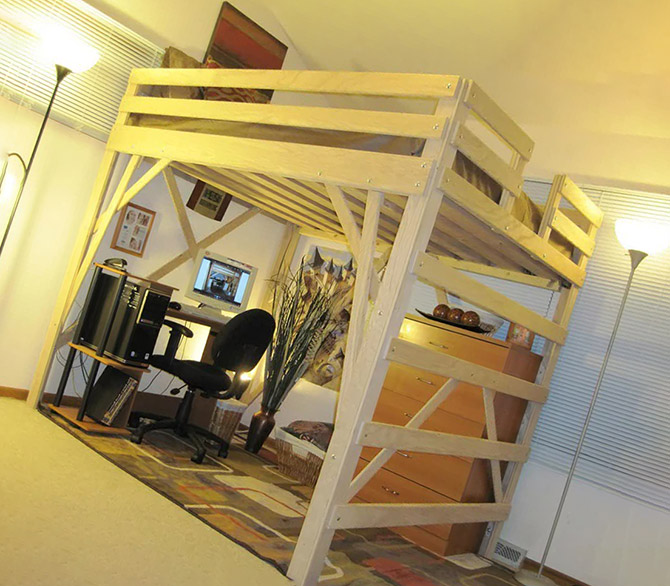
Workplace
The optimal solution for those who require a separate space with its own furnishings and working atmosphere. If you make the loft bed large enough, then the space under the ceiling (height and width) will be enough to arrange furniture - a table, chair, drawers.
In a small room, up to 2.5 m wide, you can create a workspace with a bed from wall to wall with cantilever mounting on the walls. In this scheme there are no vertical posts, which increases the reliability of the structure, and in addition, you can make a window opening from the ceiling to the floor and even with access to the balcony.
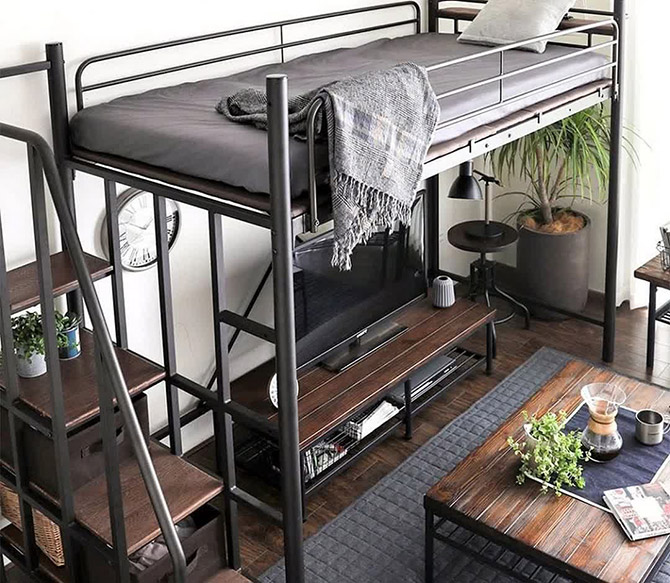
Bed in the loft style
All parts, including the bed frame, are planned to be made from steel pipes. The attic box is assembled using a screw connection with side backs welded from a 20x20 mm square pipe. The loft bed railing can be made using a pipe bender from half-inch pipe.
The staircase can be made into an extension if there is not much free space in the room. But even in this case, the staircase frame must be fixed with temporary fasteners either on the wall or to the headboard.
Despite the apparent external roughness, the loft-style loft bed looks stylish. Another plus is that such a sleeping bag is difficult to break or render inoperative. Even a peeled paint coating on the frame will not spoil the design in the loft style. But for reasons of sanitation, it is best to paint the metal frame and handrails with black automotive paint with the addition of fluoroplastic microparticles (to obtain a specific texture and shine).
The loft bed is suitable for anyone who is interested in technology and motorsports.
Drawings and dimensions of the loft bed
In theory, you can make any loft bed, without a diagram or step-by-step instructions. Experienced craftsmen do this. But the use of drawings guarantees the absence of errors, especially if someone has previously made a loft bed of this model and tested it in practice.
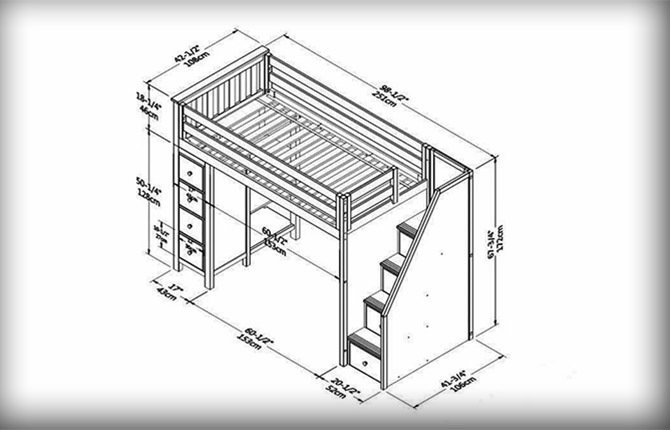
The most important thing is to make the bed frame correctly. For children's models, you can use an additional wall mount, but for adults, the attic structure should be supported by 4 posts.
Design Features
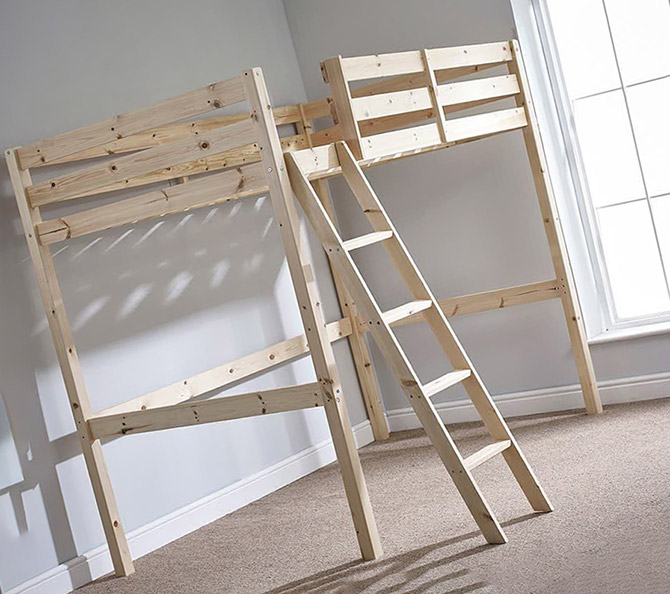
It is better to make the first loft bed according to the classic design.
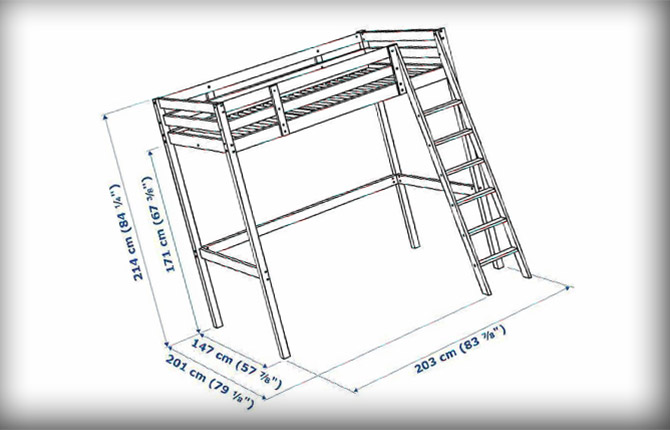
The staircase is located from the front. This means that the main load will be directed across the attic, which means it will need to be installed next to the wall.
First of all, you need to choose the dimensions of the future structure. Determine the height and sketch out the staircase diagram. The method of climbing into the attic can be considered the most important detail of the project. When lifting, the place where the load is applied changes, so the strength of the structure, according to the instructions, must be checked in conditions where one adult (weighing up to 100 kg) climbs to the middle of the stairs. If the bed frame does not deform under load, then the attic layout is chosen correctly.
If necessary, based on this design, you can make a children's version of a loft bed. All that is required is to change the size of the sleeping place for a spring or stuffed mattress and redo the staircase layout.
Instead of an inclined ladder for adults, install a vertical ladder, which is more suitable for younger children.
You can often find models of loft beds without stairs.One of the sidewalls is used to climb onto the berth. In this case, the ladder is removed, and to strengthen the overlap with the bed, you will need to make a single or paired strut.
This is important, since in such a scheme the load in the process of lifting into the attic is directed along it (from back to back). If this is not done, then over time the fastening of the rack to the ceiling will be broken.
There are obvious advantages to this solution; sometimes it is easier to make struts than to install an inconvenient and disturbing ladder.
Step-by-step instruction
The procedure for building a loft bed frame:
- We assemble the sidewalls, cut in the fence and lower crossbars.
- We join 2 longitudinal beams of the upper level and one lower.
- Make a ceiling from transverse slats 50x50 mm.
All that remains is to finish the fencing of the sleeping area, make a staircase and decorate the space under the loft bed. Before you begin decorative finishing and wood processing, you need to make several test lifts to ensure the strength of the fasteners.
What tools and materials are needed
The entire system is built from pine or oak timber, section 70x70 mm, and boards 150x25 mm, 100x25 mm. The material is checked, workpieces of normal geometry, without cracks and knots, are selected. The timber and boards are first dried using a microwave. This should be done to remove moisture and improve the absorption of the varnish. At the same time, destroy possible pests.
The design is simple, so for assembly you will need:
- Jigsaw with blades for cutting wood.
- Table saw (handheld will not work).
- A benchtop drilling machine with a set of annular drills or cutters for making through grooves.
- An electric sharpener with a disc covered with sandpaper (coarse grain) for processing wood. You may need a polishing felt wheel if you plan to make a loft bed for children.
- Set of carpentry clamps.
- Carpenter's corner, ruler.
- Screwdriver.
You may need a hammer drill with a carpenter's drill bit to cut out the plugs. This is if you don’t assemble the ladder, but climb to the berth through one of the sidewalls. In this case, the fastening of the transverse slats is carried out using wooden dowels. Any attempt to make fasteners using self-tapping screws, as a rule, leads to cracks in the wood.
In addition, it is possible that the joints of the bars holding the mattress with the longitudinal boards are made using an aluminum corner of 25x25 mm. This is done in order to lay a mattress or a ready-made mattress box from a children's bed (ottoman). In this case, the corner is sewn onto the boards along the ceiling using self-tapping screws 17 mm long.
The design of a loft bed is so simple that even a novice amateur carpenter can make it.
Manufacturing of elements
First you need to cut the workpieces. You will need to cut 4 vertical posts from 70x70 mm timber. The height of the racks is 214 cm. The figure is not final, it can be made higher, but not more than 225 cm. When choosing, we focus on the condition - from the top of the head of a person sitting on the bed to the ceiling there should be at least 15 cm.
The next step is to make the cross members of the sidewalls. There are 8 of them in total, 4 on each side. Length 147 cm, cut from board 150x25 mm.
Another set of blanks, which includes 1 horizontal crossbar connecting 2 backrests (bottom bar) along the back side, and 3 attic fencing slats.All of them need to be made from the same board 150x25 mm, 203 cm long.
In addition, you will need to cut 13-15 slats 150x25 with a length of 140 mm. From these you will need to make a frame for the bed mattress.
You will also need 4 short slats of 50 cm each for fencing the attic, as well as a set of parts for making a staircase - 2 strings of 230 cm long and 6-8 strips for steps.
Step by step assembly
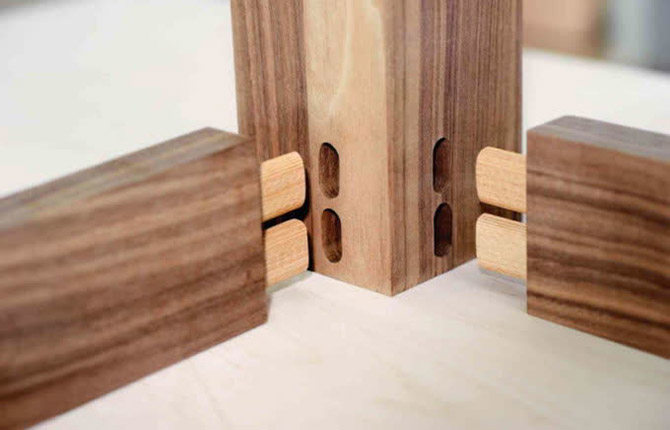
First of all, on the blanks of the slats (203 cm) of the fence (back long side) and the lower horizontal crossbar, at both ends, you will need to make a carpentry tenon. The grooves will be cut into the posts.
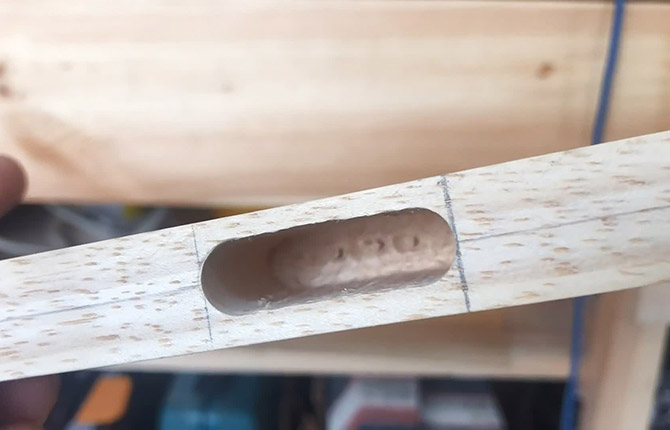
How to make a tongue and groove lock
To make a spike you need:
- Draw a center line along the entire length of the workpiece.
- At both ends, set aside an axial segment from the end equal to 70 mm (thickness of the rack beam).
- From the center line in the perpendicular direction we set aside 25 mm.
- We cut off the corners with a jigsaw, leaving only a rectangular spike 60 mm long and 50 mm wide in the center.
The corners of the tenon and wide edges need to be sharpened on an electric sharpener with an emery disc. As a result, the thickness of the tenon will be halved, and the edges will be semicircular.
For each tenon on the crossbar you will need to make a groove. At the place of the proposed connection on the surface of the vertical post, draw the contours of the tenon with a pencil. Next, on a drilling machine using a ring drill, we cut through holes in the rack. These will be the edges of the groove. We cut out the remaining part with a jigsaw.
In this way, you need to make all the connection points of the long horizontal crossbars, including the fencing of the upper tier of the loft bed. We insert the tenons of the crossbars into the grooves on the vertical posts and fix them with self-tapping screws. You should end up with 2 large bed frame units:
- Rear section with bottom cross member and three top rails for attic fencing.
- The front part has only 3 top slats for the loft bed railing.
All parts are temporarily fixed with self-tapping screws.
Installation of backrests and sides
The next step is to secure 2 aluminum corners 25x25 mm on the inside of 2 lower slats on the back of the bed and on the front. A mattress will be installed on the corners. The corners are secured using carpentry screws 17 mm long.
Next, we place and support the previously assembled back part of the frame on the wall. At a distance, we install the front part vertically and temporarily connect it to the back side using the 2 longest carpentry clamps. Inside, we lay transverse wooden slats on the corners and at the same time fasten them to the aluminum guides using self-tapping screws.
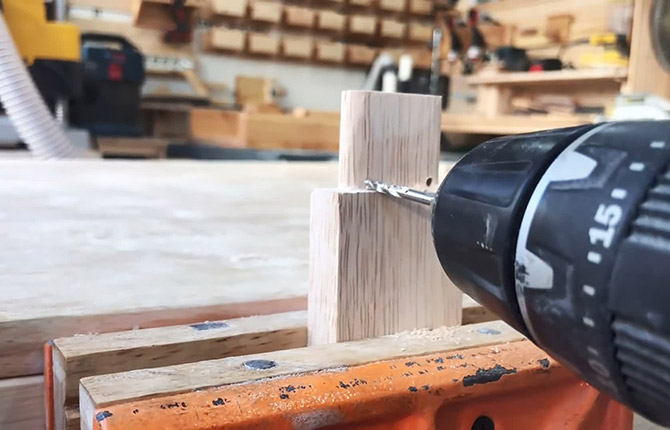
Now you need to make the sides of the attic. First of all, you need to make the lower horizontal crossbars on the backrests. They will be attached to the posts using wooden plugs. Each connection must be made in the following order:
- We determine the position of the cross member between the posts on one of the backs and fix the part with clamps.
- Using a drill bit, we drill 2 horizontal holes with a diameter of 18 mm so that the drill goes right through the rack beam and goes 50-60 mm deep into the cross member.
- We cut out 2 plugs (rods) from the strip with a diameter of 18-19 mm and a length of 140-150 mm.
- Apply glue to the corks and hammer them into the previously drilled holes.
In the same way you need to make a fence at the top of the headboards. In general, the attic is ready, you just need to install short vertical strips on the front and back of the fence. It is better to make fasteners on plugs.All that remains is to cut out part of the fence for the entrance to the loft bed and make a staircase.
Assembling the stairs
If a loft bed is being built for adults, then it is better to buy a ready-made stepladder made of aluminum profile. If you plan to make an original version of the staircase, then it needs to be made from oak boards 150x40 mm.
Initially, one blank (string) is made in order to accurately select the corners of the cut at the ends. The second part of the staircase is cut out from the board according to the pattern. All that remains is to put 2 strings in a bag, tighten them with a clamp and drill holes for attaching the steps. They can be secured with carpentry screws or made with plugs.
All joints must be glued with wood (casein) glue. This is the only safe way to increase the rigidity and strength of a loft bed.

Finishing
Having completed the assembly, the entire structure of the loft bed is sanded with sandpaper, first using a screwdriver attachment, but most of the work will have to be done by hand. Separately, the stairs and railings are polished with a felt wheel to achieve the smoothest surface of the wood.
The easiest way is to open the frame of the loft bed with varnish, make several layers with additional polishing of the surface. If the pattern of wood fibers does not look very attractive, then you can treat it with a stain to match the color of mahogany or walnut.
For a children's version of a loft bed, the front part of wood is decorated with graphics; it can be made with paints or a burning device.
Bottom Layout Options
Inside the structure you can place cabinets for shoes, clothes, and school supplies. You can make a sports corner for children.
For adults, the best option would be a regular soft corner with a coffee table and a TV.
There are not many projects and schemes according to which you can make a loft bed with your own hands. But you can come up with and collect a lot on your own. For example, choose an original way to finish wood, find an original design for a bed rail.
Video: do-it-yourself attic children's bed
Tell us about your experience making a loft bed. What problems did you encounter, and how convenient was the design? Save the article in your bookmarks so as not to lose useful instructions.


For such designs, always choose a place in the corner of the room. From experience I will say that the bed must be secured to the walls by the back board and on the back near the headboard. Ideally, they should be installed in a niche so that the bed takes up space from wall to wall. While the child is 6-7 years old, the frame can withstand it; as he grows up, play will appear.