Making an inversion table with your own hands: drawings, diagrams, step-by-step instructions
Physical inactivity is the scourge of our time. This causes joint pain, especially the spine.Protrusion, hernia and displacement of the vertebrae are troubles that cause a lot of trouble. They can only be treated with exercises, one of which is hanging upside down. The exercise is difficult and cannot be done without special equipment. And this is an inversion table.
The content of the article:
What is an inversion table for?
You can also hang upside down on the crossbar. But not everyone can do this, even young people, not to mention the elderly. Therefore, an inversion table was developed that makes it easy to hang upside down and do other necessary exercises.
They are mainly aimed at improving the functioning of the musculoskeletal system: aligning the vertebrae, improving blood and lymph flow. The inversion table can be used for both therapeutic and preventive purposes.
If you do exercises on it constantly, people achieve serious results:
- Posture straightens.
- The muscles around the spine become elastic and dense, better holding it in the desired position.
- Inflammatory processes in the spine and protrusion disappear.
- The circulatory system functions stably, and this is the prevention of diseases such as stroke, heart attack, hypertension, ischemia, and vegetative-vascular dystonia.
Domestic and foreign industry offers the widest range of inversion equipment. Its price is high. And many people with poor health cannot do without this table.
But today there are a large number of drawings with step-by-step manufacturing instructions that you can take as a basis and make your own inversion table.
Advantages of making your own inversion trainer
The main advantage is the price, which is reduced significantly. Even if you use expensive materials, the cost will still be lower. At the same time, it is possible to choose for manufacturing the health-improving installation that will exactly meet your own requirements. Plus - the safety of operation increases due to the fact that you make the device for yourself.
Typically, factory models are made of either metal or durable plastic. The former are intended for use in health centers, physiotherapy rooms in clinics and other medical institutions. Their weight is not less than 50 kg and can withstand a patient’s weight up to 200 kg.
Plastic analogues are intended for personal use. They are bought for the home where the exercises are carried out. All actions are preventive in nature. That is, it is better not to use therapeutic loads at home. They must be carried out under the supervision of a doctor.
Plastic inversion tables are lightweight and usually foldable. When folded, they do not take up much space and are not difficult to carry.
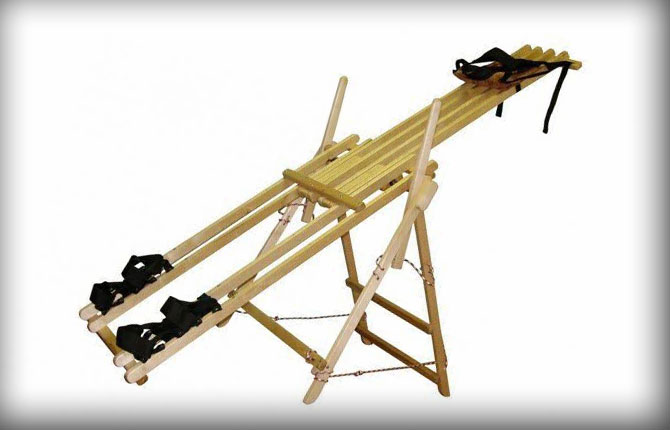
It is better to make an inversion table with your own hands from lumber. Fortunately, this is the cheapest material today that can be easily processed. You can even use chipboard.
You can assemble a table from metal, it will be stronger than the wooden version. And it will last longer. But such an inversion installation will be more expensive and heavier. Not everyone can make it with their own hands at home. This requires skills in working with plumbing tools.Somewhere even electric welding will be required.
Read the article - how to make a massage table with your own hands.
What tools and materials will be needed
If an inversion trainer is made from wood, then the following materials will be required:
- wooden beam, section 20x40 mm;
- steel pipe, diameter 25 mm;
- fasteners: bolts and nuts with washers, self-tapping screws;
- cord or weight belt, at least 50 mm wide;
- colorless varnish or paint;
- fabric or leatherette.
Tools:
- jigsaw or saw;
- hammer;
- drill;
- a screwdriver, if not, a screwdriver;
- knife;
- wrench;
- a grinder with a grinding wheel, if you don’t have one, sandpaper and a block on which you put it;
- brush.
Drawings and diagrams
Main dimensions of the inversion table:
- installation height;
- table length.
Factory models are sliding. These two parameters can be adjusted on them. This can also be done in homemade simulators, but it is difficult. Therefore, it is better to make a stationary model, but take into account the height of the tallest person in the family.
This especially applies to the table. Its length should be 10 cm greater than a person’s height. The installation height is also selected based on height. A tall person should hang upside down so as not to touch the floor with their head.
If you don’t take all this into account, that is, if you don’t choose the sizes for the individual height of the largest family member, then he probably won’t be able to perform any exercises. But there are standard sizes that fit a large number of people. Here are the dimensions of the table - 1.5x2 m. You can safely take them as a basis.
Other standard parameters:
- inversion table height – 2 m;
- width - 1.5 m;
- the angle between the inclined support posts is 40º.
The tabletop can be made from slats with a cross-section of 30x30 mm or from a sheet of chipboard 16 mm thick, which is folded in half. Its total thickness will be 32 mm. Although 20 mm will do.
Step-by-step instructions for creation and assembly
There is one important requirement for a wooden inversion table - the corners and planes of the beams and slats should not catch clothes. Therefore, all prepared lumber will need to be sanded first.
But before that, it must be cut into elements included in the design of the simulator. You can do this yourself or order trimming from a furniture manufacturing workshop. Some lumber sellers also offer this service – paid or free.
You can coat the prepared elements with varnish or paint before starting to assemble the table or after, that is, the entire structure as a whole.
And a few more preparatory operations before making a table with your own hands:
- Drill through holes in the bars where the elements will be hinged using a steel tube.
- Before this, the tubes themselves must be cut to the required size - this is 4 widths of the bar, plus the distance between the support posts.
Now you can begin assembling the inversion table.
- The support posts are connected. To do this, they are placed next to each other with mounting holes, into which a cut metal tube is inserted so that it connects 2 pairs of supports located at a distance of 1.6 m. You probably won’t be able to insert it by hand; a hammer will help. The tube will become a support for the table top of the inversion trainer.
- There is another option. To do this, the tube is cut to a length equal to the width of the bar. Each is inserted into its own rack. And the fastening is done with a bolt, which is inserted through the tube.It must go through 2 supports. A nut is screwed on the opposite side of the bolt head. The fastening is complete. It is more reliable than the first option. Although it can also be strengthened by inserting a bolt into the hinge joint. A wide washer is placed under the bolt head and under the nut. The bolts must be long, because in this case they will become a support for the tabletop.
- Installation of cross bars. They will connect the support posts on different sides of the inversion table. It turns out 2 pairs of inclined rectangular structures, connected by hinges in the form of tubes and bolts.
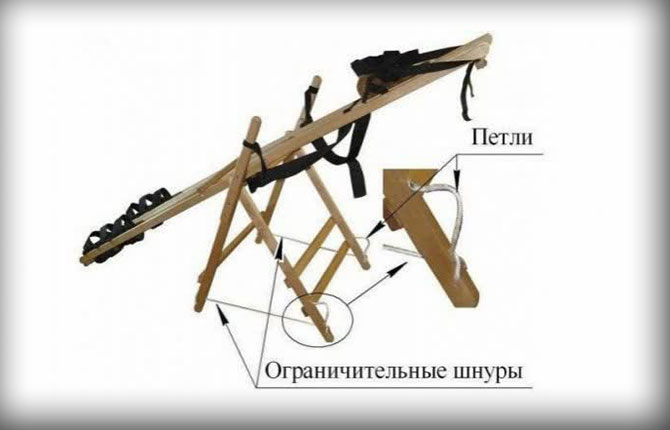
- To ensure that the supporting structures do not move apart during the exercises, they must be limited. To do this you need to install 2 limiters. These can be removable slats that are put on partially screwed in screws or a strong cord. For the latter, you can make through holes in the bars where it will be tied. Another option is to attach the cord to a wooden stand with a self-tapping screw and place a washer under it. By the way, the restrictive cords are clearly visible in the photo below.
Now the tabletop assembly measures 1.5x2 m. It can be cut from a sheet of chipboard, even a used one. And it’s easier than cutting slats and joining them into one structure. Chipboard can be covered with fabric or leatherette. This must be done before assembling the inversion table. The fabric is not stuffed onto the surface of the tabletop for beauty. It will create a certain resistance, which will help keep the human body on the surface of the tabletop.
Next, you need to install loops from a leather belt or weight tape. There will be several of them, but the main ones are in the lower part of the tabletop, where the feet will be located.There are three loops on each leg for reliability, because hanging upside down means creating a large load on the loops with the weight of your entire body.
Other locations for loops: hip joint, chest, arms. So that, being upside down, you can rise to the starting position - upside down, it is necessary to attach rubber bands to the upper ends of the supports - one on each side. By pulling yourself up on them, a person will move from an overturned position to a vertical straight one.
The tourniquets will also help you gently turn upside down. Although you can come up with a lot of options to replace rubber with another material. For example, it could be regular rope or durable fabric tape.
There is a problem here with attaching the table top to the steel pipe. In this case, the mount must be hinged, because the tabletop must rotate around the pipe. You can use different types of hinges for this. The simplest is a shaped wooden part in the form of a support with a through hole in the middle. There must be at least 2 of them.
A pipe is passed through this hole during the assembly of the support posts. Afterwards, the shaped part is attached to the lower plane of the tabletop. Fasteners - self-tapping screws or bolts with nuts.
If the tabletop of the inversion table is made of bars, then the latter should be chosen with a large cross-section so that holes can be drilled into them for a steel pipe. At the same time, the strength of the bars should not decrease so that when performing exercises they do not break in the area where the steel horizontal pipe support passes.
The video below shows an almost similar wooden structure of an inversion table, which was made by hand:
If someone has already had experience creating an inversion table (spine trainer) for themselves or their loved ones, tell us in the comments how it all happened. What material was it collected from? What design did you choose? What do you recommend paying attention to?


Wooden inversion table - tin. Somehow it never even occurred to me. Won't it fall apart under a person? It looks like a flimsy design, although I haven’t done it, I don’t know. I have already made three tables from metal profiles. This is a reliable thing that will last forever. I modified the models by attaching the legs. I changed my mind a lot, tried some. There turned out to be a large number of reliable options. You need to choose not only a reliable one, but also an inexpensive one.
I also think the wooden structure is flimsy. In the video, however, you can see that the man is calmly spinning on it. And it seems that she doesn’t even creak under him. But over time, in my opinion, a creak will appear, the connections will become loose. Metal is another matter. Everything is welded, reliably. So I completely agree with the previous comrade.