Do-it-yourself smoke generator for a smokehouse: smoke generator options and step-by-step assembly instructions
Meat, fish, and mushrooms, after being treated with smoke, acquire a unique aroma and taste.The shelf life of such products is also significantly extended. Previously, smoked products were cooked on a fireplace where firewood was used. The main problem with such cooking is that it requires a large amount of firewood and constant monitoring of the smoking process.
The hearth has now been replaced smoke generator – a device that produces smoke and directs it into the smoking chamber to the smoked products. Moreover, it is not necessary to buy equipment - in this article we will tell you how to make a smoke generator with your own hands for a smokehouse, using available materials. We will help you with your choice smoke generator, and also explain how to properly connect it to the smokehouse.
The content of the article:
Design and operation of a smoke generator
The cold smoking process is quite simple if you use smoke generator. You can smoke with this device on the balcony, at the dacha, in the village, but only if fire safety rules are observed.
A positive feature of a smoke generator is that its use helps reduce the intensity of control over cooking. Wood chips or sawdust are suitable for producing smoke.
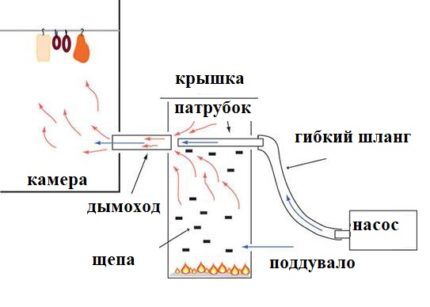
For home smoking, any container to which you connect smoke generator - purchased or assembled with your own hands. The prepared products are placed in a chamber - placed in a container on a wire rack or hung. Then turn on the compressor connected to smoke generator, ignite the sawdust through the hole in the generator flask. That's it - the smoking process has begun.
There are two types of food smoking:
- Hot — the smoke temperature fluctuates around 40-110 °C and above. The time required for this process ranges from 20 minutes to a day.
- Cold - under the influence of smoke at temperatures up to 30 ° C. The cooking process in this case can last several days. But the shelf life of the products is longer - up to two weeks.
Smoking can be carried out by any of the above methods. The main advantage of smoking at high temperatures is the speed of cooking.
However, exposure to high temperatures is not gentle and leads to the destruction of vitamins and nutrients. It also leads to a significant reduction in shelf life than with cold smoking.
DIY smoke generator assembly
For the correct process of preparing products by cold smoking, you will need special equipment. Next we will look at the manufacturing procedure smoke generator for cold smoking, we provide accompanying drawings, necessary components and assembly steps.
Option #1 - a simple pipe smoke generator
This metal pipe smoke generator is easy to make. It is suitable for small smoking volumes.
Design and principle of operation
You will need a piece of metal pipe about 1 m long. A small diameter tube is welded on top, with the help of which the smoke, rising upward, is fed into the smoking chamber. And a small hole is made at the bottom for igniting fuel.
To increase the draft, a compressor with an approximate capacity of 2 liters/min is connected to the upper part of the housing. An aquarium pump is quite suitable for these purposes, because it can be used to regulate the amount of smoke supplied.
Into the body smoke generator, made from a pipe, filled with sawdust or wood shavings. The fuel is ignited from below through a previously prepared hole. The smoke produced by combustion rises upward.
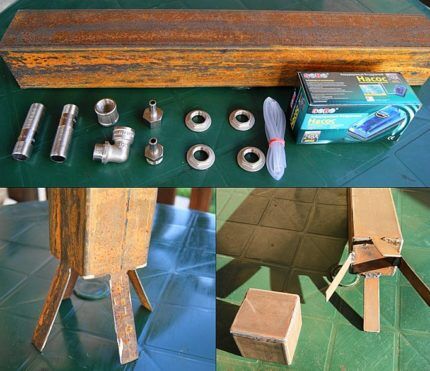
Materials required for assembly
For the body we use a pipe with a cross-section of 100 mm or a profiled pipe with sides of 100 mm. It is important that it is made of fire-resistant material, for example, a stainless steel chimney pipe or a square pipe with a thickness of at least 3 mm.
The optimal height is about 1 meter. But the length and cross-section of the pipe may be larger or smaller. In the first case, the positive side is an increase in the volume of sawdust used, which will lead to longer operating time smoke generator on one tab.
Cons: increased weight and volume of the device, inconvenient to clean and refill.
You will also need:
- metal plates 3 mm thick: two square for making the bottom and lid (80x80 mm), two 80x30 mm and two 74x30 mm;
- copper pipe with a diameter of 10 mm and a length of 360-370 mm;
- aquarium compressor, preferably with capacity control;
- two low nuts;
- two bolts;
- two fittings;
- 1/2″ bend, 150 mm long, corner with stop;
- rivets.
The tools you will need are a welding machine, an angle grinder, consumables (circles and electrodes), a drill, a set of keys, a riveter, and taps for cutting threads.
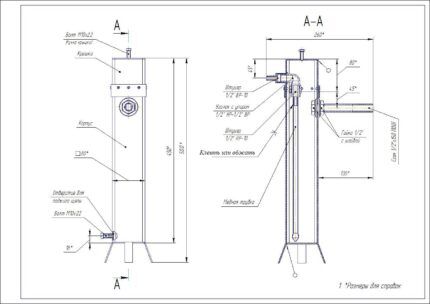
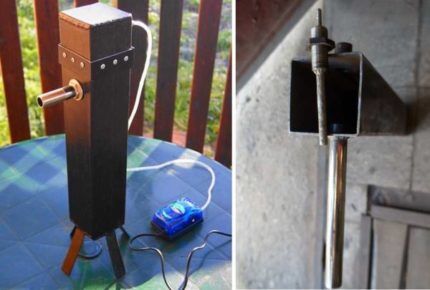
Smoke generator assembly instructions
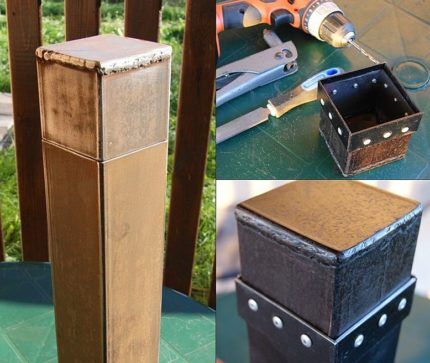
The pipe is 1 m long and is the generator chamber. There will be a lid on top that gives access inside to add sawdust and clean the container after smoking. To make it using cut off the grinders from a square pipe a part 90 mm long.
Now let's take care of the legs. They can be welded from metal plates (in this case, it is necessary to prepare plates 3 mm thick and the length required) or draw legs at the bottom of a blank pipe 70 mm long and 30 mm wide.
Left weld by welding plates prepared earlier for the lid and bottom (80x80 mm). In this assembly, sawdust is poured inside - directly to the bottom. The bottom in this version is tightly welded to the pipe from below. The ash pan is missing here and needs to be cleaned adaptation, it will be turn over and shake out carefully.
To improve operation, a mesh is installed in the body of the smoke generator at a short distance from the bottom (10 - 15 cm), on which sawdust is poured. To avoid compaction of sawdust when filling, a spring is hung inside the combustion chamber (in the lower part of the pipe). The resulting ash, which appears after the smoldering of sawdust, spills down through the mesh. To simplify maintenance of the device, the bottom can be made removable. Why is the bottom made in the form of a glass with a diameter slightly larger than the diameter of the body itself.This allows you to put it on the body from below and fix it with bolts.
In the cover plate, a thread must be cut for the bolt used as a handle (more details in the drawing).
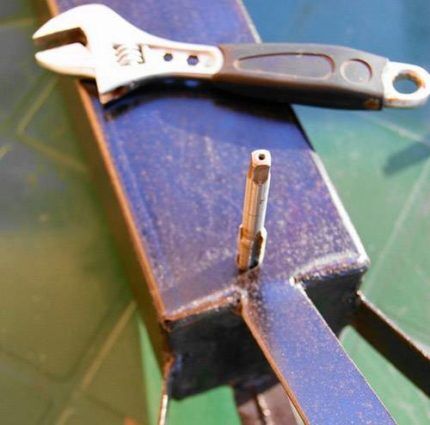
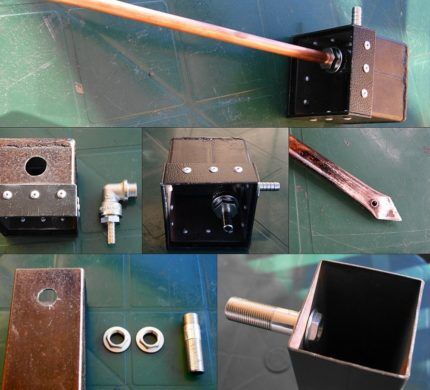
Now all that remains is to ensure the air supply and smoke exhaust.
Why do we make a hole in the lid and body and assemble an air supply kit (from the compressor) and a smoke exhaust pipe.
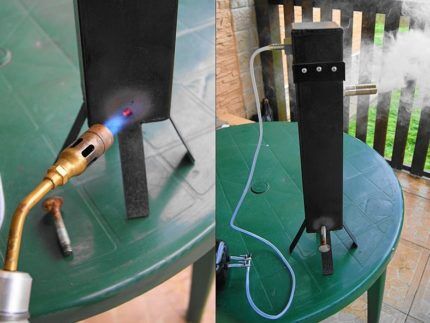
All that remains is to check the functionality of the homemade smoke generator. To do this, connect the air supply tube to the fitting of the lid, add wood chips, and set it on fire. gas burner through the previously made hole.
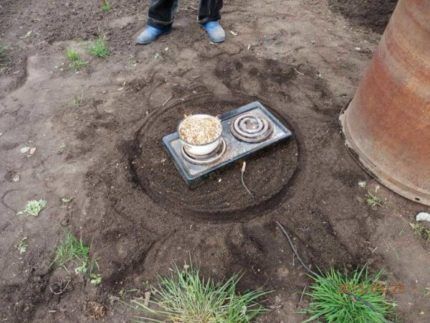
Option #2 - from an electric stove
This option will not benefit either the electric stove or the sawdust container. But, if you only smoke a couple of times a season, this option is quite good.
For the manufacture of smoke generator You will need an electric stove, an old barrel without a bottom, a steel mesh, plywood and a piece of tin pipe.
The smokehouse will be located outside. We install an electric stove. We place a barrel on top of it, and put a piece of pipe on the tile and fill it with sawdust or wood chips.
Next, we pierce the barrel with reinforcement crosswise at a height slightly above the middle. A steel mesh is placed on top of the pins, on which the smoked products will be laid out.
Cover the top of the barrel with a sheet of plywood. Smokehouse with smoke generator from an electric stove, ready for use.
Option #3 - camping mini smoke generator
This option is used for quickly smoking caught fish or small pieces of meat while fishing. The design involves a common chamber for generating smoke and smoking - a metal pot. Sawdust, twigs and wood chips are placed in it.
A metal grate is installed on top, closer to the edge, on which meat or fish is laid out. If we don’t have one, we use a lid to which we tie the smoked products and close the cauldron. The smokehouse is ready - you can begin the process of preparing food.
A simple rustic way of smoking
This design consists of two chambers connected to each other by a chimney. The smokehouse is located on one side, on the other side there is a stove or hearth, which is the smoke generator.
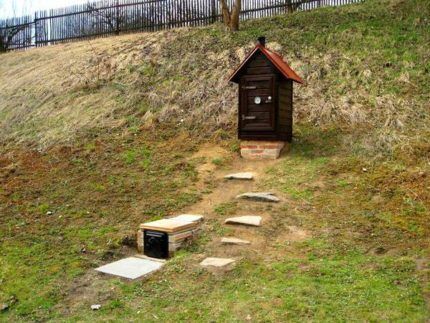
The chimney must be 3 to 4 meters long so that the smoke intended for smoking is cooled to a suitable temperature.
Depending on how the smokehouse will be used, there are 2 types of chimney lining:
- If the smokehouse is stationary, then the chimney is made in the form of a brick channel or a metal pipe buried in the ground.
- If the structure is assembled “in haste,” then a trench dug on a slope is perfect.
Connect the chimney to the smokehouse from below to fill it with more smoke. A filter must be placed at the connection point so that the soot is blocked and does not settle on the smoked products.
Fuel for smoke generator
Some purchased models smoke generators with electric or gas firebox. Therefore, it is more profitable to use homemade devices, working on sawdust or small wood chips. Owners of private houses have sufficient fuel for them.
If not, then sawdust for a smoke generator can be purchased at the store. Sawdust and wood chips are suitable from any deciduous tree. The exception is coniferous species. Their use will lead to bitterness in smoked products.

Basic safety rules
During assembly smoke generator Don’t forget the basic safety rules. Firstly, the place where it will be installed smoke generator should not be flammable, like objects located nearby.
Secondly, if you are going to open the surface of the generator with paint, then the latter must be heat-resistant.
When connecting the pump to the power supply, it is important to ensure that the power cable is as far as possible from heating elements.
Conclusions and useful video on the topic
The process of making a smoke generator at home:
How to make a smoke generator and assemble a home smokehouse:
Having familiarized yourself with the simplest options for smoke generators and home smokehouses, you can easily choose the one for yourself smoke generator, which is right for you. And of course, having the time and desire to easily make a smokehouse for yourself and smoke generator.
Do you still have questions about assembling a smoke generator? Or do you want to talk about your personal experience of making a smokehouse from scrap materials? Share your results - the feedback form is located below. Here you can not only talk about your self-assembled smoke generator, but also add original photos of the finished device, and also ask for advice from our experts and other site visitors.
