Why the trimmer won't start: causes of the malfunction and how to fix them
It's time to mow the lawn, and the lawn mower doesn't work? It’s scary to imagine how you can keep your lawn in perfect condition using hand tools, especially when you’ve never had to do this before. If it doesn't start trimmer, the reasons can be very different, but you can eliminate most of them yourself.
This does not require any special tools or highly specialized knowledge. A little courage and free time to read this material - and the trimmer will not need to be taken to the specialist.
In this article, we will tell you how to determine what exactly is preventing it from starting, give instructions for repairing each unit, and give recommendations on how to avoid problems in the future. For clarity, you will find photos and videos where the most common breakdowns are clearly shown.
The content of the article:
Common causes of breakdowns
The first step is to make sure of the simplest things: the availability and quality of fuel, the correct procedure.
Use only those fuels and lubricants recommended by the manufacturer. Gasoline with too high an octane number is sometimes no less harmful than 80 octane. Didn't keep the instructions? AI-95 from a gas station with a good reputation can be called universal.
Only fill with suitable engine oil. The vast majority of gasoline trimmers have a 2-stroke engine, so regular car oil cannot be used. For a 4-stroke engine, oil is poured separately from fuel.Moreover, you should not pour in “waste” – used, used oil.
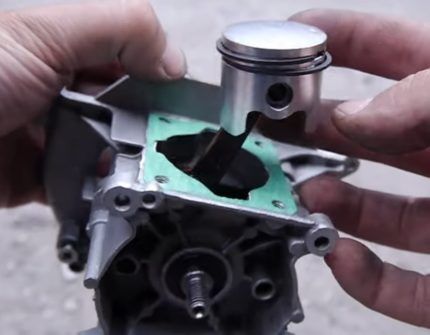
Observe exactly the mixing proportions of gasoline and motor oil, do not pour “by eye”. For most lawn mowers, the recommended ratio is 1:25, that is, 40 ml of oil for every liter of gasoline.
Do not prepare a lot of mixture at once: ideally, it should be worked out in 1 day and the equipment should be stored in a dry tank. The maximum shelf life of the finished mixture is 2 weeks, so it makes sense to mix more than 2 liters at a time except for utility workers who mow city lawns.
If you haven’t used the scythe for a long time and there is gasoline in it, it’s better to pour it out. The mixture has already divided into fractions and lost its properties; even the most thorough mixing will not save it.
After making sure that the gas tank is in order, try starting the scythe. To do this you need:
- Pump fuel into the carburetor using the primer button 5-6 times.
- Close the air damper.
- Turn on the ignition on the handle.
- Pull the starter cord 1-7 times until it starts.
- After 5-10 seconds, turn off the starting system.
After idle time, if you cannot start the engine normally, try opening the throttle and pressing the gas trigger. Without releasing the trigger, pull the starter cord.

It is also recommended to start the engine with the throttle held down if it has not yet cooled down after the previous operating cycle.
If the engine still does not start after 5-7 jerks, you should look for a breakdown.
This is interesting! TOP 12 best brush cutters: review, quality, price.
Option number 1 - problem in the ignition system
The first thing suspicion falls on is that the spark plug does not produce a spark, and therefore the fuel mixture does not ignite. Most often the problem is in the spark plug itself.
To check, unscrew the spark plug from the cylinder, first disconnecting the wire from it.
A thin layer of brown soot indicates normal engine operation, red or pink soot indicates an abundance of additives in the fuel, change the gas station. If the element is covered with black or white scale, the motor did not work correctly.
A wet spark plug indicates overfilling or excessive pumping of fuel with primer. In this case, the candle needs to be dried, but not heated. Pour out excess gasoline from the cylinder by turning the brushcutter over.
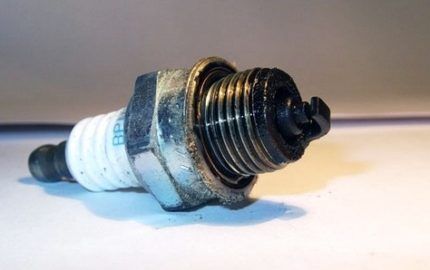
The contacts of a dried spark plug should be cleaned of carbon deposits using a file, sandpaper or a nail file. The gap between them should be 0.7 - 1 mm - this is the thickness of a standard coin. If necessary, bend the top electrode.
Before assembly, it is worth checking the functionality of the spark plug. Connect it to the power supply (put on the cap), apply the body to the cylinder or any metal part of the engine, turn on the ignition, pull the starter. At the end, between the electrodes, with each jerk a bright, powerful spark should jump.
It is very important to follow safety precautions. When checking, there should not be a drop of gasoline on the neck of the spark plug hole and the body of the brush cutter!
If after drying, cleaning and setting the gap there is no spark, buy a new spark plug. It happens that a spark does not appear on a new spark plug. In this case, check the quality of the contacts, try replacing the armor wire - it’s inexpensive and simple.
If there is no spark even with the new wire, you need to buy a new ignition coil. It happens that the cable is not disconnected from the reel; they are sold only assembled. It is somewhat more difficult to replace it yourself, because you need to accurately set the gap to 0.25 - 0.4 mm to the starter flywheel.
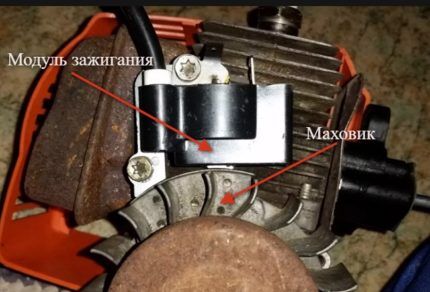
Install the reel with spacer and try it on. Spin the starter until it touches the spacer but turns completely. Remove the paper tape or plastic and finally assemble the assembly.
It happens that when checking, the spark plug produces a small but stable spark, but starting does not occur. After you screw the spark plug into the cylinder, a weak spark may disappear in a closed space. In such a situation, it is also worth replacing the coil: a new one will produce a more powerful impulse.
Option number 2 - you need to replace the filters
If there is a spark, but the scythe does not start, the problem is most likely in the fuel supply. The easiest way to check the air and fuel filter is to start with that.
Testing their condition is quite simple: remove the filter elements and try to start the engine. If it works, it needs replacement or at least cleaning.
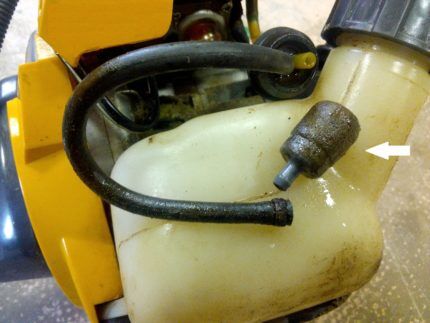
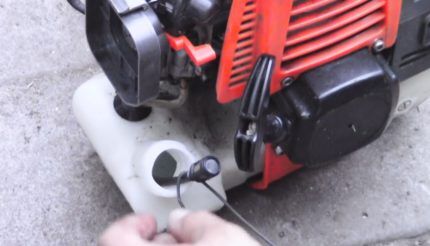
The fuel filter is located directly in the tank, at the end of the fuel supply tube. Carry out the following operations:
- Pull out the gas tank cap along with the restrictor.
- Take a piece of stiff wire and bend one end into a hook.
- Feel around with the wire and pull out the tube with the filter.
- Assess its condition by eye. In case of visible blockages, replace immediately.
- Try blowing it in both directions. The air should exit through the mesh on the sides, with small bubbles of gasoline, minimal resistance.
- If it’s a long way to the store with a new filter, but you need to mow it urgently, try washing the old one with clean gasoline and blowing it with compressed air.
- Insert the filter into the tube, clamp securely clamp and return it to the tank.
The air filter often causes unstable operation and floating speed, but if it is heavily clogged, it can also prevent starting. It is located on the side, above the carburetor (fuel pre-pumping button).
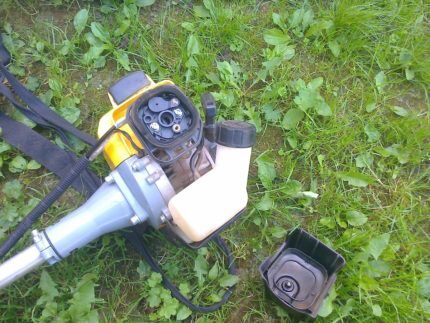
The plastic cover is held on by a latch - remove it. The filter itself usually consists of 2 layers: thick, dense foam rubber and a flat, rigid mesh. If it looks dirty or the engine will only start without it, replace the cleaner or blow it with compressed air.
On average, it is recommended to replace both filters with a new one every 2 years.
Option No. 3 - clogged breather and muffler
The breather is a check valve that allows air into the gas tank, but does not let fuel out. It is most often located on the lid, but sometimes on the body of the gas tank.
When it becomes clogged, the tank becomes sealed, a vacuum is created inside and the power of the carburetor valve is not enough to suck in fuel.
The following signs indicate a malfunction:
- The trimmer starts up normally the first time, but after a short period of time it stalls and will not start again.
- The outer hole of the breather is clogged with dirt.
- The scythe works fine if the gas tank cap is not screwed on completely.
- If you disconnect and point down the fuel supply pipe from the carburetor, gasoline drips from it in a thin stream or does not flow at all.
The problem can be solved simply: clean the hole from the outside with a needle, slightly pressing the valve inward, and blow it out with a compressor. If this does not help, you can pick it out of the lid along with the rubber seal.
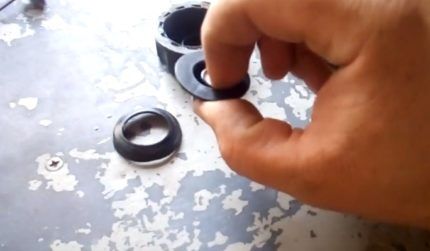
Wash both the rubber parts and the built-in filter with clean gasoline. Blow everything out, dry it and put it back together. If you still cannot blow air through the breather after this, buy a new cover.
The muffler or exhaust port is located on the side opposite the carburetor. On older models it often becomes clogged with soot and carbon deposits. As a result, the engine is choked by exhaust gases and cannot start or stalls almost instantly after starting.
The problem lies in the anti-spark mesh on the engine exhaust. It can be cleaned with a needle or completely removed.
Option number 4 - problem with the carburetor
Many owners, at the first problem with starting a lawn mower, immediately disassemble the carburetor. We recommend that you first check whether the problem is really in the fuel supply, and also rule out simpler breakdowns, above.
To check, fill a syringe with 3-5 ml of a mixture of gasoline and oil, unscrew the spark plug and pour fuel directly into the combustion chamber.
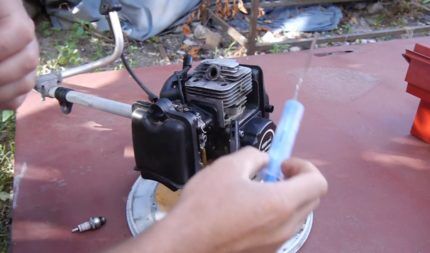
Install and connect the spark plug, and then try to start the trimmer 6-8 times. If the engine starts and soon stalls, the problem is really in the fuel system (carburetor, fuel filter, gasoline supply pipes). This often happens after winter, especially if the gas mixture is not drained: it breaks up into fractions, heavy oils literally seal small holes and parts.
If direct refueling of the engine does not help the start, return to checking the ignition, and also make sure that the combustion chamber is tight, there is compression, and the piston group is in good condition.
Once you determine that the problem is with the carburetor, disconnect it from the body. To do this, remove the air filter and unscrew the 2 or 4 long bolts. Disconnect the 2 fuel pipes and the throttle cable. Remove the carburetor, do not lose the paronite gasket between it and the engine.
To disassemble the carburetor, remove the 4 bolts located around the fuel pre-priming button. Carefully disassemble and fold all layers in order so as not to lose anything. You can immediately soak them in a bath of gasoline to clean them.
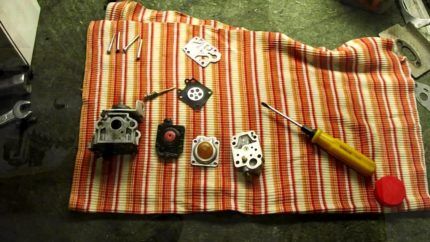
Assess the condition of the gaskets, if necessary, buy a repair kit and replace them.
On a metal plate with a round recess there is a needle on a spring-lever. It is located on the edge of the circle and is responsible for supplying fuel. To check whether it is stuck or moving, press the opposite end of the spring lever into the center of the circle.If mobility is limited, use special liquid and compressed air, or just gasoline for flushing.
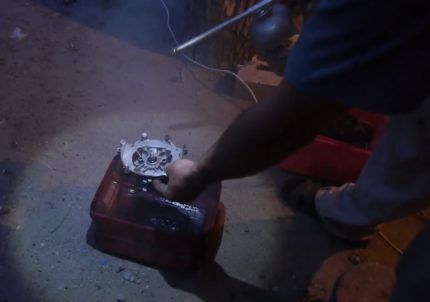
In addition to the needle, the inlet spray valve is located on the same part. It is better visible from the back of the part - a hole in the center, often cross-shaped. To check the functionality of the valve, attach a flexible thin tube, rubber or silicone, to it and try to blow in both directions. Air should pass only when inhaling - from the concave side of the part to the flat one.
If air does not pass through, cleaning is needed. A simple way is with a match, not a toothpick or a needle, only with a blunt end, from the side of the hole. A more complex and reliable option is with disassembly. Unscrew the small screw next to the needle and pull it and the spring out.
Find a small hole in the center of the circle and carefully, using a blunt object, such as a cut wire, push the spray membrane out of the valve through the hole on the opposite side.
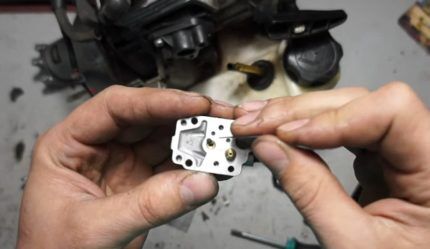
After thoroughly washing with gasoline, blowing and drying all the parts, replace the membrane and needle with spring.
Reassemble the carburetor in reverse order: rubber gasket, transparent gasket, metal part with needle and valve, thin rubber membrane, thick membrane in a plastic case, primer button.
Screw it to the trimmer body through the gasket, connect the fuel pipes and the throttle cable. Try it start a lawn mower as usual. If the problem is resolved, be sure to reinstall the air filter.
Most likely, you will need to adjust the fuel mixture parameters using the adjusting screw on the carburetor. Start the trimmer and, periodically accelerating, tighten the screw to a position in which the engine reaches maximum speed (by ear). Then make a half turn back so as not to overload the motor.
Other tool malfunctions
If all the problems described above have been checked and corrected, and the trimmer still does not start, there is probably a problem with the engine itself. Compression may be reduced due to destruction of the crankshaft seals or damage to the piston group.
This often happens with trimmers that are used very actively or for a long time: for example, in public utilities. For diagnostics, use a compression meter.
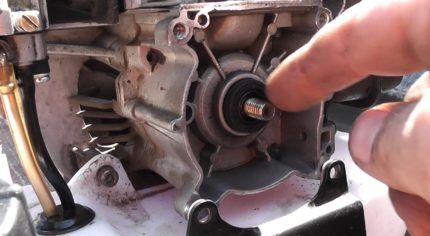
In most cases, such repairs should be entrusted to a workshop, if only because in almost all trimmers, in order to access the oil seals and the cylinder, you need to unscrew the nuts with a thread lock. This can be done either with an electric impact wrench or by warming them up thoroughly.
The oil seals are located on both sides of the crankshaft: under the starter and on the drive, and it is better to change them in pairs. Having reached the place where they are installed, assess the condition by eye: they should fit tightly, without play, and not bulge or be cracked. Oil leaks around also indicate the need to replace the seals.
When reassembling, be sure to use thread lockers wherever they were - this is a safety issue.
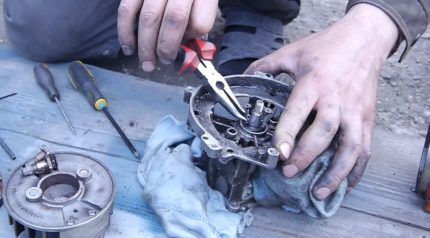
Restoring the piston group requires specialized tools. If you are not an auto mechanic at a service station, entrust the restoration of the trimmer motor to a specialist.
When opening the cylinder, check all surfaces for chips, burrs, and scratches. To determine whether the piston rings are worn, rock the connecting rod. The slightest play in the piston indicates the need to replace the rings.
Maintenance and prevention of startup problems
To ensure your tool lasts longer and doesn't cause problems, keep it clean and perform regular maintenance.
Do not store a fueled lawn mower: if you leave it for more than 2 weeks, and even more so during the winter, drain the remaining fuel from the tank, then start the engine and let it run until it stalls. When leaving the tool in the shed for the winter, wrap the motor and knives in an oiled rag.
To lubricate a 2-stroke engine before storage, unscrew the spark plug and use the starter to lift the piston to the very top. Drop some engine oil from the syringe and use the starter to crank the crankshaft several times.
In the spring, before the first use after inactivity, it is advisable to check the spark plug and filters, disassemble and wash the carburetor, even if there are no problems with starting.
Conclusions and useful video on the topic
For clarity, we offer a video with an analysis of common problems:
To check the carburetor or if you decide to change the oil seal yourself, this video will be useful:
Disassembling and cleaning the carburetor is described in some detail here:
If your lawn mower does not start, do not rush to look for a technician to repair it.It is quite possible that finding and eliminating the cause yourself will not only be much cheaper, but also faster and easier.
Most trimmers are designed almost identically; the structure of small parts and, of course, the quality of their workmanship may differ. Use and store your tool carefully, spare no expense on fuel and lubricants and time on minimal maintenance, and the trimmer will become a trouble-free assistant for many years.
Have you ever encountered a situation where a lawn mower stopped starting? How did you correct the situation? Share your opinions and experiences in the comments below!


