How to properly putty drywall with your own hands - techniques and recommendations for performing the work
Before applying finishing materials, plasterboard walls must be prepared.To do this, gypsum putty is applied to the surface. It hides recesses formed from fasteners, assembly seams and other irregularities. You can putty the walls with plasterboard yourself. Anyone with minimal technical knowledge and skills in construction can handle this with their own hands.
The content of the article:
Which finish is suitable for plasterboard walls?
Leveling with plasterboard is popular due to the good characteristics of the material.

After installation with your own hands, you can obtain a surface with a minimum number of depressions. The following types of finishes are suitable for plasterboard walls:
- Ceramic tile. The elements are laid on an adhesive composition. There is no need to putty the canvas. This type of finish has a lot of weight. To increase the degree of adhesion to the cardboard surface, a reinforcing mesh is additionally installed.
- Dye. Use water-based, acrylic or oil enamel. To obtain a smooth surface, it is necessary to putty the drywall before painting. The gypsum composition is sanded after drying.
- Wallpaper. Glued on in advance prepared wall. Violating this rule will result in unevenness being visible through the wallpaper layer. This worsens the appearance of the walls. Before you putty the plasterboard walls under the wallpaper, you should place a mesh for reinforcement at the joints.
- Decorative plaster. Apply to carefully sanded putty.
- Plastic panels. No pre-leveling required.When installing plastic panels, you will need to apply putty to the joints and fastening screws.
The finishing material is selected separately for each case. In this case, operating conditions are taken into account. For rooms with high humidity, ceramic tiles, paint or plastic panels are suitable.
How to prepare walls
For high-quality adhesion of putty to cardboard, it is necessary to carry out a number of preparatory measures. To do this, check the evenness of the surface. In places of recesses you will need to apply a large amount of solution. They are puttied in several layers.
The canvas is inspected, checking the protrusion of the heads of the fasteners. The screws must be tightened so that the cap is recessed into the cardboard layer by no more than 1 mm.
To improve the degree of adhesion to the solution, the wall is cleaned of dust and small abrasive particles. They can be removed with your own hands using a dry cloth or a jet of compressed air. The cleaned outer layer is treated with primer. Use a spray gun, hand sprayer, roller or paint brush.
Required tools and materials
The list of devices is selected separately for each case. To speed up work, hand tools can be replaced with electric ones. To putty the walls with your own hands, you will need:
- Gypsum mixture. The starting and finishing composition is used. In the first case, a rough surface is obtained. The finishing mixture is applied as an outer layer. After sanding it becomes smooth.
- Container for mixing the solution. Select a vessel with a wide neck. The inner surfaces of the container must be smooth. This will make it easier to remove all the putty from the walls and bottom with a spatula.
- Screwdriver.Used for screwing in screws with your own hands to the required depth. To speed up the work, use a screwdriver. The bit is selected taking into account the type of fastener.
- Putty knife. Plasterboard walls are puttied with tools with a narrow and wide working edge. Apply the composition with a small spatula. Use a wide tool to level the putty layer.
- Reinforcing mesh.
- Mixer or attachment to an electric drill for mixing the solution. It’s difficult to cook it yourself without tools.
- Scraper with installed sandpaper. Necessary for processing the finishing layer. Small irregularities can be removed with a grinding machine.
Materials and tools are located near the workplace. This way you won’t have to waste time searching while working.
How to mix putty correctly and quickly
The mixture is prepared in a vessel with a wide neck. A plastic bucket works well. The putty is kneaded using a specialized attachment on an electric drill. The method of preparing products from different manufacturers differs. Before doing the work yourself, you must study the instructions.
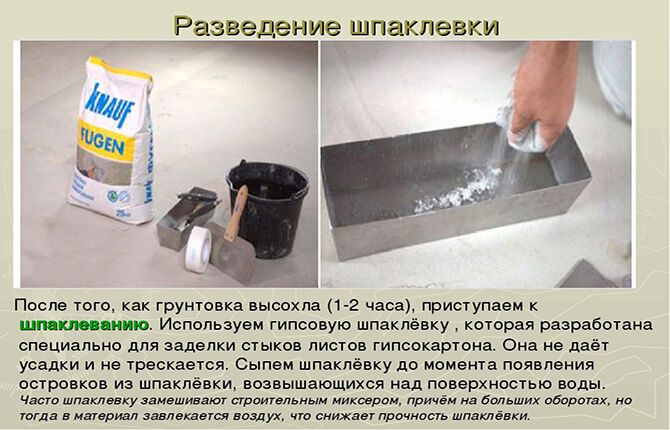
Water is taken into the container. The gypsum mixture is served in small portions.
The composition is kneaded until a homogeneous consistency is obtained. The density of the solution is adjusted by adding a gypsum mixture. The goal is to obtain a homogeneous mass. It must be taken into account that the gypsum-based composition hardens in a short time. Mix the amount that can be used in 30-40 minutes.
Wall putty technique
To determine how to properly putty plasterboard walls with your own hands, inspect the surface for unevenness. The composition is applied in a thin layer. In areas of large depressions, several layers are applied.At the same time, wait for each previous one to dry.
Work starts from the top. First of all, the installation seams and installation sites of fasteners are puttied.
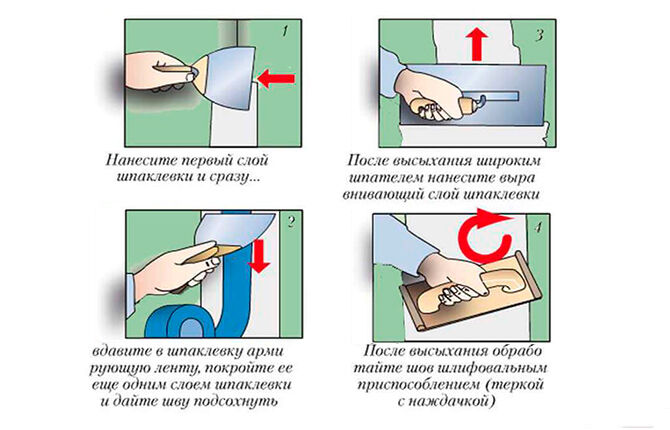
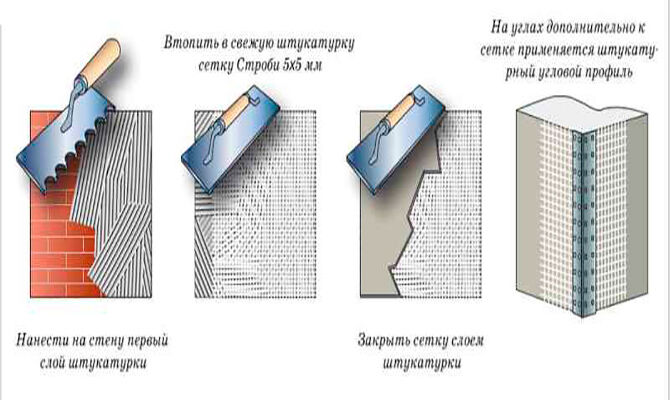
Improved strength characteristics are achieved through the installation of reinforcing mesh. It is attached at the joints. This prevents cracking of the finished canvas. The material is fixed in the following sequence:
- Primer is applied to the plasterboard wall. Preference is given to deeply penetrating formulations with antifungal action.
- A thin layer of putty is placed at the joints of the drywall sheets. Its thickness should be 2-3 mm.
- Lay the reinforcing mesh. Glue the edge at the top and, unwinding the roll, press it over the entire surface.
- Level the mesh with a spatula. This prevents the formation of folds.
- Wait until the solution hardens.
- Lay a second layer.
- Remove irregularities with a wide spatula.
After arranging the joints and holes from the fasteners, the plasterboard wall is puttied over the entire area. The final stage is applying the finishing layer and sanding it.
Tips for puttying
You can get a high-quality coating with your own hands by following a few rules. Properly puttied plasterboard walls have a long service life. Helpful Tips:
- Use personal protective equipment. When grinding, a large amount of gypsum dust and abrasive substances are released into the air. When working, you must wear a respirator.
- Stir the mixture until a homogeneous consistency is obtained. If there are lumps of different fractions, it will not be possible to create a smooth surface. The mixture used to putty on drywall should not be too thick.
- Eliminate large irregularities before the composition dries with a wide spatula. This way you will be able to spend less effort on sanding the surface with your own hands.
- Clean off any protruding parts after drying with sandpaper or an abrasive mesh. The evenness of the surface is checked using a long rule.
You can putty plasterboard walls with your own hands. This will require standard tools and minimal construction skills. When working, you must strictly follow the sequence of actions.
Have you puttyed plasterboard walls with your own hands? What finish was the surface prepared for? Leave comments, bookmark the article and share it on social networks.
We also recommend watching a selection of videos that will reinforce your knowledge and answer any remaining questions.
How to putty drywall under wallpaper?
Plasterboard putty. Detailed description of the work from A to Z.


