How to make a cabinet from plasterboard at home: step-by-step instructions with diagrams and drawings
A plasterboard cabinet is one of the options for organizing a large storage space in the room.You can buy a ready-made one at a furniture store, order it to the required dimensions, or make it yourself from plywood or other flat wooden materials. But all this doesn't come cheap.
Drywall makes this piece of furniture inexpensive. In addition, there are several options for its finishing, which allows you to choose one at your discretion.
The content of the article:
Design options
Regardless of what material the cabinet will be made of, all designs are divided into 2 types:
- Straight cabinet. This is the one that is installed along the wall. He can cover all or part of it. But this is a rectilinear design (exposed in a straight line).
- Corner cupboard. These are 2 straight models connected at right angles. Although the angle may not be right. Typically, such cabinets are installed in the corner of the room. This is not an ideal option for all rooms, because it takes up a lot of space.
These are 2 main categories, which include several groups. Two of them are the most common and frequently used:
- Built-in model, when a niche is used to install furniture. Often the storage room in an apartment or house is replaced with a closet.
- Closet, which differs from other types only in the door opening mechanism. It can be built-in, angular or straight.
Finding a suitable location to install the cabinet
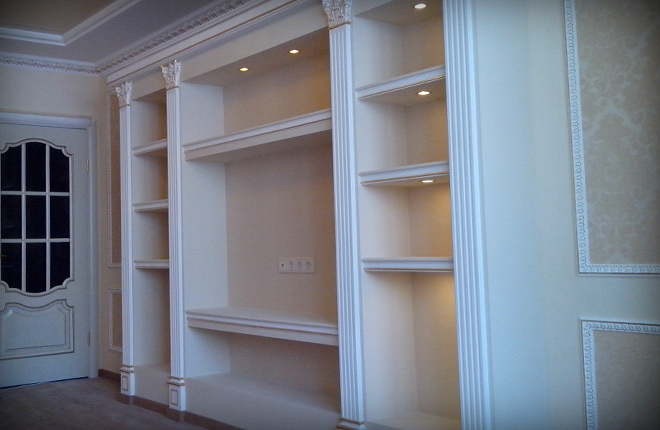
Everyone decides for themselves where the plasterboard cabinet will be installed. This applies to both the room and the space in it. For example, installation is often carried out in the hallway. For this purpose, a wall along the room is highlighted.A mirror is also installed here. Usually a built-in cabinet of a rectilinear type is constructed.
If you need to organize storage space in the bedroom, then a corner option is suitable. There is also a place for the straightforward here. Built-in models are rarely built in bedrooms.
Still, special attention must be paid to the installation location. After all, a cabinet made of plasterboard cannot be moved to another place, like a regular one bought in a store. Because it is a piece of furniture attached to building structures: floor, ceiling and walls. It is installed once and for many years.
Sketches and drawings
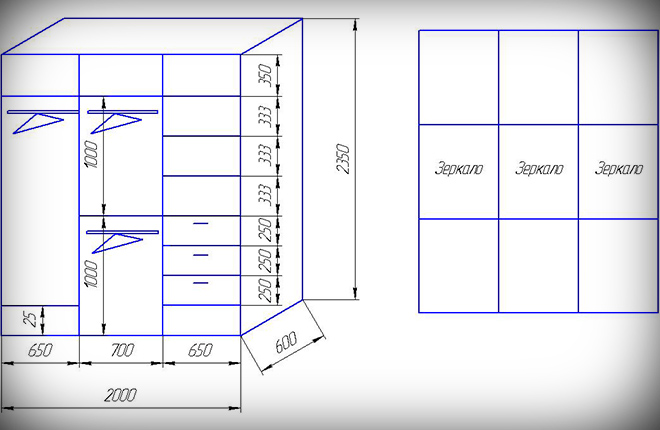
Regardless of what type of cabinet will be built from plasterboard, you need to sketch it on paper. This mainly concerns the number of shelves, doors, hanging rails and other things. What we mean here is how many there will be, large or small, where they will be located.
The second is the size. It all depends on the place where the cabinet will be installed. Its overall dimensions will be the main one for the size of the elements: shelves, niches, etc. But there are certain standards that go into the design when determining the dimensions of the cabinet and its elements. What you need to pay attention to:
- width and length of the plasterboard cabinet;
- distance to interior doors;
- how much free space is there in front of the furniture?
All 3 criteria will help you choose the type of door structure - hinged or sliding. This is a serious issue and cannot be brushed aside at the design stage. For example, in narrow hallways and corridors it is better to install sliding doors in which a cantilever rod is installed - across.
Next, decide what will be stored in the closet. For example, outerwear, shoes, bags and some utensils are stored in the hallway.In the bedroom - underwear, bedding, shirts, trousers, dresses, etc.
Now we need to know exactly who will use the future plasterboard cabinet. For example, if the structure being built will be used by all family members, then it must be made large. If it is being built in a children's room, then there is no need for large dimensions. But you need a lot of shelves.
For men one or two shelves, as well as a long rod - the best option. For women, the more shelves the better.
About the mounting height of the rod:
- for coats – installation height 1.7-1.9 m;
- for trousers and shirts – 1.2-1.3 m;
- for short items, 2 rods are usually installed, one above the other, with a distance between them of 0.8-1.0 m.
You need to decide on the size of the shelves. Their number will depend on this. For example, if a plasterboard cabinet will be built in the hallway. Here are the recommended shelf height dimensions:
- for shoes - no more than 20 cm;
- for bags – 35 cm;
- for hats – 20 cm;
- for small things: keys, brushes, shoe polish, etc. - there are no standards or recommendations here, everything is at the discretion of the owner of the apartment or house.
If a plasterboard cabinet is being built in the bedroom, then the shelves should be higher in height than described. The reason is simple - large things are stored in such a closet: bedding and towels. Therefore, the height here should not be less than 30 cm. And the depth of such furniture is significant - 60 cm. In the hallway, 40 cm will be enough.
Much depends on where this piece of furniture will be installed. The smaller the room, the smaller the closet should be.
Construction stages
Step-by-step instructions for making a cabinet from plasterboard are several construction operations, one after another:
- The location of the cabinet - you need to determine it exactly.
- Taking into account the dimensions of the selected location, a scale drawing is made with the exact dimensions of the entire structure and its elements.
- Taking into account the size of the cabinet, the necessary building materials are purchased.
- Tools are being prepared.
- The future frame is marked taking into account the dimensions according to the drawing.
- Installation of a frame made of metal profiles.
- Covering the frame structure with plasterboard.
- Primer, putty and finishing.
Preparation of tools and materials
Regardless of whether the cabinet will be built from plasterboard with your own hands or it will be made by craftsmen, the materials and fasteners, as well as the tools, will be the same.
Materials and fasteners:
- wall plasterboard with a thickness of at least 12.5 mm;
- 2 types of metal profiles – rack and guide;
- self-tapping screws and plastic dowels for them for attaching profiles to walls, ceilings and floors;
- self-tapping screws for attaching profiles to each other;
- self-tapping screws for attaching drywall to the constructed frame;
- perforated paper tape or fiberglass tape;
- putty and primer;
- perforated corners made of plastic or galvanized steel for sealing the corners of plasterboard sheets joined on the frame.
Tools:
- drill with drill bit;
- screwdriver;
- plumb line;
- building level;
- cutting tool for drywall: hacksaw or sharp construction knife;
- metal scissors for cutting profiles;
- spatulas;
- roller or paint brush;
- ruler or rule, simple pencil.
We carry out the markings
Everything here is strictly according to the drawing. From the wall against which the plasterboard cabinet will be assembled, the depth of the future piece of furniture is laid out along the adjacent walls. It's better to do this near the ceiling.Now the 2 applied marks must be connected to each other with a line along the ceiling, using a rule and a simple pencil.
You can use painter's thread and tap a colored line on the ceiling. Any method is chosen so that markings appear on the ceiling for installing a steel profile.
Next, along the walls located opposite each other, from the ceiling marking, a construction plumb line is lowered to the floor. It will indicate the installation locations of the vertical profiles. You also need to leave a line here. All that remains is to connect the marks formed on the floor. It turns out to be a rectangle with sides along the ceiling and floor, and two opposite walls.
Assembling the frame
The first thing is to cut sections from the guide profile. Their lengths are equal to the sides of the frame structure rectangle. Holes are drilled in them every 30-50 cm. Each piece is placed at its place of installation and marks are made with a simple pencil through the holes made on the planes of the building structures.
Profiles are put aside. Using the marked marks, holes are drilled for the dowels, where the latter are inserted. Then put the profiles back and secure them with self-tapping screws using a screwdriver.
It is recommended to place a special tape under each profile, which will dampen structural sounds. It is self-adhesive. You just need to remove the protective film from it and glue it to the back sides of the profiles. The tape will be between the latter and the planes of the building structures.
The profiles must be laid so that the lines drawn on the walls, floor and ceiling are along the edge (front or back), but not in the middle.
Determine the installation locations of the rack profiles strictly according to the drawing. Taking the dimensions from the drawing, transfer them to the assembled rectangular frame.The rack element is mounted strictly vertically, for which a plumb line is used. Therefore, the size of the installation location must be marked on a guide attached to the ceiling. And using a plumb line from it, determine the attachment point on the guide near the floor.
In this way, all vertical elements are installed, which are attached to the guides with pins. Installation operations related to the installation of rack elements attached to the wall against which the plasterboard cabinet is being built are carried out in the same way. Vertical racks are mounted on the wall, which are located strictly opposite the racks attached to a rectangular frame of guides. They are attached to the wall in the same way as the guides - with screws and dowels. Laying a shock-absorbing tape is mandatory.
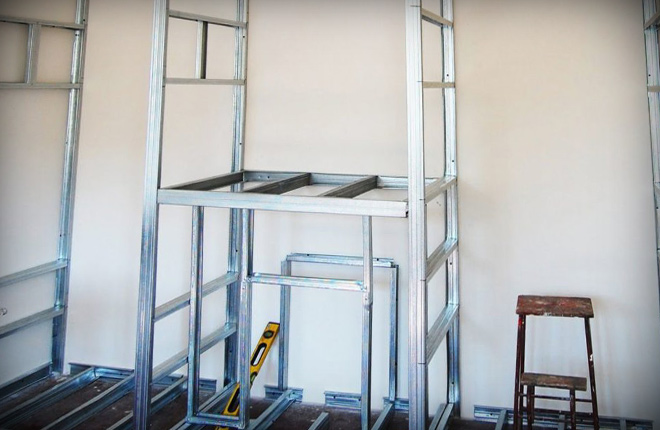
Vertical racks are connected in pairs along the floor and ceiling with the same rack elements. The result is a three-dimensional structure, the strength and rigidity of which must be increased by fastening the vertical posts together in pairs with intermediate elements. Their locations are the locations of the cabinet shelves. Strictly according to the drawing, these dimensions are transferred to the structure, where the trimmed rack profiles are mounted to the rack.
The same must be done with the areas that will divide the structure horizontally. For example, you should end up with something similar to the design in the photo below.
You cannot skimp on the construction of a plasterboard cabinet frame. The design must be strong, reliable, last a long time without creating problems. Therefore, the more jumpers between the main elements, the better.
Moreover, when working with metal profiles, there is always unused material left. Therefore, it is better to use it on jumpers, especially in those places where there will be heavy loads.These are usually shelves, places where the rod is attached. The wider the shelf, the more jumpers must be installed.
Craftsmen with extensive experience advise installing wooden blocks inside the rack elements, which will increase the strength and load-bearing capacity of places under heavy loads.
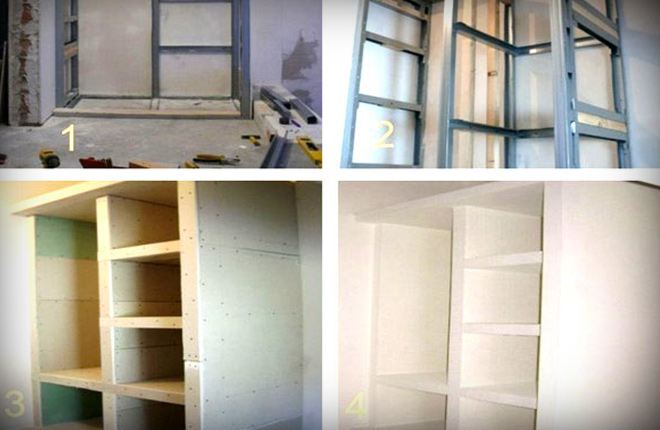
Sheathing with plasterboard
The most important step in sheathing is cutting the drywall correctly. Even the most accurate dimensions can create errors when laying cut sheets, because the frame is assembled along walls, ceilings and floors that do not meet maximum evenness.
There will definitely be deflections and bulges somewhere. Even if they are small, they will not allow the cut piece of plasterboard to stand at the installation site.
How to cut drywall correctly:
- cut out a piece of drywall;
- applied to the area that needs to be covered with sheet material;
- identified locations of inconsistencies;
- outlined them with a simple pencil;
- cut off protrusions or other irregularities;
- applied again at the installation site;
- checked that everything matched exactly.
Helpful Tips:
- sheets of plasterboard are joined in the middle of the installed profiles;
- the sheathing should begin from the far wall;
- the frame is completely closed;
- screws are screwed in every 10-15 cm;
- the distance of their screwing from the edge of the sheet is 1-2 cm;
- The head of the fastener must be screwed in, recessed into the body of the drywall by 0.5 cm.
The process of cutting drywall is not difficult, but a little experience is needed to understand the cutting technology. Use a sharp knife to cut through the cardboard, its tip deepening to a third the thickness of the drywall sheet. The sheet material is placed on the edge of the table along the cutting line. You need to press down on the hanging part with your hand. The sheet will break at the cut site.All that remains is to cut the cardboard on the opposite side. If the cut line turns out to be uneven, then it can be improved using a drywall plane.
Finishing
The built-in plasterboard closet is almost ready. You need to seal the joints and seams between the sheets of drywall, level the entire surface and choose a finishing method.
The joints are filled with putty using a spatula. It is necessary to cover the places where the screws are screwed in with the mixture. While the solution has not dried, a mounting tape is placed on it. It must be pressed tightly so that the putty mixture comes out through the holes. The purpose of the tape is to reinforce the seam frame. On top is another layer of putty. It is recommended to treat the surfaces of the joints with a primer before starting puttying. After it dries, the putty mixture is applied.
Any cabinet, including plasterboard, has many corners. These are vulnerable places that quickly become unattractive. That's why they are being strengthened. For drywall, special perforated corners are used, made either of plastic or galvanized steel.
The corner of the structure is treated with putty. Immediately, before it dries, apply a corner and apply another layer of putty on top.
Next, all plasterboard surfaces are treated with a primer liquid - inside and outside. A paint roller and brush are used. The primer is applied in at least 2 layers - the second after the first has completely dried. Next, all planes are puttied. After drying, the surfaces are treated with fine-grained sandpaper. The purpose of the operation is to remove particles of protruding leveling material, spatula marks and small irregularities.
Typically, drywall is painted with water-based emulsion. But no one forbids covering it with wallpaper.If a plasterboard cabinet was built in a bathroom or on a balcony, then you can decorate it with ceramic tiles or plastic panels.
With the last two options you can save money, because there is no point in carrying out leveling operations associated with applying putty under the tiles. Ceramic tiles and plastic panels themselves are leveling materials. The only thing is that the plasterboard under the tiles needs to be well primed.
But more often the plasterboard cabinet is painted. In this case, the water-based emulsion is applied in 2 or 3 layers. The next one must be done after the previous one has completely dried. And if the first layer is applied vertically, then the second horizontally, and the third again vertically. This is if a roller and brush are used for painting. If it is a spray gun, then there are no requirements for the direction of paint application.
The last step in building a plasterboard cabinet is the installation of various elements: doors, rods, hooks, mirrors, etc.
A consistent plan of action simplifies the construction of any plasterboard structure. It is practically unchanged, so this step-by-step instruction can be transferred to any plasterboard structure - wall, ceiling, niche, shelves, etc.
Anyone who has created a cabinet or other piece of furniture from plasterboard with their own hands - please respond. Write in the comments about your experience. What exactly did you collect, how did it all go, were there any difficulties?


It took a long time to select a wardrobe for the hallway. Either the dimensions are not the same, or there are not enough shelves and compartments. In general, the color turned out to be a problem. In general, we decided to make a cabinet out of plasterboard. They thought about it and didn’t save money - they put everything on the shoulders of the craftsmen. In two days they built everything. Guys, this is the best thing you can imagine.Everything we wanted is in this closet. We are thinking about a plasterboard closet for the bedroom.
I made a small cabinet on the loggia. With installation across. There are only shelves inside. It seemed like nothing complicated, but it took three days to assemble the frame and cover it with plasterboard. The walls on the loggia are uneven, so it took a long time and carefully to adjust. The doors are also made of plasterboard, they are hinged. Then I painted everything with water-based emulsion in one color - the walls and the cabinet itself.