How to make a headboard at home: options, detailed manufacturing instructions
When arranging the interior of a bedroom, the head of the bed often becomes a bright accent. It's easy to make it yourself.Choose a hard or soft design depending on the overall style and desire for additional comfort.
The content of the article:
- Possible implementation options
- Wooden headboard with shelves
- Slatted headboard
- Wicker headboard
- From cuts
- Mosaic fantasy
- Fine carving
- Mirrored headboard
- With mirror frame
- Painted headboard
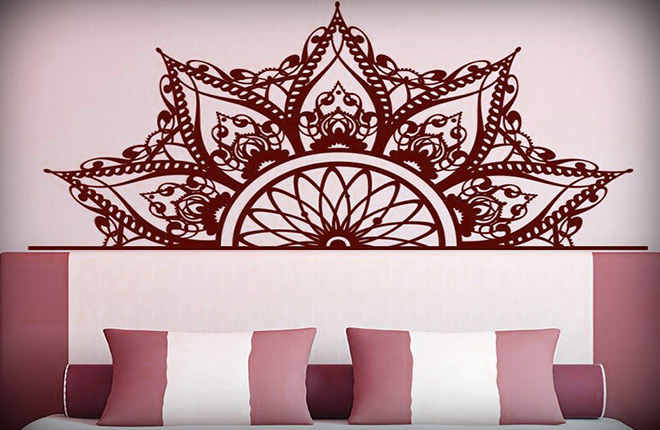
- Wall stickers
- Wrought iron headboard
- Headboard-photo frame
- Lace headboard
- Canopy headboard
- Solid wood back
- Headboard-wardrobe
- For children
- Back - “fence”
- Knitted headboard
- Headboard - “curtain”
- Rope decor
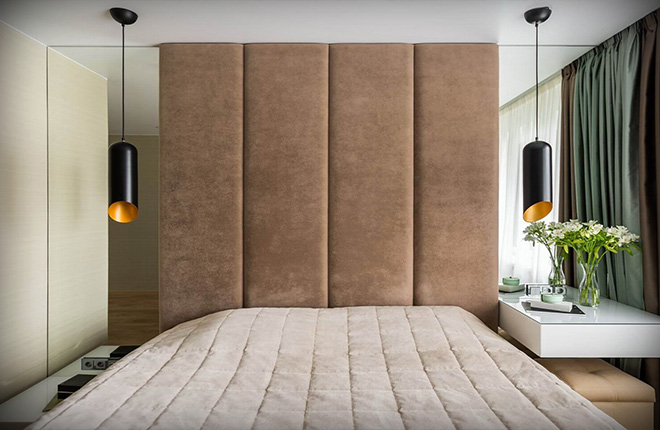
- Tall soft panels
- Storage systems
- Moss headboard
- Step-by-step instructions for creating a solid headboard
- Step-by-step instructions for creating a soft headboard
Possible implementation options
At the preparatory stage, you need to decide what shape the updated headboard will be. They analyze photographs and evaluate various beautiful ideas. This will allow you not only to produce a functional element of the interior, but also to add an unusual bright accent to the atmosphere of the bedroom.
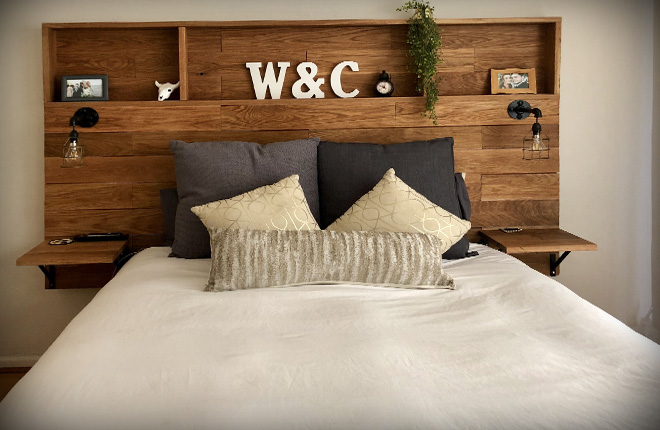
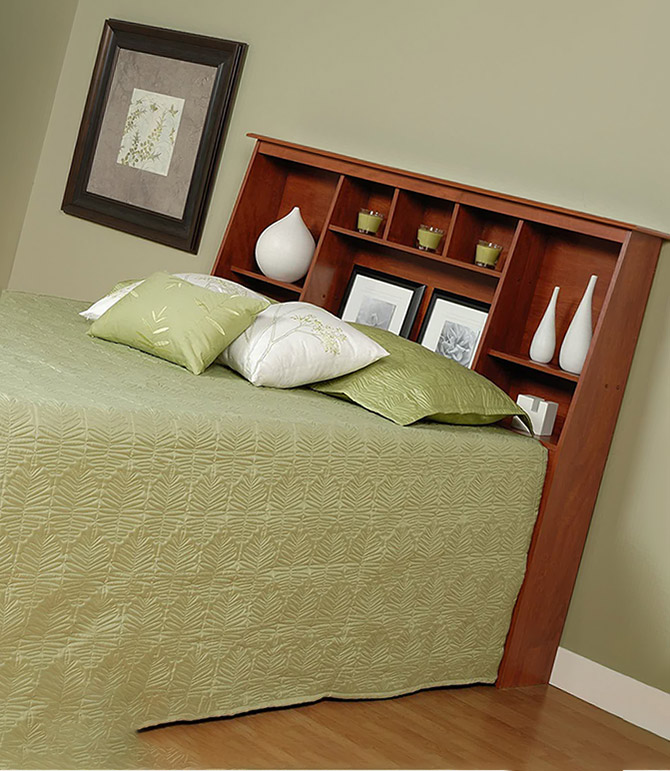
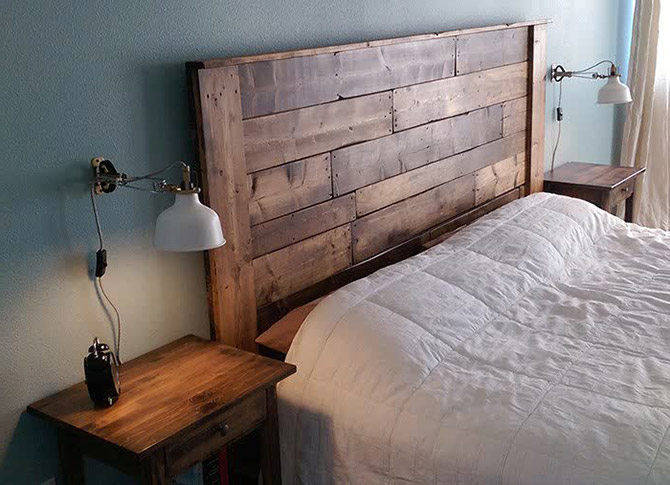
Wooden headboard with shelves
This solution results in an increase in usable space. A convenient shelf above the bed is used to place frames with memorable photos and other small souvenirs. Sconces can be easily mounted on a wooden headboard. Small shelves below serve as a replacement for bedside tables.
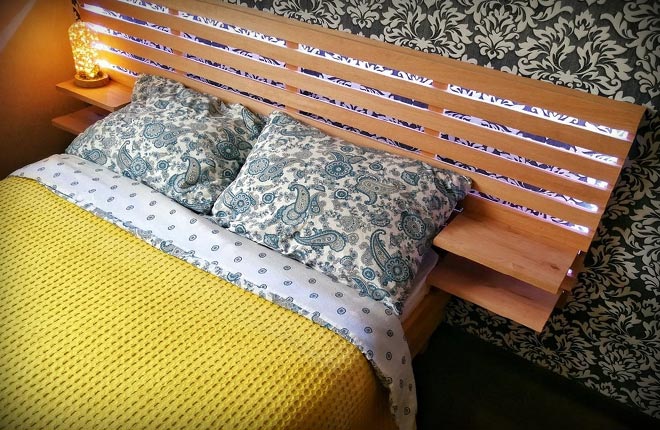
Slatted headboard
The natural texture of wood, emphasized in the strict horizontal direction of polished slats, goes well with the contrasting finish on the wall. The lighting adds additional charm.A lamp is placed on a small bottom shelf.
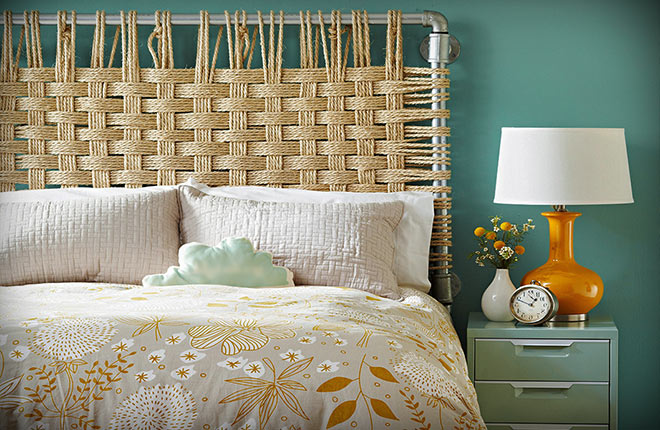
Wicker headboard
Unusual design option beds involves the use of thick rope. If necessary, you can take yarn that matches the style of the bedroom interior.
The simplest weaving method is “basket weaving”. The yarn is pulled onto a pre-fixed rectangular frame and woven alternately in a checkerboard pattern.
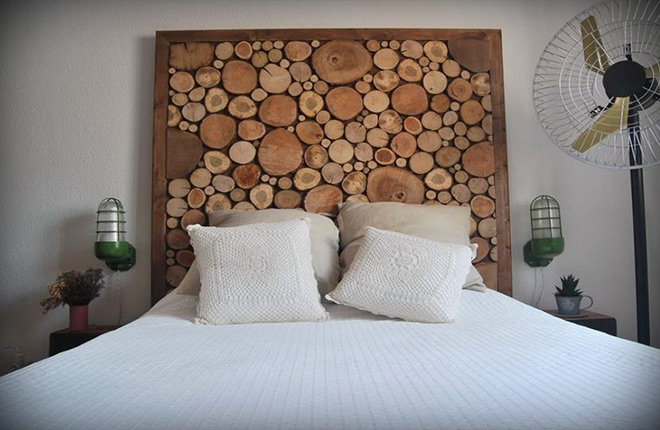
From cuts
An original headboard is easy to make using tree cuts of different diameters. They should be sanded. Then the wood is impregnated with special compounds that provide protection from rotting and fire.
The finishing layer is a transparent varnish. Frame the composition with a frame.
Mosaic fantasy
You can make a colorful, refreshing headboard for your bedroom in the form of a mosaic panel. The basis for it is a sheet of plywood of the required size.
Mosaic fragments can be obtained from fragments of tiles. Liquid nails are suitable for fixing them. After gluing is completed, the seams are filled with a special grout. The panel is framed with a frame.

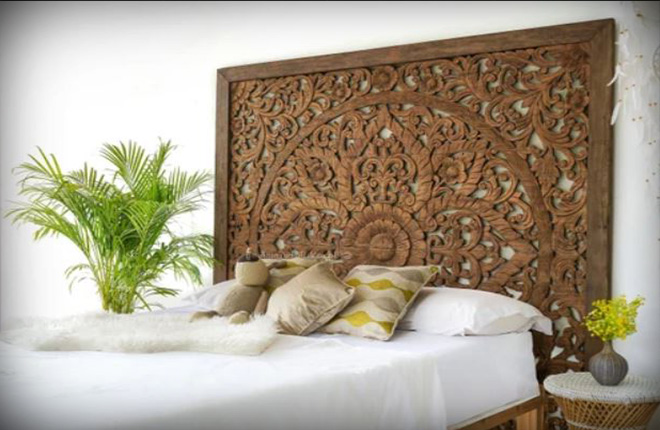
Fine carving
Different wood species are used for production. After carving and polishing, a beautiful openwork fabric is obtained. This headboard will decorate the most modest bedroom. But it requires systematic care, which consists of renewing the polish. To clean this bed design, special products are used.
Mirrored headboard
This option should be used in small rooms, since the reflection in the mirror panels visually enlarges the space. The dimensions of the mirrored headboard can be different, reaching the ceiling in some cases.
The mirror is glued to a solid base, leaving free space around the perimeter for the frame. It is often made from wood. If you want to make the decor brighter, lay out a mosaic ornament, glue beads, shells or other design elements.
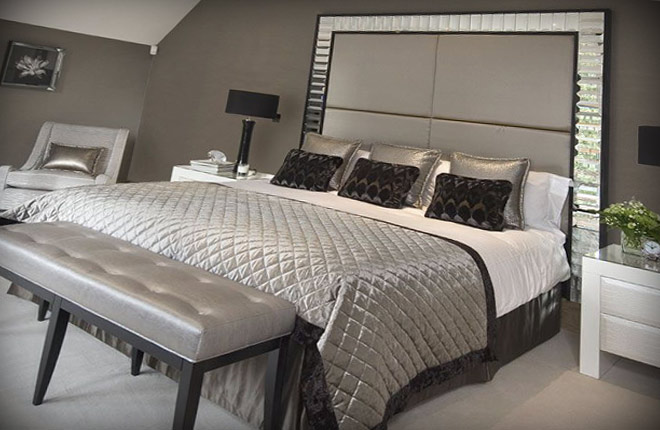
With mirror frame
An interesting nuance to the bedroom, designed in a strict achromatic tone, is brought by the headboard made of rectangular panels covered with eco-leather, framed by a frame with mirror tiles.
This design technique adds completeness to the interior, diluting its laconicism. The result is a cozy space with a touch of sophistication.
Painted headboard
If the walls near the bed are painted in a light tone, painting is the easiest way to decorate the headboard. To do it yourself, it’s easy to purchase ready-made stencils.
It is convenient to apply paint of the desired tone from spray cans by covering the floor and bed with film. Even a modest drawing becomes a decoration for the bedroom if done carefully.
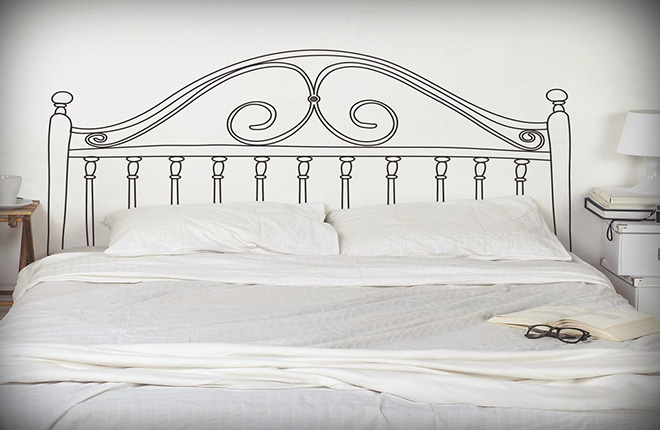
Wall stickers
Ready-made stickers will allow you to add an original touch to the design of your headboard. They easily stick to painted walls near the bed. A correctly selected shade of this headboard option decorates the room, attracting attention with its interesting interweaving of lines.
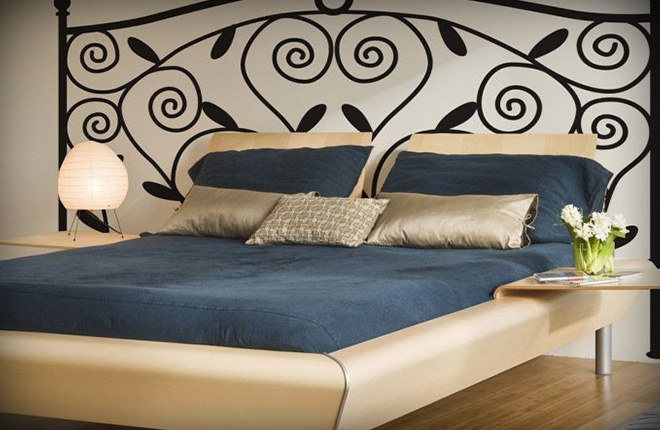
Wrought iron headboard
Openwork motifs embedded in durable cast iron bring back the feeling of antiquity to the bedroom. This headboard fits into interiors with different stylistic solutions. It looks fresh and romantic.
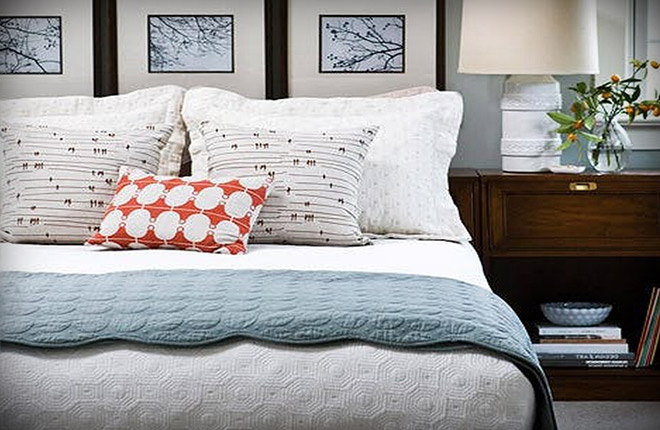
Headboard-photo frame
Favorite photographs of landscapes and memorable places, framed with neutral mats, will serve as an elegant option for decorating the wall area behind the bed.You will get a kind of headboard that you can admire while remembering memorable moments.
Another advantage of this method is the ability to replace the photo if necessary, periodically updating the exposure by the bed.
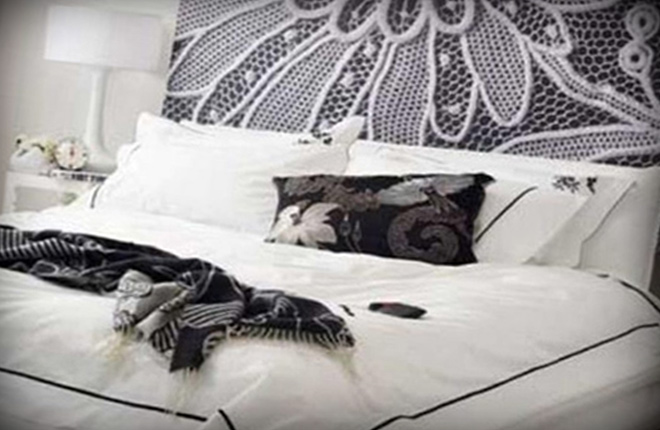
Lace headboard
The delicate lace openwork used to decorate the headboard fits well into the bedroom interior, designed in light pastel colors. For manufacturing you will need a plywood base. You can add foam rubber, which will provide a more voluminous look to the back.
To make white lace more expressive, you can glue a plain fabric of the desired shade to the foam rubber underneath it. Fasten the fabric parts to the plywood with a construction stapler. Without foam, lace on a flat base will resemble a decorative panel.
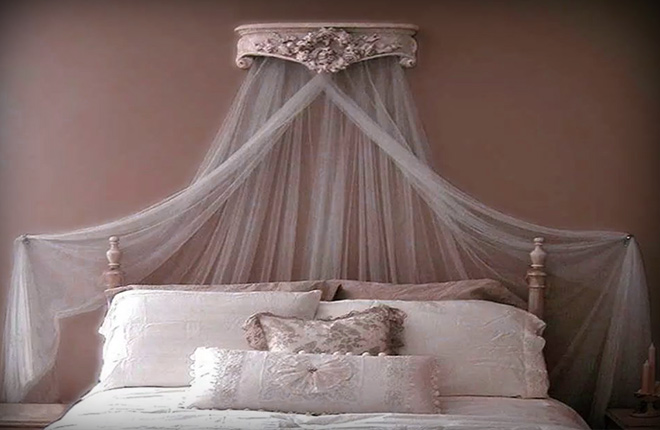
Canopy headboard
The canopy design provides a more comfortable, cozy environment. A reliable base is used for fastening. The fabric is often selected in accordance with the design of the window.
A bed canopy can be light airy or densely draped. This structure can be fixed to the ceiling if you plan to use long sheets. A more compact canopy can be easily fixed on the wall.
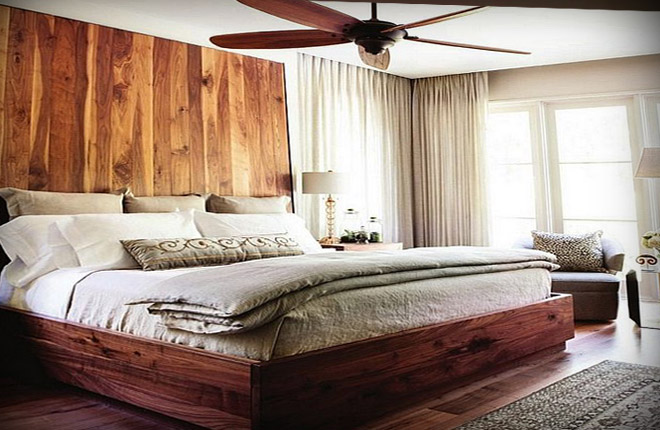
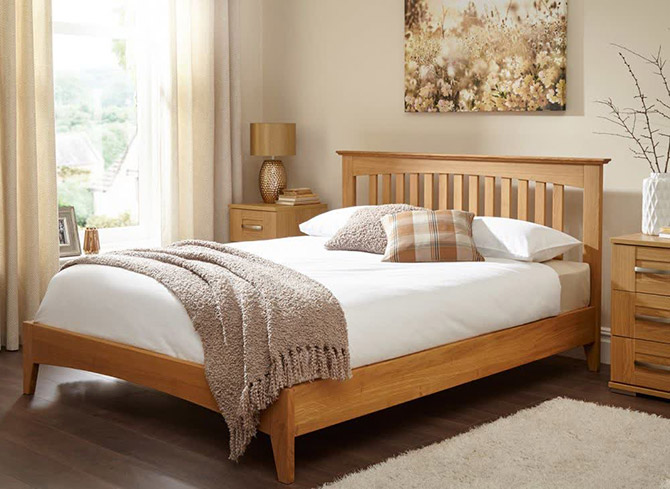
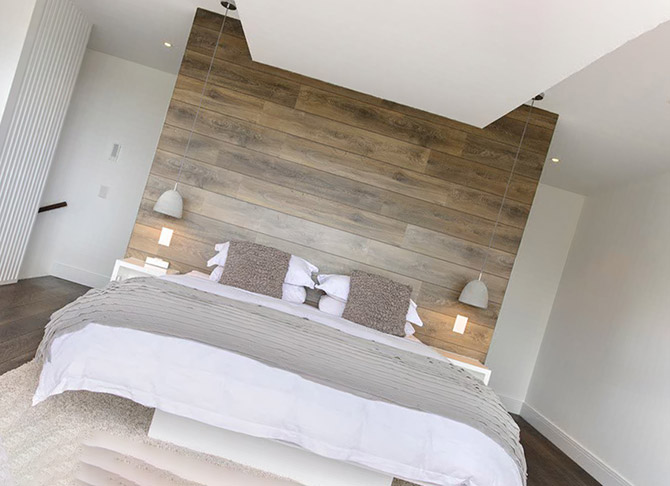
Solid wood back
An easy-to-manufacture design made of sanded boards and laminated veneer lumber is suitable for interiors with country and Provence style elements. You can use MDF, chipboard, chipboard panels, provided with an additional protective layer.
The shape of such a headboard is predominantly strict, often rectangular. The wood is varnished to highlight its natural texture.
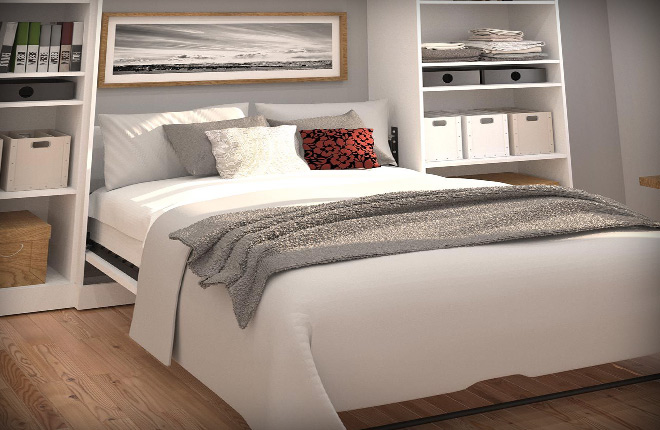
Headboard-wardrobe
This solution is practical.Installing a design with shelves and additional storage space at the head makes the sleeping space more comfortable and orderly.
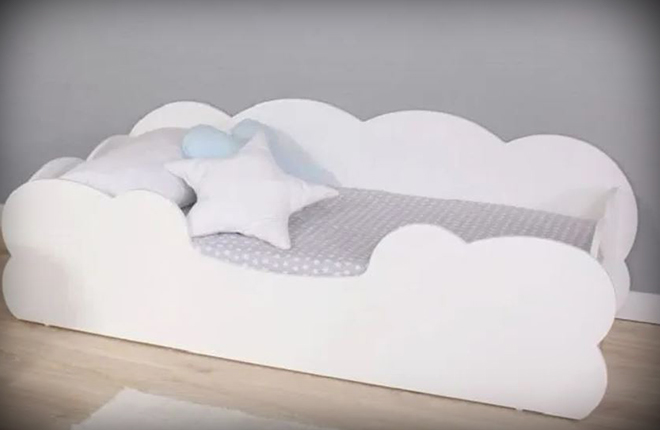
For children
Making a wooden headboard for children's bed, try to make the design not only convenient, but also safe. It is supplemented with side walls that protect the baby from accidental falls.
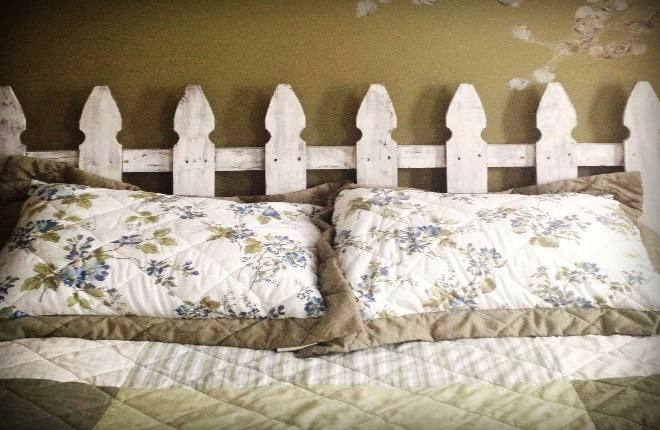
Back - “fence”
From ordinary lining it is easy to create a headboard that resembles a fence. The upper ends of the planks are sharpened, and then semicircular fragments are cut out along the edges. The parts are nailed to form a fence onto the crossbars.
If desired, you can replace the lining with a polished picket fence for authenticity. After assembly is completed, a protective varnish layer is applied.
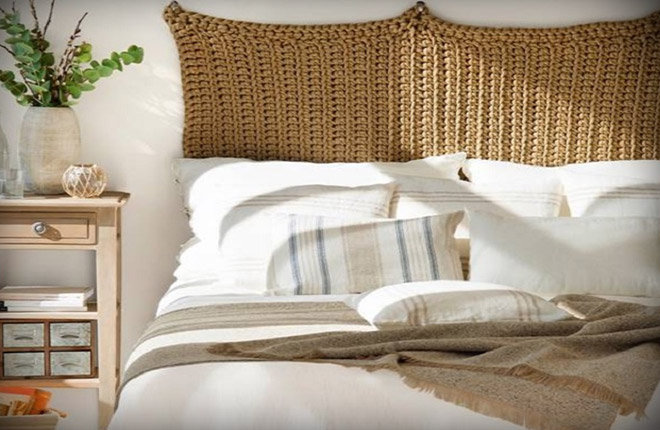
Knitted headboard
You can knit an interesting design for the bed. Use a thick hook and a tight elastic cord. If you know how to crochet, a panel of the required size can be made in a few days. Fix it with dowels.
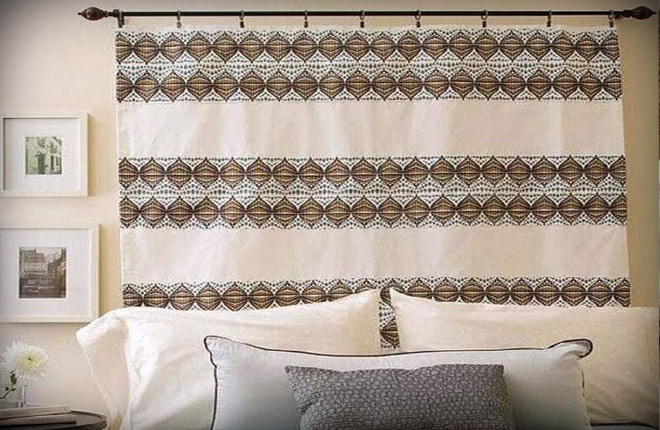
Headboard - “curtain”
You can even decorate the area of the wall behind the bed using curtain fabric with an expressive geometric pattern. An interesting solution is to use fabric similar to curtains on a window. For fixation, a regular window cornice is attached to the wall.
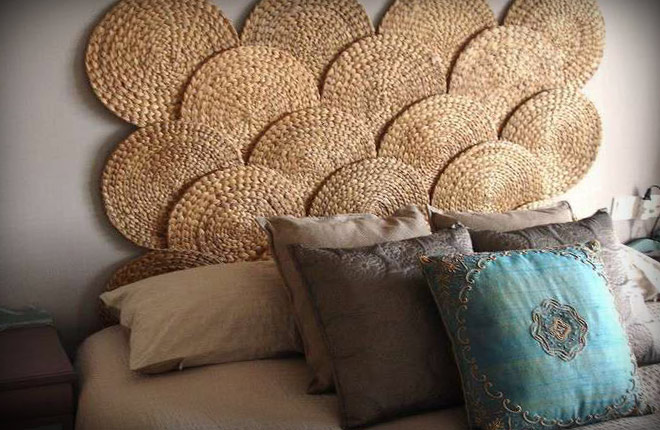
Rope decor
To create an unusual headboard, you only need a strong rope with a silky texture. Mugs are crocheted from it using a thick metal hook.
The technology is simple, involving an increase in the number of loops at equal intervals in each subsequent row. The details are tight. But if required, fix them on a base made of thick cardboard, and then form a decor on the wall next to the bed. To secure it, a sheathing is first made.
Tall soft panels
Panels lined with foam rubber and covered with velvet fabric that reach the ceiling fit well into the spacious bedroom. This solution requires compliance with the compatibility of the main shades. When balance is achieved, the interior looks complete.
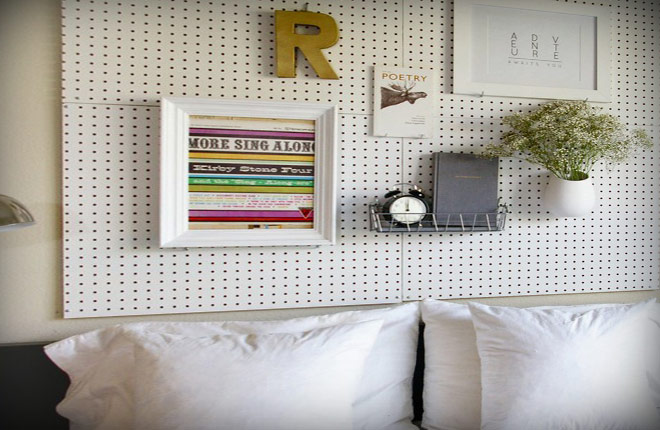
Storage systems
If you hang an organizer made of a perforated base, complemented by mesh shelves and hooks, above the bed, you get a convenient place for small things. Frames with memorable photographs, interesting drawings, and various crafts are strengthened here. It is important that there are no heavy objects on the organizer, and that the remaining exhibits are securely fastened.
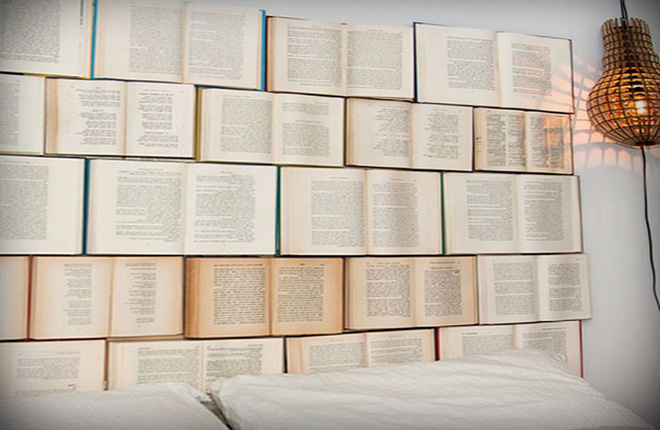
The original headboard, for which open books served as material, will not leave people indifferent. They are selected according to size and fixed on a plywood base. Then the panel is fixed to the wall.
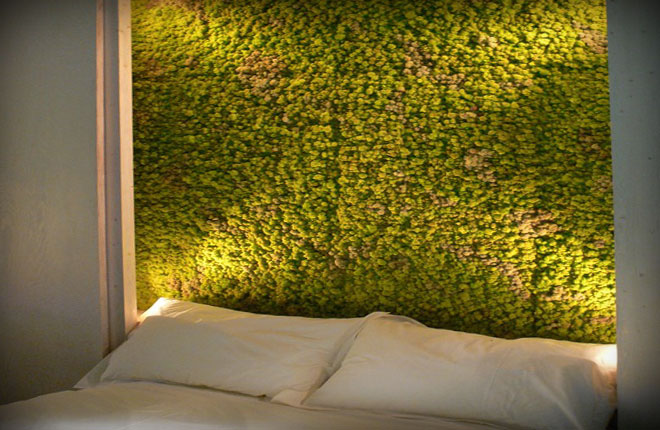
Moss headboard
The panel, created from artificial moss and enclosed in a wooden frame, creates a bright decorative accent in the atmosphere of the bedroom. The natural texture goes well with different types of finishes.
Step-by-step instructions for creating a solid headboard
If you wish, it is easy to make a comfortable solid headboard with your own hands. At the preparation stage, a drawing is developed that will make it possible to more accurately select the material and cut it into individual parts.
Choosing material
Bed headboards are often made from wood. For work you need to prepare suitable strips. They can be purchased at a hardware store.
You will also need:
- jigsaw (it’s more convenient to work with an electric device);
- screwdriver;
- drill;
- self-tapping screws
Making a headboard
Before work, study the master class in order to avoid mistakes when performing all operations independently.
The following step-by-step instructions will also help you solve the problem:
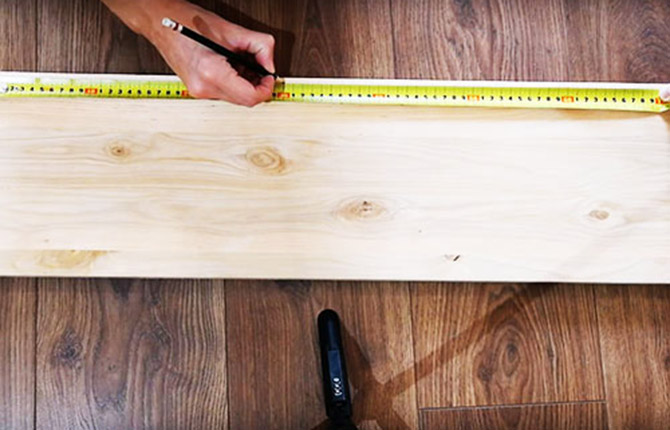
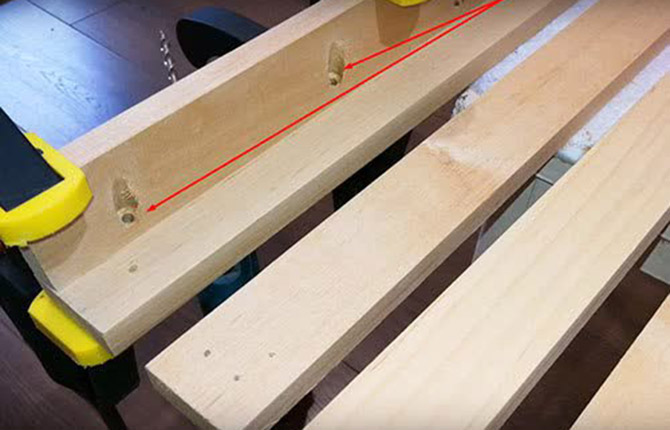
- Marking. It is not always possible to purchase planks of the required dimensions. In such a situation, the boards must be marked, making the width of future planks 7-8 cm. In total, 9 pieces of 2 meters in length will be required. It is also necessary to leave 4 strips for the shelves, about 20 cm wide. Their length is left within 40 cm. It is planned to prepare 3 crossbars. Their exact length is determined after all the planks are laid out on the plane. You will need 4 more bars for a frame at least 2 meters long.

- Cutting out parts. The boards are trimmed according to the marked marks. A jigsaw speeds up this operation. It is important to then use sandpaper to sand not only the cuts, but also all other surfaces of the planks, eliminating burrs.
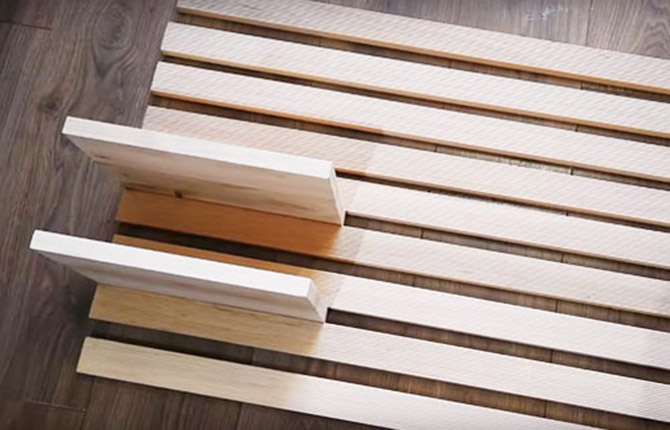
- Layout. The planks are placed on a flat horizontal surface. To ensure that the interval between them is the same, fix it with scraps of boards of the required thickness.
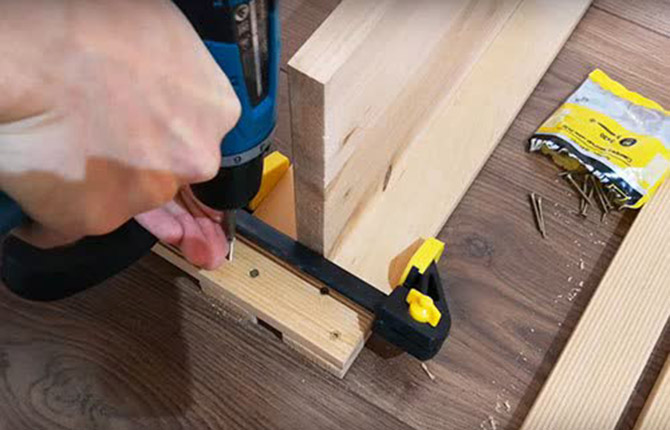
- Preparing the crossbars. To securely fasten the planks, you will need to cut 3 transverse slats from pre-prepared boards. Select the self-tapping screws so that after screwing in they do not pierce through two parts placed on top of each other.
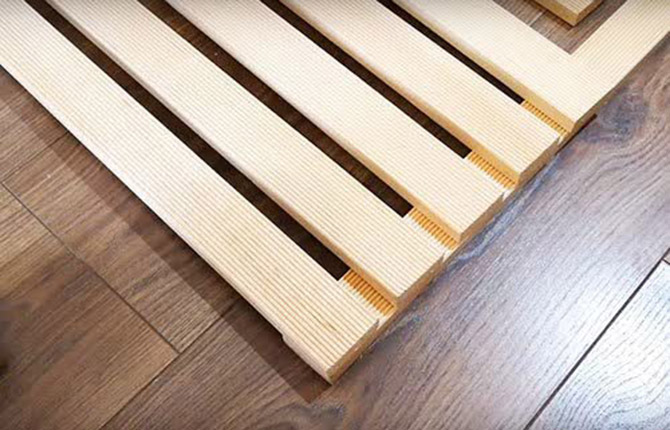
- Screwing the planks. Using a piece of board to fix the same spacing, screw the planks to the crossbars one by one. This action is then performed on the other side and in the center of the grate.
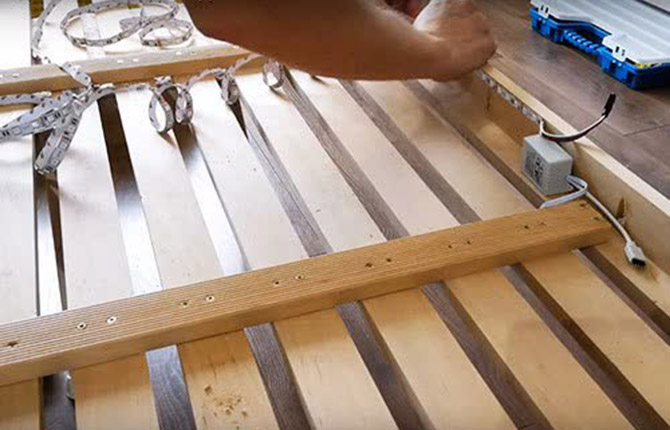
- Frame equipment. When the main lattice is assembled, a frame of wooden slats is attached to its perimeter on the front side. Holes for secure fixation with self-tapping screws are made at an angle. You can leave this headboard without a frame.
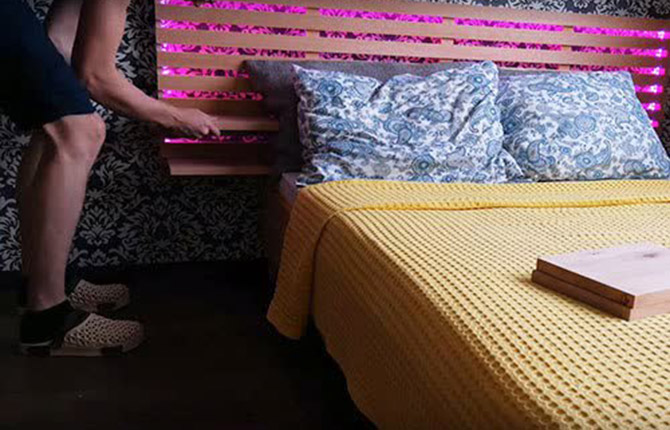
- Installation of backlight.To enhance the decor, an LED strip is fixed on the inside of the assembled slatted frame around the perimeter. The mechanism for turning it on is fixed. You can provide diodes of different shades, supplemented by a controller. This device, in accordance with the program, changes the tone of the lighting, adding a touch of mystery.
- Headboard design. Fix the lattice frame behind the headboard. The design looks lightweight, and the lighting enhances its attractiveness. The boards prepared for shelves are easily inserted between the planks. This allows you to install shelves in any convenient place.

If a darker shade is required for the interior, stain is used. Then, after it has completely dried, a varnish coating is applied. Wood is also easy to paint if necessary.
How to Attach a Solid Headboard to a Bed
There are several methods used to install a rigid headboard.
Pristavnoy
The manufactured massive structure is installed without additional fasteners. An attached headboard is equipped with stable legs or is made in the form of a chest of drawers, a cabinet, or a rack.
Such options are often equipped with convenient storage areas. They are not suitable for a small bedroom, as they take up a lot of usable space.
Mounted
Practiced to secure a solid headboard to the wall behind the headboard. Self-tapping screws, dowels or anchors are used depending on the weight. Can be mounted on special canopies.
Stationary
This technology involves attaching a manufactured hard headboard directly to the bed. Different types of fasteners are used. The most common choice is screws or bolts.
It is not always possible to purchase wooden planks.In such a situation, a good option is a headboard made of laminate left after laying the flooring. The combination of 2 surfaces in tone and texture gives the interior completeness.
First, a wooden sheathing is made, which can be immediately attached to the wall. Laminate panels are fixed onto it. The first bottom plate is secured with shoe nails. Then the lamellas are laid, fixing them with locking joints. If necessary, nails are driven in along the edges for security. The result is an even coating on which the joints remain invisible.
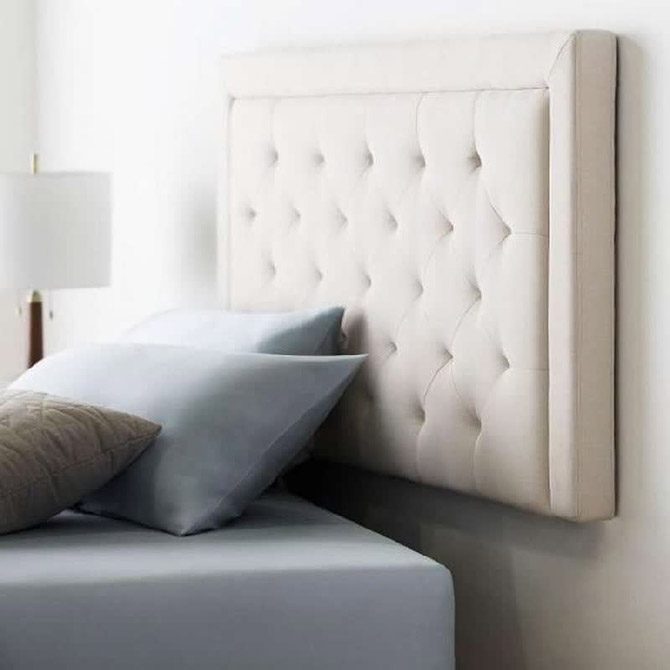
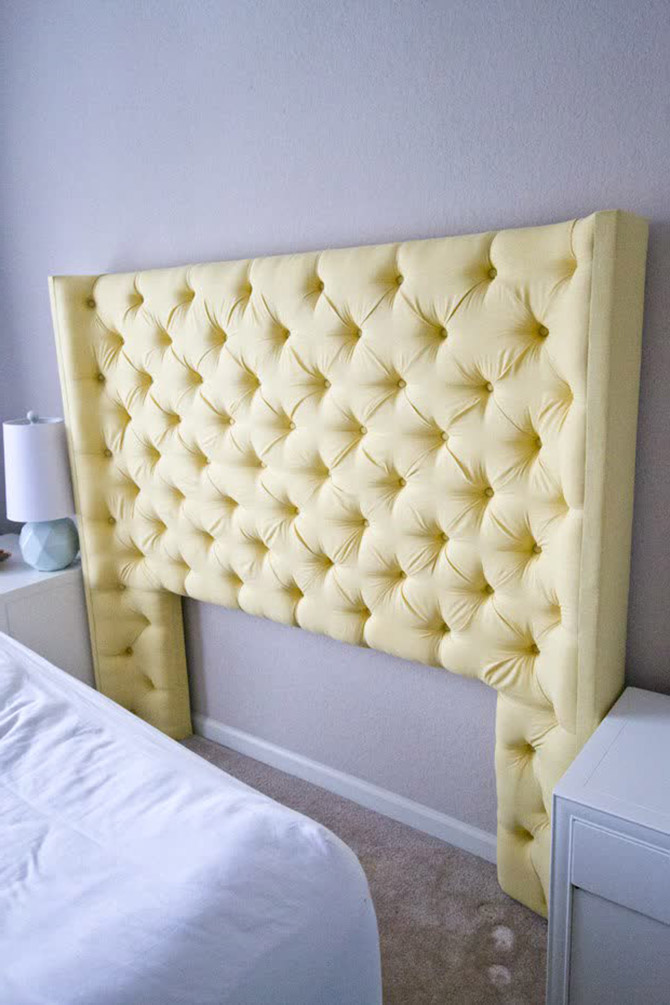
Step-by-step instructions for creating a soft headboard
To enhance the feeling of comfort, it is worth making a soft headboard of the bed. There are many methods, but the main one is the use of fabric and filler.
Choosing material
A solid base is required. It is often made from plywood, but you can also use wooden boards.
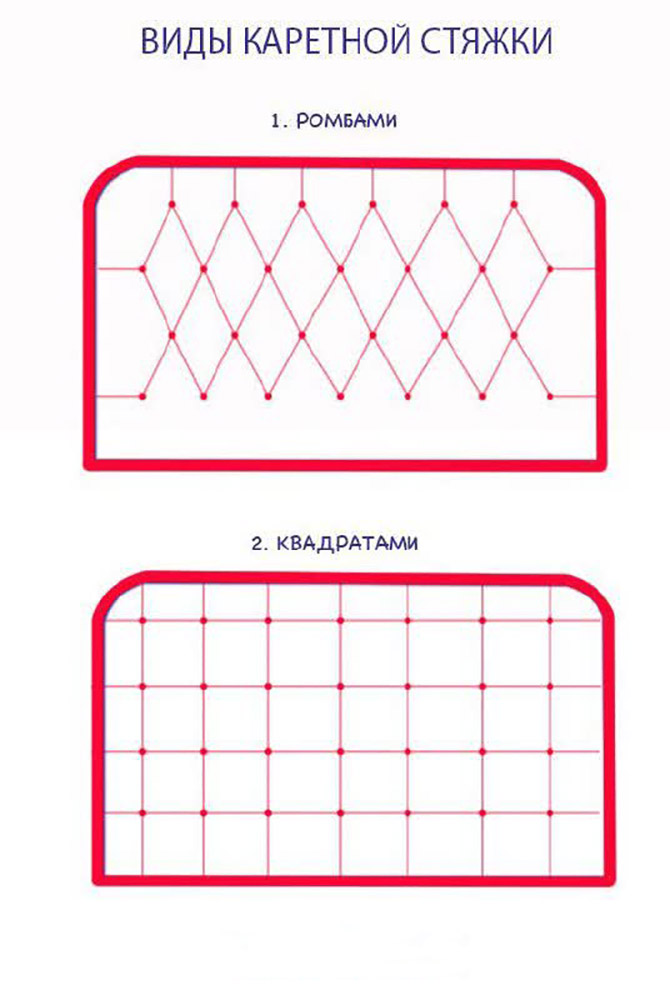
If you plan to make a soft headboard using the “carriage tie” technique, you will also need:
- fabric of the desired shade - it should be durable and easy to drape, eco-leather is also suitable;
- furniture buttons;
- padding polyester;
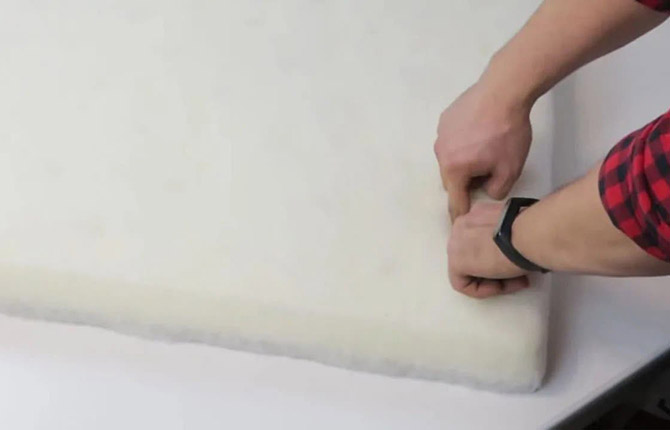
- foam rubber - use plates with a thickness of at least 5 cm;
- glue – a special composition recommended for foam rubber is suitable;
- long needles;
- furniture stapler;
- stationery knife;
- a drill equipped with a “tsifenbor” attachment – it will allow you to make even holes in the foam rubber;
- drill;
- scissors;
- strong threads.
Making a headboard
When working, care is required to ensure that the folds are laid evenly.
Step-by-step instruction:
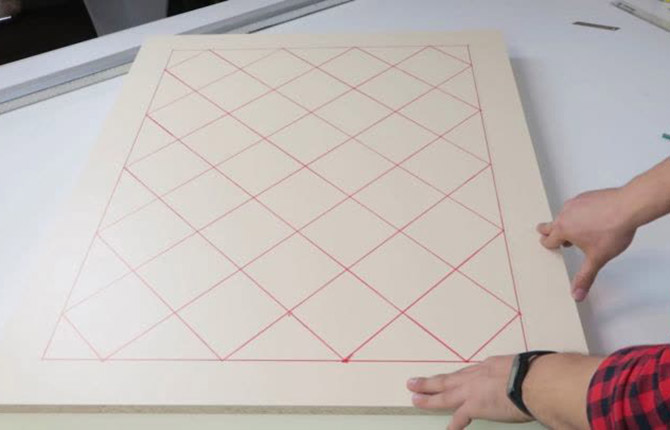
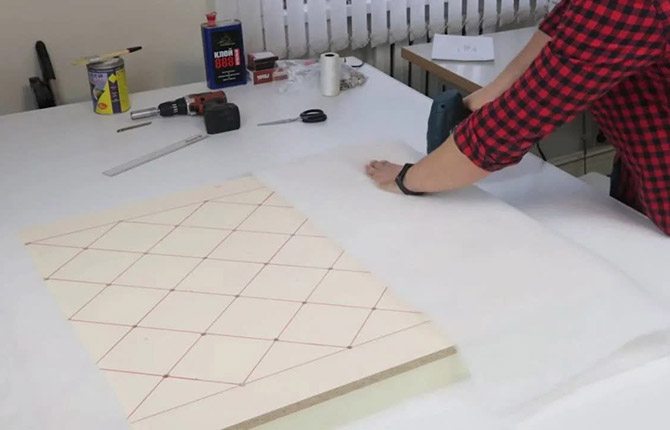
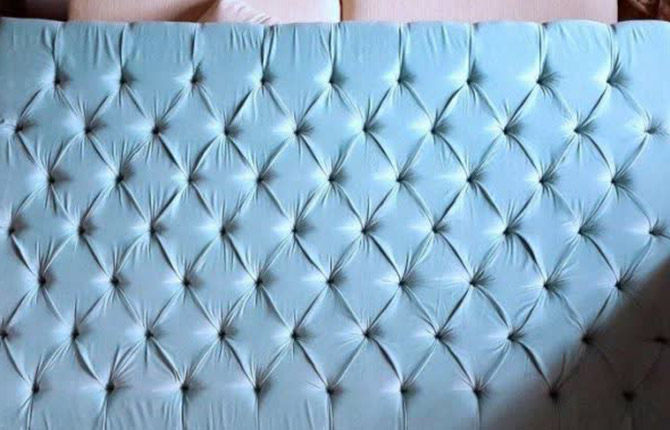
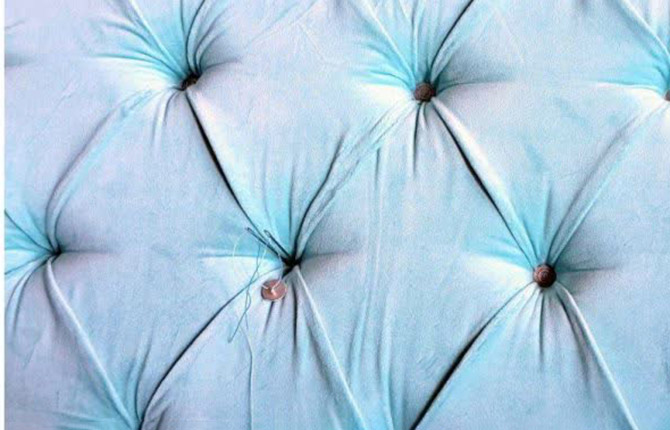
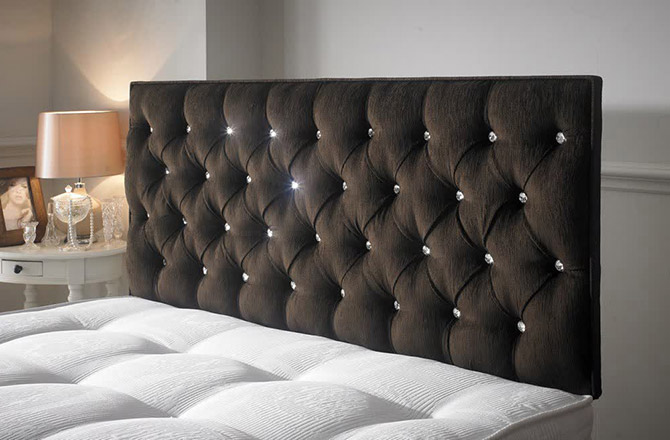
- Selecting a pattern. The decorative pattern obtained using the “carriage screed” technology is often diamond-shaped. Sometimes in the form of squares.

- Drawing development.Markings are made on a separate sheet of paper, focusing on the dimensions of the future headboard. It will allow you to more accurately transfer lines onto blanks made of plywood and foam rubber.

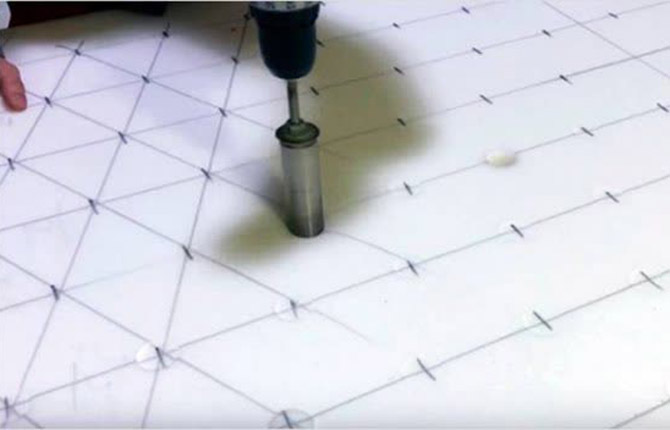
- Preparing foam rubber. Cut the foam to the required size. The markings of diamonds are transferred to it in accordance with the drawing. For control, cut out a template of one diamond. It will help check the accuracy of the markings. Apply the template to the marked surface, checking the vertical and horizontal direction. Using a “tsifenbor” - a special crown mounted on a drill, even round holes are made at the tops of the rhombuses.
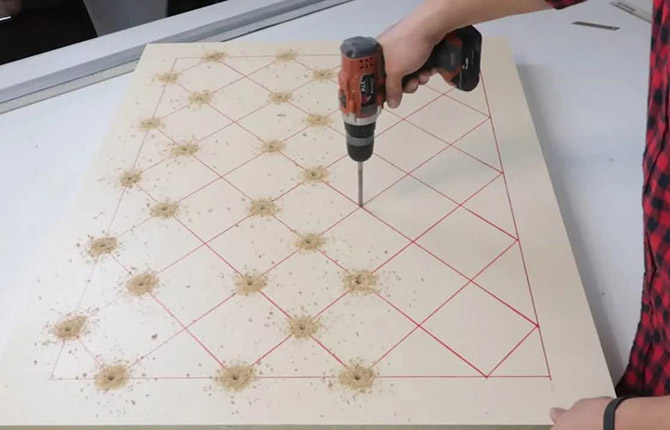
- Marking plywood. A plywood blank is cut out in accordance with the dimensions of the foam rubber. Transfer markings. For accuracy, it is worth drawing out the plywood base, making the lines exactly according to the drawing. Sometimes they combine the parts and then make marks on the plywood through holes in the foam rubber, but this method can lead to deviations, which ultimately has a negative impact on the drawing.
- Drilling holes. Using a drill equipped with a drill of the required diameter, holes are made on the plywood blank. They are also located at the vertices of the marked diamonds.
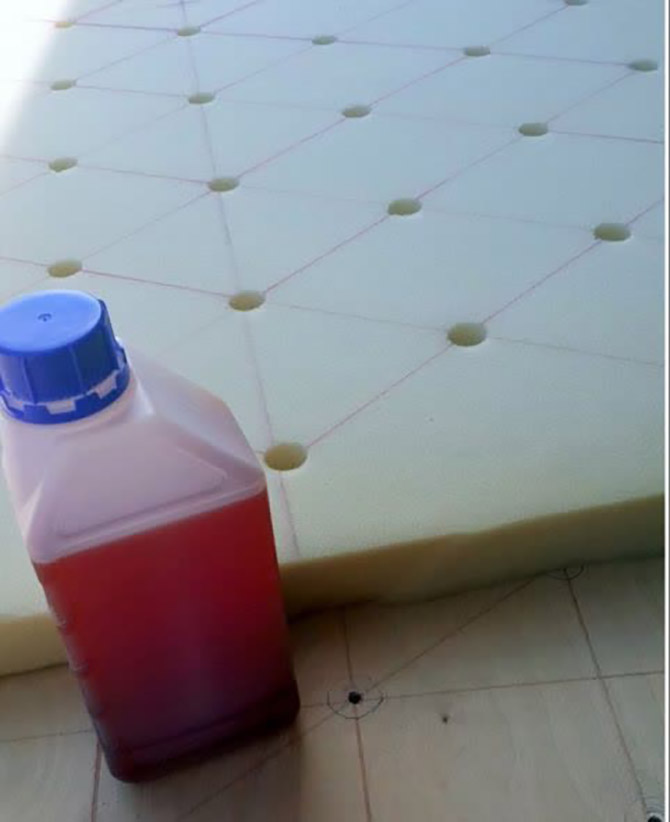
- Gluing foam rubber. Glue is evenly distributed onto the plywood base. Apply foam rubber, making sure that the holes on both parts match. Pressing lightly, smooth the foam rubber with your palms, ensuring that it sticks well.

- Securing the padding polyester. Cut out the padding polyester with a margin of at least 15 cm on all sides. Spread it evenly on the foam rubber. The workpiece is turned over. The edges of the padding polyester are secured to the plywood base with a stapler. The corners are neatly tucked. Then the excess padding polyester is cut off.
- Surface preparation. You need to make holes on the stretched padding polyester.Considering the fibrous nature of the thin fabric, this operation is performed with the fingers. Find a hole in the foam rubber and carefully push the padding polyester apart in this place.
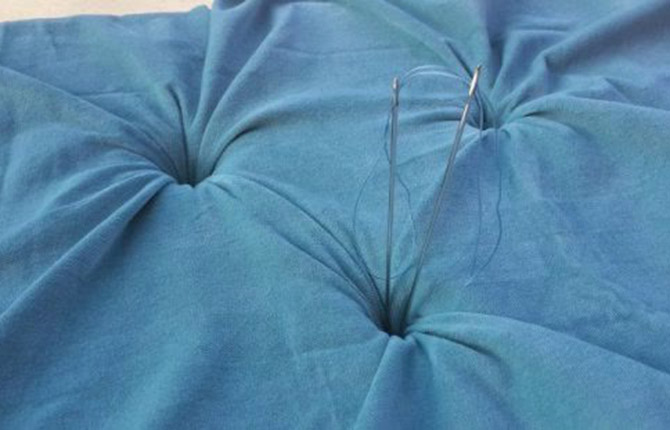
- Performing a screed. A piece of fabric is spread on the base. The thread is threaded into 2 long needles. They are inserted into the outermost hole. Then you need to move to the opposite side.
- Fixing threads. After removing the threads, the fabric is stretched, and their ends from the inside on the plywood are securely fixed several times in a zigzag manner with a stapler. The excess is trimmed off.
- Fastening the fabric. As the screed progresses, carefully straighten out the folds. Make sure they turn out the same. After completing the design, the edges of the canvas are turned, trying not to change the direction of the pattern. On the wrong side, the fabric is fixed around the perimeter with a stapler. The corners are folded without unnecessary folds.
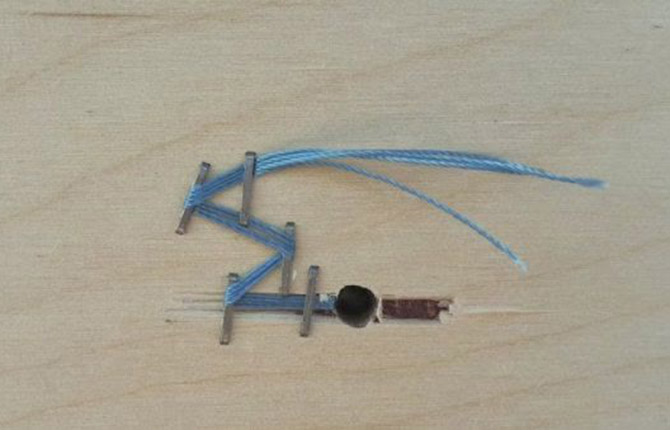
- Fastening buttons. Using a similar method - using 2 needles with a thread, which is first passed through the eye of the buttons, fix them in each hole.

The back side of a finished headboard is covered with fabric to give it a finished look. Choose a non-stretchable material. The finished headboard is installed in the designated place.

How to attach an upholstered headboard to a bed
More often, direct fixation of the headboard, made, for example, using the “carriage screed” technology, to the bed frame is used. The soft wall is secured with bolts and nuts.
You can nail a soft headboard on a wooden or plywood base to the wall. Then the bed is pulled up.
They also make attached structures. This soft bed upholstery does not require additional fasteners. Its stability is ensured by the legs.
An easy to make soft headboard for a bed made of pillows can be fixed with long loops on a rod mounted on the wall.

If a double bed requires reupholstery, you can sew a new headboard cover from jacquard or velvet fabric. Foam rubber is glued to the back and then covered. This is the simplest and most accessible method.
A headboard of any shape enhances the decor of the bed. A soft or hard structure is chosen depending on the planned increase in comfort and the created interior style solution.
What do you think, is it worth making a headboard for a bed yourself or is it better to purchase it ready-made? Share your opinion in the comments. Save the article in your bookmarks so as not to lose useful instructions.


I removed the vertical blinds from the windows. It would be a shame to throw it away. Maybe they can be used for a headboard?
Blind slats serve as a good material for updating the headboard. They are released from the ropes. Then the foam rubber is cut to the size of the headboard. Cut the planks so that they are 20 cm longer than the foam blank. Glue the planks end-to-end, carefully covering the ends of the foam rubber. The ends are brought out inside out. If desired, the planks can be secured to wooden blocks, making a slatted structure.
I'm interested in handicrafts. I really like macrame. I wonder if it’s possible to make an unusual headboard for my bed with my own hands?
Panels are made using the macrame technique. Thick elastic threads are used. Give preference to neutral shades.Silver headboards that are mounted on the wall look impressive.