Comfortable dressing room made of plasterboard - step-by-step creation plan with drawings and recommendations
In many apartments wardrobe is not planned, but large quantities of things, especially seasonal ones, need to be stored somewhere. An ordinary closet does not solve this problem, so most people are thinking about building large storage spaces. And here two questions arise - where to build and from what.
The second question concerns the family budget. The cheaper the selected material, the lower the cost of the dressing room will be. Of all the options offered today, a plasterboard dressing room is the ideal solution. Moreover, it will not be difficult to assemble it with your own hands.
The content of the article:
Options for implementing a dressing room
Here you need to decide on the construction site - choose a room in the apartment where the dressing room will be built. Wet rooms are removed from the list. What remains are the living rooms, balcony or loggia.
The choice here is not so simple. Because constructing a dressing room from plasterboard means reducing the area of the room itself. Therefore, the bedroom is most often used for this. Instead of a wardrobe, a dressing room is built against the wall.
Although the option on the balcony, especially on the loggia, is optimal. But you will have to carry out insulation, and this is a serious expense of money. But in order not to reduce the area of the same bedroom, you can go for some expenses. Moreover, they are one-time use.
Purely in terms of design, a dressing room in any room is built the same way. This is an assembly of a metal frame, which is covered with sheets of plasterboard.Shelves can be made from the same material inside. It’s just that in different rooms the structures may differ in size, shape, and finish.
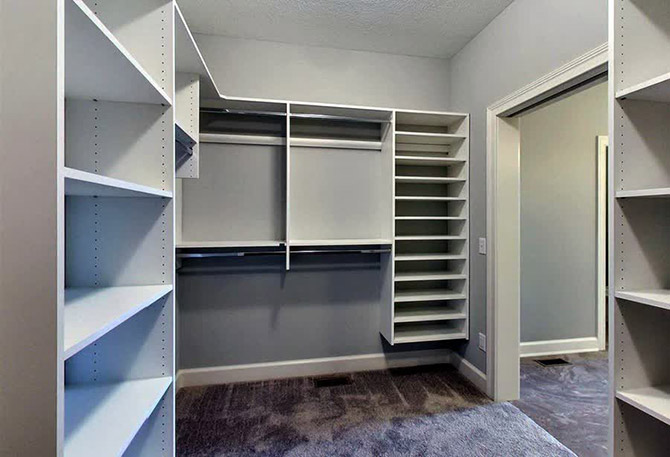
The design requirements are simple - strength, reliability, durability. The only thing you need to do is decide on the size first. There is information that the minimum is 1x1.5 m. You should not trust it, you should not invest money in such a small structure. Because it’s practically a mini-wardrobe.
A dressing room is a room. Therefore, its normal dimensions are 6-8 m². The minimum is 2x3 m. And if, for example, the apartment has a loggia measuring 2x6 m, then half of it can be used to build an ergonomic dressing room. The same goes for the bedroom or other room. There is no point in building a small room; it is better to replace it with a closet. And if we do build it, then it will have a normal, spacious area.
What else you need to consider when building a dressing room from plasterboard with your own hands:
- Door. Its design and location should not create interference when entering and exiting the storage room.
- Internal layout. To do this, you need to create a small project where the locations of storage areas will be indicated in detail.
- Functionality. The larger the area, the more functional the room. But you can install everything compactly and take into account different conditions of use. For example, hang a mirror inside or install a folding ironing board.
- A walk-in closet that solves a storage problem doesn't have to create a new problem. This usually concerns its location. One of the options is a corner one, which can reduce the passage to the next room.
Step-by-step plan for creating a dressing room from plasterboard
The step-by-step instructions for constructing a dressing room made of plasterboard are no different from other structures. Therefore, first of all, a project is created or a sketch is sketched on paper. It indicates the shape of the future room, specifies its dimensions, and also indicates the location of the storage areas themselves - mainly shelves, rods, etc.
The required materials are being calculated. To build a frame structure from plasterboard, you will need plasterboard itself with a thickness of at least 12.5 mm - wall plasterboard. Since a full-fledged partition will be erected, the frame will be covered with plasterboard on both sides. This must be taken into account. The same goes for shelves and niches.
It’s easier to calculate metal profiles, because there are standard sizes for installing them under sheets of drywall, and that’s three for each full sheet. Plus jumpers. Profiles for shelves and niches are also added here. It all depends on the size of the frame and its shape.
10% is added to the estimated amount of material, which will be spent on trimming and unforeseen expenses.
A frame is constructed and covered with plasterboard. Finishing is in progress. The last stage is installing the door.
Required tools and materials
Materials you will need:
- drywall;
- metal profiles: guides and racks (PS 50x50);
- self-tapping screws;
- putty;
- tape for sealing seams between sheets of drywall;
- finishing material for drywall - it is better to use water-based paint or wallpaper;
- laminated chipboard – for shelves.
From the tools:
- drill with drills;
- screwdriver;
- jigsaw or hacksaw with fine teeth;
- hammer;
- building level;
- construction plumb line;
- putty knife;
- tape measure with pencil;
- construction knife.
Designing a dressing room
It is not recommended to build a dressing room in the bedroom by eye. It is better to sketch out a drawing with dimensions on paper.
To do this, you need to draw a rectangular room in which to separate part of the space intended for a dressing room. Here, add dimensions to the nearest centimeter. The more precise the better. The location inside, for example, a bedroom, will already be clearly visible. And here you can play with the locations of other furniture by marking their dimensions.
Passages and free space will immediately form. It will be known for sure whether the owner of the apartment is satisfied with this arrangement. If not, then you can change everything on paper and find the optimal solution. For example, reduce the width of the dressing room. This is exactly what the project is created for.
The drawing will also be useful during the construction process. Profiles and sheets of drywall will be cut to its dimensions. This way you can avoid large waste of building materials.
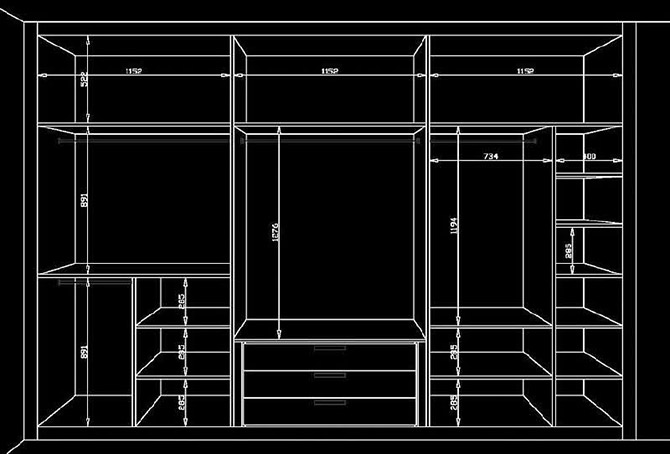
The project must indicate the location of the shelves and their sizes. There are standard sizes that can be taken as a basis:
- depth half a meter;
- the distance between them is 30-40 cm;
- for bulky items – 40-50 cm.
The height of the compartments where I will store long items is 1.5 m. We must not forget about the passage, the minimum width of which is 80 cm. All dimensions are recommendations. Changing them up or down is not prohibited.
Now the door - it can be hinged or sliding. It can also be made from plasterboard. The first one is easy to install and uses door hinges. For the second, you will need to buy a kit for sliding doors, since they are sold in all hardware stores. Its installation is more complicated, but you can figure it out and install it yourself.
If problems arise with the creation of a project, then you can take any drawing as a basis. For example, as in the photo below.
Markings on the wall
The main element of a dressing room that makes it a room is the partition. To do it, you need to apply a single outline in the same vertical plane on the ceiling, floor and walls. To do this, you can use a laser level. A mark was placed from the wall of the room inwards along the floor or walls, which will determine the depth of the dressing room. A contour is established along it using level rays along the perimeter of the future partition.
There is no laser level, you can do it differently. 2 marks are placed on the ceiling near two opposite walls, indicating the location of the upper edge of the partition. These marks are connected to each other by a line.
From them, 2 marks are also lowered to the floor using a plumb line, which are also connected by a line. Now, in pairs, marks on the floor and ceiling along the walls are connected by the same lines. They must be vertical, for which it is better to additionally check them with a building level. The outline for the partition is ready.
Now on the wall itself, which will be the back wall of the dressing room, you need to strictly according to the selected drawing outlines that define shelves, niches, places for drawers and other things.
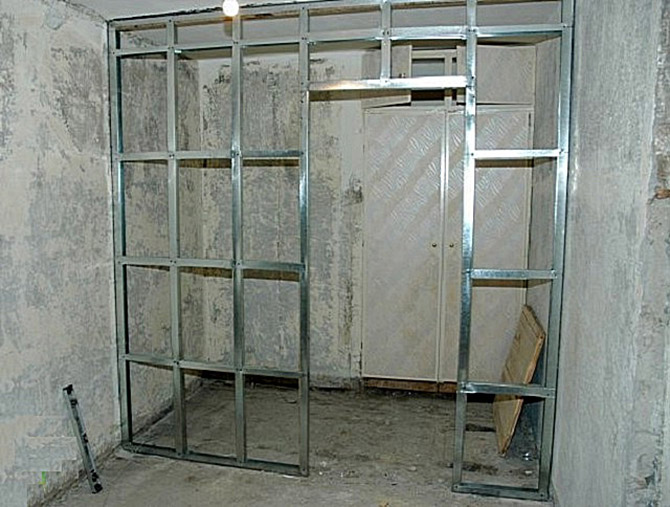
We create the frame of the dressing room partition
Along the drawn contour lines, holes for plastic dowels are drilled with a drill or hammer drill every 30-40 cm. The latter are immediately driven into these holes using a hammer. Along the lines - on the ceiling, floor and walls - guide profiles are laid, which are attached to the planes of the building structures with self-tapping screws. The latter are screwed into the installed dowels with a screwdriver.
Next you need to install the rack profiles.The carriers will be installed vertically. The distance between them is equal to half the width of the drywall sheet. It is equal to 120 cm, which means that you will have to retreat 60 cm from the wall. The same size is between the racks. The rack profiles are attached to the guides with self-tapping screws.
You need to immediately mark the location of the doorway. Along its edges, regardless of the distance between the posts, 2 vertical PS elements are installed.
Now the entire frame structure of the partition must be made rigid. Sections 65 cm long are cut from the same steel rack profile. They are laid across the vertical elements, to which they are attached with pins. The distance between the crossbars is 50 cm. One must be a multiple of the length of the plasterboard sheet, which is 2.5 m. Mounting methods vary.
The height of the doorway is also determined by the crossbar. These elements are not installed inside the opening. In the end, you should end up with a design like the one in the photo below.
Now we need to start laying the electrical wiring. The lighting fixture should definitely be present inside the dressing room. The presence of an outlet is not always appropriate, but this is at the discretion of the apartment owner.
Lighting requirements:
- use LED bulbs or strips;
- lay the wires in grooves, boxes or corrugations;
- The switch can be installed inside or outside the dressing room.
Creating a shelf frame
If the shelf will be mounted not on the opposite wall from the door, but along the storage room, then a frame from a profile must also be made for them. The latter can subsequently be sheathed with plasterboard, or cut laminated chipboard can be laid on top.
The frame itself is made in a horizontal plane, supported by 2 adjacent walls of the room and a constructed partition.Therefore, the depth of the shelf in this case is determined by the installation location of the first rack from the wall. This distance is 60 cm.
Now sequentially:
- Guide profiles are installed along two adjacent walls at the shelf mounting level. They will be perpendicular to each other. Fastening to the walls - self-tapping screws on dowels.
- From the first rack of the partition to the guide installed on the opposite wall, a rack profile is mounted in a strictly horizontal plane, which is checked by the building level.
- Now the rack profiles cut to the required size are laid across and secured. They will create a horizontal plane of the shelf. The distance between the crossbars is 30-50 cm.
In dressing rooms in which the wall opposite the door is the wall of the room, for example, a bedroom, it is better to organize shelves and other storage elements on it. It is wide, there is a lot of space.
There is no need to form a complex metal structure on it. It's more expensive and more complicated. It is better to attach mounting brackets, or shelf supports, to this wall. And then place pieces cut from laminated chipboard on them, which will become shelves. The brackets have holes through which the chipboard is attached to them with small self-tapping screws.
Between the shelves you can form niches - a small free space for long things. Here you need to install 2-3 powerful brackets, on which a crossbar made of steel furniture pipe is placed.
You can get by with little money and effort, without constructing a metal structure that still needs to be sheathed with plasterboard.
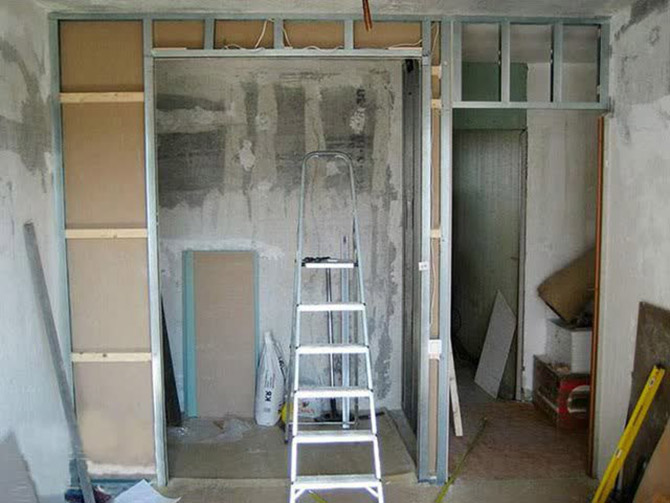
Sheathing with plasterboard sheets
And yet you can’t do without plasterboard sheathing. First of all, this concerns the dressing room partition.First of all, solid sheets of drywall are installed, which do not require trimming. They are laid on the frame so that their edges fall in the middle of the rack profiles. The two sheets must be joined on one profile exactly in the middle.
Other requirements for installing drywall:
- screws are screwed every 10-15 cm into each element of the partition frame;
- the place of screwing from the edge of the sheet is 1.5-2 cm;
- the head of the fastener is recessed into the drywall to a depth of half a centimeter.
But not all drywall will be laid in complete sheets. Something will have to be cut to the required size. It's easy to do:
- apply markings;
- cut the cardboard exactly along the lines and deepen the knife into the plaster layer;
- place the sheet along the edge of the table exactly according to the trim;
- lightly press on the hanging edge of the drywall - it should break;
- Use a knife to cut off the bottom cardboard layer.
Now to the question of insulation - should thermal insulation material be placed in the wardrobe partition or not. Not necessarily, although everything is at the discretion of the apartment owner. If it is decided that there will be insulation, then this is the very moment. The insulation is placed in the frame over its entire area. Next, the partition structure from inside the dressing room is sheathed.
Decor and finishing work
A plasterboard partition is a structure that requires improvement. The joints between gypsum board sheets are filled with putty. Before it dries, reinforcing tape is immediately laid. It can be perforated paper or in the form of a fiberglass mesh. The latter is called serpyanka.
On top of the tape - another layer of putty. Then the entire drywall surface is coated with a primer. When it dries, puttying of the entire plasterboard structure begins.Usually the putty solution is applied in 2 layers - one leveling layer, it is thick, the second finishing layer is thin. The second is applied to the first after it has completely dried. It is better if it is pre-primed.
As soon as the putty has dried, you need to go over the entire area with fine sandpaper. In this way, traces of a spatula and small particles of solution are removed. The last thing is another coat of primer. All that remains is to decorate.
It should fit exactly into the interior of the room. And if the walls of the latter are covered with wallpaper, then the partition should also be designed like this. But this is optional.
The easiest way to decorate is to coat drywall with water-based paint. It is applied with a paint roller in 2-3 layers. There is no need to wait for one layer to dry. Application technology: wet.
Installation of a door in a dressing room
You can make a door out of plasterboard with your own hands. But it's better to buy ready-made. With swing doors everything is simple. It, together with the door frame, is installed in the opening and attached to the risers of the partition frame with long self-tapping screws.
In order for the racks to withstand the load from the door, at the stage of constructing the frame, wooden blocks with a cross-section of 50x50 mm must be installed in them. And this is their entire length with fastening to the floor and ceiling using corners. After installation is completed, the gaps between the frame and the partition frame are closed with platbands. They are attached to the door frame.
If a sliding door model is chosen for the dressing room, then its kit includes detailed installation instructions. We must strictly follow it, without even the slightest deviations to the side.
A dressing room made of plasterboard is a rational design, even if it is a corner dressing room. It is more spacious than a closet.It is possible to independently decide the location of storage places, their shape and size. It's cheaper than a large store-bought or custom-made wardrobe.
Does any of the readers have experience building such a dressing room? It doesn’t matter if it’s made of plasterboard or other material. Write in the comments why you suddenly decided to build it? Was it difficult or not? Did you encounter any problems during the assembly process?


