How to make shelves for a bathhouse with your own hands: detailed instructions, drawings, assembly and operation
Steam room - heart baths, in which 2 important elements are installed: an oven and shelves.One warms, the other sits or lies, taking bath procedures. And if everything is clear with the stove - it must warm the room to a certain temperature, then you need to sort out the wooden shelf. Especially if the task is to make shelves in the bathhouse with your own hands.
The content of the article:
Choosing durable material for a bathhouse shelf
The classic material for making a bathhouse shelf is wood. They still haven't found a replacement for him. Therefore, there is no need to resume your search among modern materials. You just need to know what type of rock to use for this structure.
More often, shelves are made of aspen, alder or linden. Causes:
- high density of fibers per unit volume;
- low thermal conductivity of the material;
- resins are present in wood, but in small quantities;
- easily tolerate high temperatures.
Recently, an African species called abashi has appeared on the Russian wood market. The price is high, the characteristics are inferior to aspen.
From coniferous species, you can use cedar. It contains resin, which will begin to release at high temperatures, which will negatively affect the quality of use of the shelf in the bathhouse.
To avoid this, you need to choose the right cedar lumber. Typically, resin is present in places where the main trunk meets the branches. That is, the fewer knots in the material, the less resin discharge there will be.
Characteristics by wood species:
- Aspen.It is important to choose high-quality material for a bathhouse shelf, because aspen boards can hide invisible defects, which under the influence of changes in humidity and temperature will become visible. And this will subsequently affect the quality of the shelf in the bathhouse.
- Linden is the best option. The material is beautiful, retains its smoothness for a long time, and is easy to process, which is important when building a shelf with your own hands. Gives off a pleasant smell.
- Alder. It has been used since time immemorial. We can say that this is a traditional wood used in baths. It practically does not absorb moisture, so it rarely cracks. If you make shelves for a bathhouse with your own hands for a long service life, then this is one of the best options. Alder can be black or light, the color practically does not change over time.
- Birch. Lumber from this tree is the cheapest. And although birch is considered a furniture wood, it will not last long in extreme bath conditions. Cracks, warping, peeling are just a few of the things you can expect.
- Oak is the strongest and most durable, but expensive, so its popularity among bathhouse owners is low.
- Maple is not the most popular type of wood for baths. He's simply underrated. Its advantages: not afraid of humidity, wide range of shades, beautiful texture, long service life, price in the middle segment.
- Cedar also costs a lot of money, but is not inferior in strength to oak. Easily withstands high humidity and bath temperature, under the influence of which it emits a pleasant smell.
- Larch. Advantages: high strength and density, not afraid of high humidity and temperatures, long service life (other breeds cannot compare with it). There are two disadvantages: high price, difficulty in processing.The latter is important if the shelf is made by hand.
Step-by-step instruction
First of all, you need to choose the type of shelf. There are three of them:
- bench, also known as a bench;
- bed;
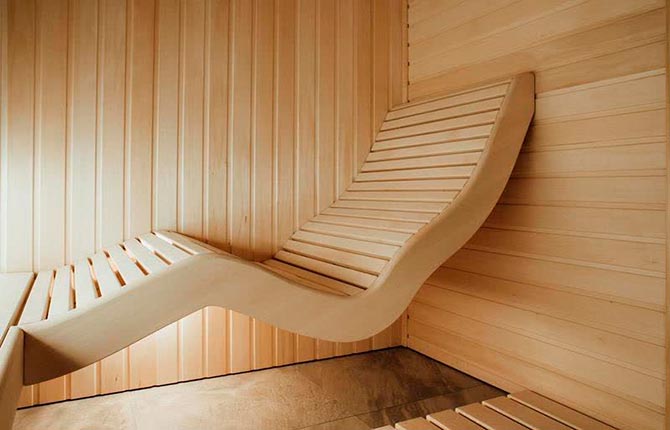
- chaise lounge.
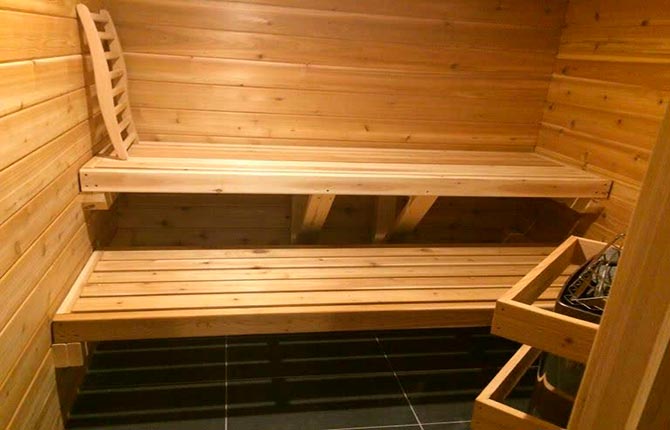
The latter began to be installed in bathhouses as a tribute to popularity, although their practicality is low. The other two are usually arranged into one shelf. Benches are installed at the bottom, sun loungers at the top. For example, if the shelves are a two-tier structure, then the two lower shelves are benches, and the top one is a couch. A lounger is a wide shelf on which you can lie down and relax. Bathing procedures take place there - they whip with brooms, wash, etc.
As for the step-by-step instructions, after choosing the type of shelf you need to decide on the size of the wooden structure. Here everything depends on the size of the steam room in the bathhouse and the installation location of the structure. It is better to make a drawing to scale, where both dimensions and location are indicated.
Next, the necessary materials are purchased in the quantities indicated in the drawing. This applies not only to lumber, but also to fasteners and impregnations. The last stage is the assembly of the structure.
Choosing a drawing and design
Before you make shelves in the bathhouse with your own hands, you need to decide on the version of the drawing that will not seem the most difficult. The more complex it is, the more money you will have to invest and the more time you will have to spend.
The first thing you need to pay attention to is the dimensions of the shelf - its height and depth. With the first parameter, this is the case - if a person sits on the top shelf, then there should be a distance of 30-40 cm from his head to the ceiling of the bathhouse. Speaking approximately, then from the ceiling surface to the surface of the top shelf there should be somewhere around 1.2-1, 3 m. The bottom shelf should be at a distance of 20-40 cm from the floor.The distance between the shelf tiers is 40-60 cm.
Now with depth. The upper level should be wide - 80-90 cm. This makes it more convenient to lie down and take bath procedures. The lower one is within half a meter.
Length has no restrictions. A two-meter shelf in a bathhouse is an ideal design. But it all depends on the size of the steam room. If a two-meter structure fits in it, then it should be there.
If we talk about a simple design that you can make with your own hands, then it is frame. A frame is made of bars or boards, which is covered with panels of slats or boards. Shields can be stationary or removable. The second option makes it possible to sometimes dry the flooring outside and carry out repairs outside the bathhouse.
Structurally, you can make shelves in a bathhouse in the following form:
- Stairs, that is, steps. Traditional model, easy to manufacture, convenient and practical.
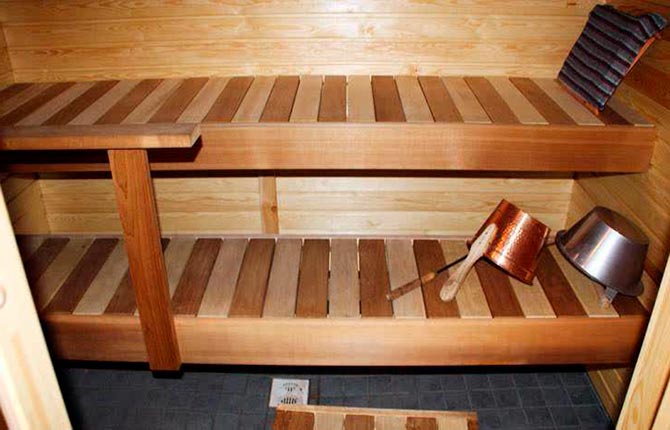
- Coupe. This is when one shelf is located directly above the other, like couches in a railway carriage. This option saves space in the bathhouse. But to climb onto the top shelf, you need to substitute a chair or stool.
- Angular. This is an increase in seating in the bathhouse, increased functionality of the steam room, and the opportunity to gather in a large group to socialize.
If the steam room has window openings, then there is no need to install shelves next to them. There is a possibility that the glass will crack and shatter, causing injury to a person.
The frame of the shelf in the bathhouse is attached to the wall, because the structure must be stable. But this is optional. The wooden flooring is attached to the frame, but it is necessary to leave free space between the shelf and the wall. Its size is 8-10 cm. This is a kind of ventilation, plus - condensation flowing down the wall of the bathhouse will not collect on the seat.To increase the possibility of drainage, it is better to make the flooring with gaps - leave 1 cm gaps between the boards.
There is another type of design. It is also framed, only the back of the shelf is not vertical posts, but a horizontally laid board that is attached to the wall. It is the supporting element on which the rest of the main structure will rest.
What materials are needed
To make a frame, you need bars or boards. Lumber is called lumber with a square or rectangular cross-section, the maximum size of one of the sides of which does not exceed 100 mm. Anything larger than this parameter is timber.
It is better to choose a running material for this - bars with a section of 50x50 mm. They have a high load-bearing capacity, which can be easily increased by installing vertical posts more often. But here it all depends on the model of the bath shelf. Because sometimes you need to use bars of a larger cross-section, for example, 50x70 mm, to make protrusions on which panel boards will be laid.
If the second type is taken as the basis for production, that is, not with rear support posts, but with a supporting beam, then you need to choose a board for the latter. Here it is - the thickness is at least 50 mm, the width is selected based on how many load-bearing elements will be used.
For example, if you make a three-tier model, then 2 load-bearing boards 70-100 mm wide will be fine. If you reduce the width to 80 mm, then it is better to install 3 support elements under each level. They are simply laid on the wall of the bathhouse at the level of the shelves, and attached to it - often with metal dowels.
The amount of lumber depends on the size of the shelf in the bathhouse.
Next are materials for decking. They sit on them, lie on them, and all this is naked.Therefore, sharp protrusions and corners will only be a hindrance. Hence the conclusion - you need a material with no sharp protrusions. This is planken - a type of lining. It is more expensive than a floorboard, but not so much as to reduce the comfort of your stay in the bathhouse. Therefore, the recommendation is to purchase a plank with a thickness of 15-20 mm.
The width does not matter, because it must be selected based on the multiplicity of laying the boards, taking into account a gap of 1 cm, so that there is no need to cut the lumber to width. But even here it is necessary to take into account the distance between the support posts. If flooring boards are laid longitudinally, it is better to use them wider. Load bearing capacity is higher. If laying is carried out crosswise, the width can be chosen smaller. The same applies to the thickness of the planken.
Now about fasteners. The metal gets very hot in a steam bath, and touching it can cause a burn. But there is no better metal fastener. Therefore, it must be used so that it is not visible and it would be impossible to touch it. Self-tapping screws, bolts and nuts, steel angles and tapes - all this can be used in the process of assembling a shelf in a bathhouse.
Assembling the shelf in the bathhouse
Before moving on to the step-by-step manufacturing instructions, you need to prepare the tools:
- tape measure and pencil;
- screwdriver;
- chisel;
- drill;
- saw;
- wood sander.
The first stage of the assembly scheme is the preparation of the necessary lumber. It is necessary to cut structural elements from bars and boards, taking into account their dimensions according to the prepared drawing. A saw is used for this.
The second stage of the assembly manual is processing of lumber. It is necessary to remove burrs, splinters and other defects that, when using the shelf, can leave unpleasant splinters in different parts of the human body.A grinding machine is used for this. More attention to the flooring. And although planken is a ready-made and smooth wooden product, cuts with a saw will leave sharp edges and burrs on it. You need to get rid of them first.
At this stage, it is necessary to treat the wooden elements with impregnations made from natural ingredients so that they protect the wood from rotting and cracking. Chemical compounds at high temperatures will begin to release harmful elements into the steam bath, which can lead to poisoning of people.
For information, look for the composition on the packaging or label of liquid impregnations. It should include vegetable or mineral oils (linseed, vaseline), turpentine. This composition penetrates deeply into the wood, making it moisture-proof.
Many bath attendants with extensive experience do not recommend treating the flooring with impregnations. The tree must be, so to speak, alive. It should be in direct contact with the human body, giving off the accumulated heat. But over time it will darken. This only means that the bathhouse is being used.
How to make a frame
The first frame type, only on support posts, is made in the form of a bookcase, taking into account protrusions for seats and a lounger. For example, like the one shown in the picture below. It's not difficult to make.
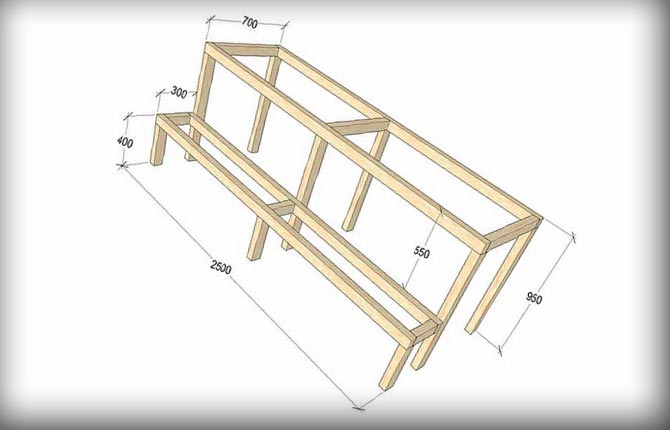
First you need to make a frame for the sunbed. Three high racks are tied around the perimeter with bars of exactly the same cross-section. An additional cross member is installed inside the resulting structure, increasing the rigidity of the structure. Its location is intermediate racks.
All connections are steel angles with self-tapping screws. You should not use pins made of wood here because the metal fasteners will not protrude outward.
Next you need to make a frame for the bottom shelf. Here it is better to first make a frame for the flooring, then attach 3 short supports to it. A rectangular structure is assembled with the installation of a cross member. Racks are mounted along one of its edges. The same fasteners are used here.
All that remains is to attach both parts to each other. This can be made easier by using steel angles and self-tapping screws.
How to make a deck
There is an opinion that the thicker the boards of the seat and lounger, the better. This is actually true, because a thick board absorbs heat and remains in this state for a long time. It effectively warms up the human body.
Making a flooring means assembling a kind of lattice. The parts of the structure will be connected using self-tapping screws. Therefore, they must be screwed in from the reverse side. How to do it correctly:
- The longitudinal elements are laid - the upper main ones, on which they will directly sit or lie. The distance between them is 1 cm.
- The same boards as the top ones are laid on them in the transverse direction. Their number is determined by the distance between them - 50-100 cm, that is, 2 at the edges, the rest are intermediate.
- All elements are connected to each other with self-tapping screws.
Here it is necessary to say separately about the fastener. If a plank with a thickness of 20 mm is chosen for the seat flooring, then the total thickness of the 2 planks will be 40 mm.
Therefore, to fasten them you need to take a self-tapping screw 35 mm long. It will secure both boards well together, and its sharp end will not protrude beyond the top.
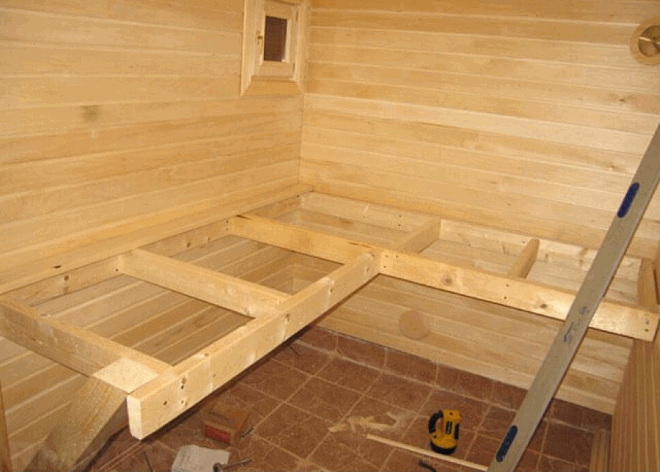
The wooden flooring for the bathhouse is ready - it needs to be laid on top of the shelf frame. These turned out to be removable seats and a lounger. If you attach the flooring to the frame from the bottom side, you will get a permanent model.Install to the back of the hinge - there will be a folding design.
How to make a support-free shelf in a bathhouse
Essentially, this is a frame made for the flooring of a seat or lounger. It is a rectangular lattice. The same as in the previous version, only without racks.
To make such a frame so that it is strong and reliable, you need to use the widest bars with a thickness of 50 mm. The best width is 90-100 mm. And the ready-made frame for the flooring is placed against the wall of the bathhouse, and secured to it. Fastening method - any, even with 200 mm nails. Safety of use is important here. But to increase it, you need to add jibs to the design. They are clearly visible in the photo. The more jibs, the more reliable the shelves.
If the bathhouse is small, then the shelves can also be made without racks. Again, a seat or lounger is made in the form of a deck with a frame base. And this whole structure is attached to the walls, but not to one, but to 2-3, as shown in the picture.
You can make the shelves removable. Then, under each of them, horizontal supporting bars are attached along the perimeter of the installation along the walls of the bathhouse. The seats are placed on them.
The third option for a non-supported shelf design in a bathhouse. It is combined - there are racks, but they are not present everywhere. Namely, against the wall. The load falls partly on the wall because it acts as a support.
To do this, the entire structure is assembled without installing and fastening the rear support elements. The frame of the top shelf is attached to the wall of the bathhouse. Self-tapping screws, nails, using steel angles - any fastener will do.
How to make fasteners correctly
The main task is to ensure that the entire structure does not adjoin the surface of the bath wall. A gap should form in this area. This can be done using a spacer.These are small wooden inserts. They are installed between the shelf and the wall. Most often, installation is done near fasteners.
How to do it easier:
- Through holes are made in the frame board for the flooring, for example, for long screws.
- The shelf is placed against the wall and pre-prepared screws are screwed through these holes.
- They are not screwed in completely; the main task here is to determine the exact location of the fastener.
- Spacers are inserted between the wall and the shelf next to the fasteners.
- The screws are screwed in all the way, the spacers are pressed against the surface of the bathhouse wall.
Some useful tips:
- the more fasteners, the more securely the structure is attached to the wall;
- it is better to make small spacers that fit on both sides of the screw;
- increase the strength of the construction of a pair of jibs from the outer posts to the rear board of the shelf.
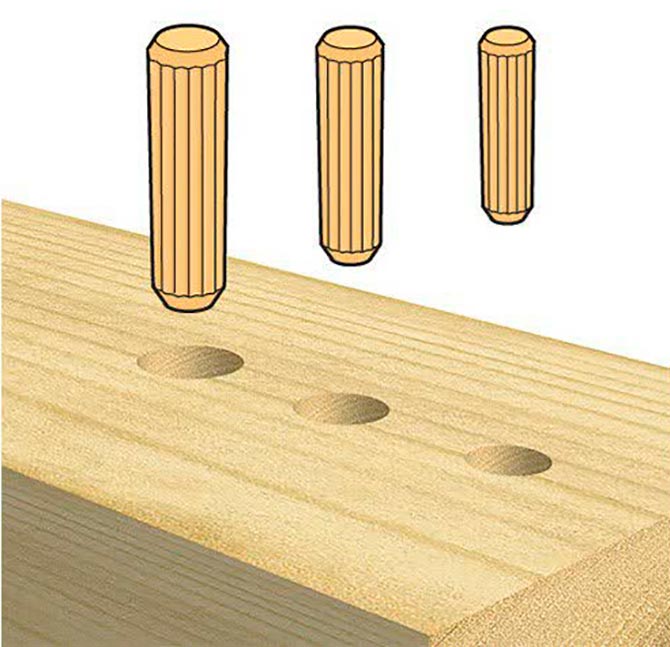
How to make a pin connection
To avoid using metal fasteners, you can try using wooden pins for connections. Their use on the entire structure is unjustified, but it is possible to make a flooring for the seat in this way.
To do this, you need the pins themselves - cylindrical wooden sticks. In hardware stores, fasteners are sold in different diameters. For a bath it is better to use oak.
How to make a pin connection:
- 2 wooden elements that need to be connected are applied to each other.
- The joint should only overlap.
- A through hole is made using a drill exactly in the center of the connection.
- A pin is driven into the hole.
A few notes;
- The pin must fit into the hole with interference, for which the diameter of the latter should be slightly less than the diameter of the fastener.
- The place where the pin is installed is filled with glue for wooden products - but it is better not to use the adhesive composition for furniture in the bathhouse.
- It is better to use grooved or spiral pins rather than straight, smooth ones. The former have higher connection strength.
How to care for it to last longer
Wooden blocks, boards, slats and other lumber lose their characteristics under the influence of changes in humidity and temperature inside the bathhouse. First of all, their appearance changes - the wood darkens. Then the strength decreases. Colonies of harmful microorganisms, cracks and other defects appear on the surface. The tree emits an unpleasant odor.
The main enemy of wood is water and high humidity. Previously, the elements of the bath shelf were dried by taking them outside. What we recommend doing now. The more often the better. Optimally - after each bath procedure.
Treatment of wooden parts and parts with impregnations is important. Pure linseed oil will do. After application, it takes time for the composition to be absorbed into the wood and make it waterproof.
There are many folk methods on how to extend the service of a regiment in a bathhouse. One of them is to take a terry towel, soak it in hot water and wipe with force all surfaces of the wooden structure. Then dry the structure.
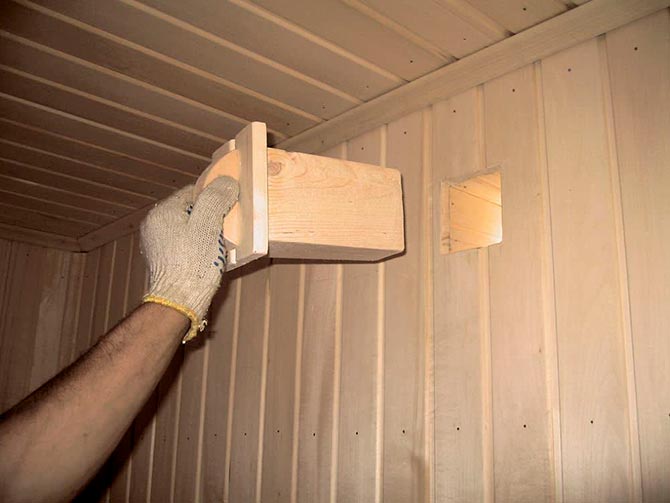
Well-functioning ventilation in the bathhouse solves this problem at its roots. Effective removal of moist air will create conditions for reducing humidity inside the steam room. The shelves in such a room will dry quickly and will not rot. It is not difficult to make ventilation in the bathhouse - one through hole in the wall where the entrance door is located, one on the opposite one. The first should be located near the floor, the second under the ceiling.
A huge number of shelf designs makes it possible to choose and make the one that best suits a particular bathhouse. There is no point in building something serious and complicated with your own hands.
It is not a fact that you will get what is shown in the picture that you liked. It is better to stick to the position - to make an inexpensive option, but practical and functional.
Those who have already made shelves for the bathhouse with their own hands will respond. What materials and fasteners were used? What design was chosen? Was it difficult to do or not? What difficulties did you face? Share your experience in the comments.


My steam room is small, so I didn’t think for a long time about what kind of shelves to install in it. I simply installed support bars horizontally at the same level on opposite walls. I laid boards on them. I screwed the screws in as close to the walls as possible, and sank the caps deeper. The result is a hanging bench like this.
And I have a large steam room in my bathhouse. Corner shelves were installed in it. I did it outside under a canopy. The structure is three-tiered. I did all the parts separately. Then I also brought them in separately, taking into account the order of installation from the walls. All the blocks were connected to each other with metal corners and strips. I had to tinker a lot. It was very uncomfortable in some places. But I managed. The frame was treated with impregnations, but there are no benches or a sun lounger. This is what experienced people advised me to do.