What to do if your humidifier is leaking: finding the cause and recommendations for eliminating the leak
Household humidifier subject to operating rules allows you to create an optimal microclimate in your living space. But with it, like with any other equipment, problems may arise, including leaks and so on. Have you noticed a puddle next to a working device and don’t know what to do if the humidifier is leaking and is it possible to fix this problem yourself? Or is it better to contact a service center?
We will help you sort out these issues - our article discusses the possible causes of leaks and provides step-by-step instructions for identifying the location of the fault. We will also talk about what should be done to fix the breakdown, and in which case it would be more practical and cheaper to purchase a new humidifier.
The content of the article:
Safety precautions when repairing a humidifier
A humidifier is an electrical appliance, and the interaction of electricity and moisture can lead to negative consequences such as electric shock or short circuit (short circuit) for users. A short circuit can not only permanently damage the climate control unit, but also cause a fire.
Therefore, when identifying traces of leakage, first of all, it is necessary to take care of safety measures.
Why:
- de-energize the device;
- pour out the remaining water.
The last point must be completed to ensure that liquid does not get on the control board or any other electrical element of the structure during independent troubleshooting.

Instructions on finding and eliminating leaks
A problem such as water leaking from a humidifier can occur due to various reasons.
To identify the malfunction with minimal time and money and eliminate it, you should perform a number of actions by checking:
- correct assembly of the unit;
- validity of the guarantee;
- structural integrity;
- check the functionality of the electronics and other structural elements that ensure spraying.
Since the performance of a dripping humidifier may depend on each of the listed actions, you should familiarize yourself with them in more detail - this will facilitate effective troubleshooting and allow you to make the right decision.

Step #1 - checking for correct assembly
Any humidifier has rubber elements in its design. Namely gaskets housings, filters, valves. They are designed to prevent leakage and overflow of liquid.
But it happens that these parts are installed incorrectly, for example, after replacing the filter or disassembling the housing to cleaning and maintenance. This leads to a violation of the tightness of the structure and loss of performance.
The described cause of leakage is common and easily removable even at home. Therefore, repairs should always begin with a leak test.Especially when the malfunction appeared after performing any manipulations with the humidifier.
Many models begin to leak if the filter is not tightly screwed on. If the humidifier has been in use for many years, leakage may indicate that the rubber structural elements have reached the end of their service life and need to be renewed. Which is technically simple and inexpensive to do, but there may be a problem with finding the right gaskets.
And yet, in most cases, the problem will be resolved quickly, for which you just need to correctly assemble the humidifier.

Sometimes, installation of the unit on an uneven surface leads to distortions and deformations that cause leakage. All that is needed in this case is to use a horizontal and strong support.
We recommend that you familiarize yourself with the recommendations for choosing the right one places to place a humidifier.
Step #2 - clarify the warranty period
If, after following the steps listed in the previous section of the article, you cannot achieve the desired result, then you should stop searching for the cause of the leakage and remember when the purchase was made.
If this was relatively recent, then you should find the documents that came with the humidifier and see if it is covered by a warranty.
If yes, then there is no need to waste time on troubleshooting yourself and just need to hand over the leaking unit:
- to a retail outlet, which carried out the sale;
- to the manufacturer's service center, whose specialists will be able to perform high-quality repairs or return the funds spent on the purchase of a humidifier.
If you still have the opportunity, you should definitely take advantage of the warranty provided by the manufacturer. Since this is the simplest and most effective way to avoid financial losses and time costs.
A significant disadvantage of contacting a service center is the long repair period - sometimes you have to wait months for the required part.
Step #3 - search for mechanical damage
Often the cause of a leaking humidifier is cracks, chips and other damage that occurs on the housing as a result of mechanical damage. Namely, during falls, impacts and any other critical loads.

In these cases, it is easy to identify the cause of humidifier leakage. For this purpose, it is usually sufficient to perform a visual inspection of the product body.
Eliminate leakage by replacing the failed structural element. But it should be understood that repairs are not always advisable due to their high cost. Since, in order to restore the functionality of the humidifier, it is often necessary to replace large parts of the housing, namely its lower or upper part.
If the area of damage is insignificant, then you can try gluing a plastic cover over the crack if it does not interfere with the assembly and functioning of the parts and components of the humidifier.
Sometimes the cause of leakage is damage or wear to the exhaust pipe.This is also easy to identify, but again the feasibility of repair in this case is questionable due to the high cost of the spare part.
Step #4 - checking electronics and mechanics
Studying the condition of the insides of the air humidifier should begin with those structural elements whose damage can be detected visually.
These include:
- water seal;
- distribution head responsible for the air supply.
A detail like gate often gets clogged. This causes liquid to be squeezed out of the product body through any nearby openings.

Distribution head allows you to adjust the air pressure. Since excessive performance or high air speed leads to some of the water splashing. In this case, you just need to adjust the humidifier.
But it happens that it wears out or fails for other reasons. Consequently, the malfunction can be eliminated only by replacing the distribution head, and sometimes the fan.
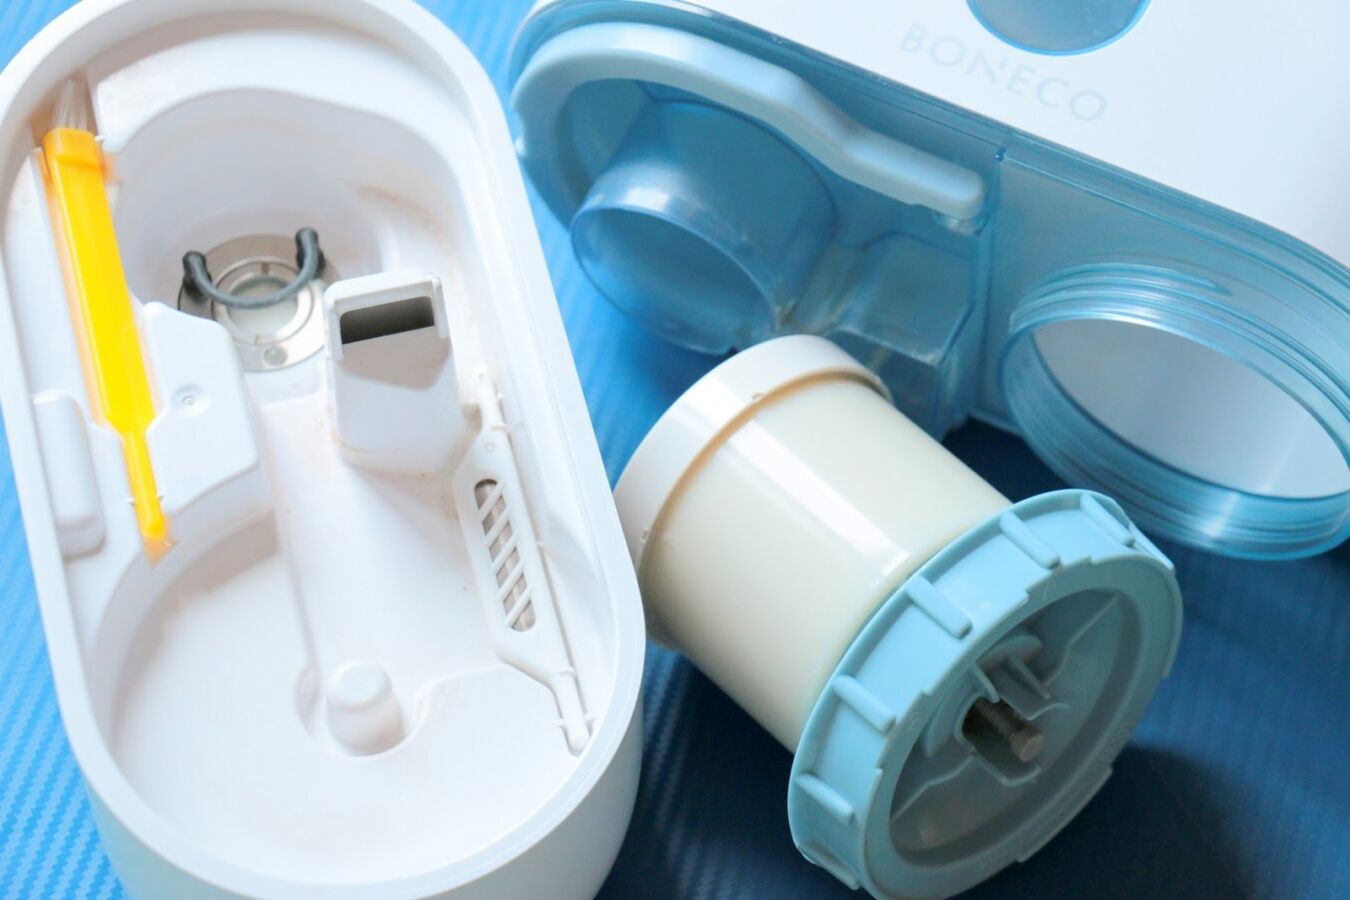
In design ultrasonic humidifiers a mechanism called a membrane is provided. Its job is to split water into tiny particles.But sometimes the membrane (piezoelectric element) fails, which can be easily determined by the absence of a characteristic “gurgling” sound during operation of the device. As a result, the fan does not blow steam out of the case, but drops of water, which leads to the formation of puddles of water around the unit.
These faults are eliminated by replacing the part. But, if replacing a piezoelectric element (even on your own) is quite simple, by removing the old one and soldering in a new one, then difficulties may arise in finding what you need.
In addition to leaks, there may be other problems with your humidifier. Therefore, we recommend that you familiarize yourself with most popular faults and ways to repair them.
Conclusions and useful video on the topic
The video attached below shows how to replace the membrane yourself. And most importantly, this material will allow you to become familiar with the design of humidifiers and how to disassemble them. This will simplify the task of finding and eliminating the cause of leakage:
Finding out why your humidifier is leaking is relatively easy, even at home. But it should be understood that a person who is faced with this problem for the first time may take quite a lot of time to solve it. Sometimes it happens that repairing a product is unprofitable - it’s easier buy a new humidifier.
Have you dealt with the problem of a leaking household humidifier yourself and want to tell other users about the nuances of the repair? Or do you still have questions about the topic of our material? Ask our experts, share your own experience - the feedback block is located below.


electrolux 3810d
the reservoir is filled from the tank, the humidifier seems to start working
but water continues to flow into the tank and overflows into the ventilation hole
The water level sensor is intended only to turn off the device when there is no water
but according to the physical principle, water should come out of a vertical tank; water has evaporated and is topped up, but in my case water continues to flow from the tank and what the problem is is not known; I haven’t found a solution to this anywhere on the Internet
THE TANK IS WHOLE!!! After filling a full tank of water and placing it on the table overnight, water does not leak from it
Probably no longer relevant. But a simple action helped me - remove the check valve (this is what prevents water from flowing out of the tank), remove and wash all the gaskets, remove and stretch the spring. Probably, the problem was precisely in the spring - it compressed and did not hold the gasket. Yes, when the tank is removed from the device, the check valve is maintained by water pressure, but while in the device it opens slightly. In general, it is not clear why no one on the Internet has such a problem. I myself disassembled and dried the control unit three times, then I studied the principle of operation, and except for the check valve, no one can be responsible for the overflow in this primitive design.
The humidifier was leaking. I tried stretching the valve spring, but it didn't help. The plastic on the tank window was cracked, I taped it with tape, it doesn’t seem to work, 2 launches were successful, I continue monitoring.
Hello! Humidifier Deerma DEM-F630. It stays inoperative for half a day, a day and begins to leak. What could be the reason?