Bathtub fittings: overview of types of drain-overflow systems + step-by-step installation instructions
Modern innovations also have an impact on the field of plumbing, where many interesting new products have recently appeared.One of them is the bathtub trim, which is also known as the “drain-overflow system.”
Initially, such devices consisted of two separate elements: a siphon and an overflow tube, the installation of which was carried out independently of each other. These parts were later combined into a compact design.
Installing a drain and overflow is not particularly difficult - any home craftsman can do the job. But first you need to decide on the type of strapping and become familiar with the technology of its installation. You will find all the necessary information in our article.
We outlined in detail the features of different models of plumbing fixtures, provided practical advice on choosing a fitting, and also prepared step-by-step instructions for installing the system on a bathtub.
The content of the article:
Operating principle and design of the device
A standard bathtub fitting is essentially a more complex design than a regular siphon. It comes with a special tube and controls that are attached to the overflow hole.
Thanks to the pipe, excess liquid is drained into the siphon, which prevents the bath from overflowing and water overflowing.

The drain-overflow system also makes it possible to control the outflow of water. To do this, a rotary handle is mounted on the overflow hole, connected by a small metal cable to the drain valve, which is installed in the lower siphon.
By turning the handle in different directions, you can adjust the tension of the cable, which in turn affects the drainage capacity of the siphon.
Types of plumbing products by material
Bath trims are produced in a wide range.
According to two fundamental criteria, there are two options for the accepted classification.
- according to the material from which the product is made;
- according to the technological features of the design.
The following materials are used for the production of most plumbing systems:
- high-strength polymers;
- non-ferrous metals/alloys - bronze, copper, brass;
- stainless steel, which is coated with chrome as a protective layer.
Let's consider the features of products made from different materials.
Option #1 - plastic
Systems made of high-strength plastic have the following features:
- long period of operation;
- the material does not collapse even with prolonged exposure to moisture;
- relatively low price;
- ease of installation and operation;
- smooth internal surface that prevents the formation of blockages;
- resistance to modern cleaning products, which often include aggressive chemicals.
At the same time, plastic piping with corrugation has certain disadvantages, the main ones being the excessive fragility of the material, which requires special attention during installation, as well as the softening of the polymer under the influence of hot water.
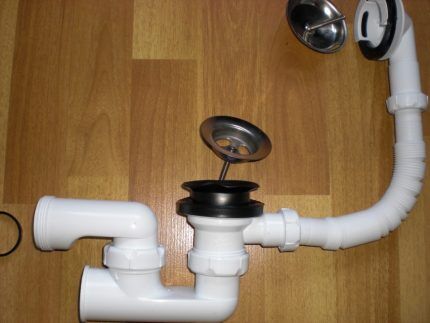
Hot water causes the pipe to deform in places where areas of stress have formed due to improper installation.
Option #2 - metal
Plumbing fixtures made of non-ferrous metals or polished/chromed steel are somewhat inferior in popularity to their plastic counterparts. They are strong and durable, but have a much higher cost.
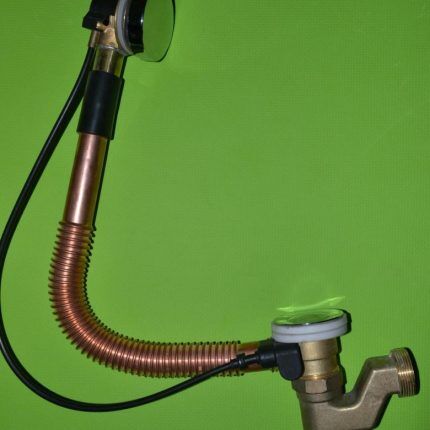
The disadvantage of such products is also the difficulty of installation: when installing the structure, it is necessary to precisely adjust the parts of the product using special tools.
Metal piping is prone to the formation of fat and other deposits; they can be damaged by active substances (acids, alkalis), which are sometimes added to household chemicals.
Design features of drain-overflow systems
According to technical features, models can be divided into the following categories:
- universal;
- semi-automatic;
- automatic.
The most popular is the first design option, characterized by its simplicity and affordable cost.
Simple universal devices
A characteristic feature of such devices is the well-known chain with an attached plug that closes the siphon drain. Such devices are mounted on standard bathtub models, in which the distance from the center of the overflow hole to the middle of the drain does not exceed 57.5 cm.
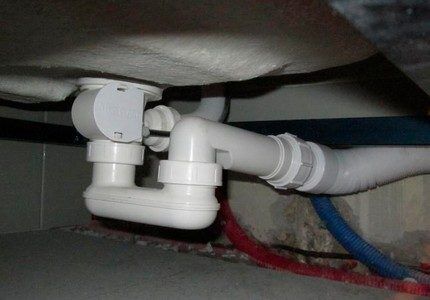
Installation of a universal type system is extremely simple; almost anyone can install it, even without much experience or special skills.
The device consists of four components, namely:
- siphon located directly under the bathtub;
- drain neck intended for the lower hole;
- lattice overlay complementing the previous component; the cover has a recess in which the cover is installed;
- a corrugated pipe that connects the upper overflow hole with a water seal designed to drain excess water to prevent the bath from overflowing.
Such bindings can be made from different materials described above.
Convenient semi-automatic strapping
Such a system differs from a universal one in the mechanism attached to it that allows you to regulate the drainage.To do this, not only a corrugated pipe is installed on the hole located at the top, but also a rotary handle connected by a metal cable to the bottom drain hole.
Moving the handle allows you to control the level of opening of the drain neck, making it possible to adjust the outflow of water without using a special cover.
In such systems, the overflow device is disguised as a control handle for the drain structure, which gives the system an aesthetic and stylish look.
At the same time, the design of the handle of the semi-automatic bathtub trim can be very diverse, namely in the form of:
- decorative valve;
- buttons;
- lever;
- rotary ring.
An important advantage of the design is comfort during use, since the handle is located at the top of the bathtub: the user does not need to bend down to the bottom or even wet his hands.
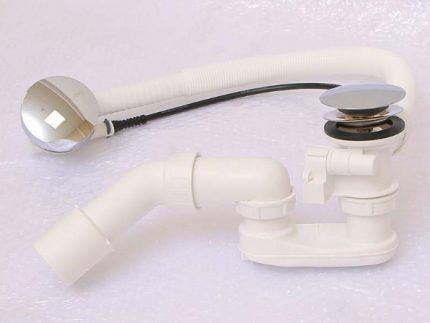
It is worth adding that the installation of the piping, which involves semi-automatic draining, is quite complicated for non-professionals, since it requires certain knowledge.
Automatic bath systems
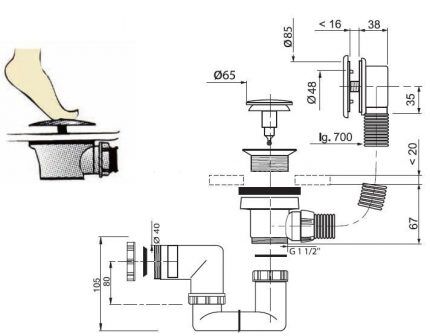
The functioning of this type of harness occurs without the use of cables and rotating elements. Like the previous device, the machine is equipped with an overflow pipe, while at the bottom of the drain there is a special valve: when you press it, a hole through which water goes into the siphon becomes accessible.
Pressing the lever is quite easy: you can do it with your hand or even your foot. The valve is also secured in a pressed position so that you do not have to hold it until all the liquid has left the bath.
The disadvantages of such products include:
- Fairly high cost. It is several times more expensive than a conventional mechanical device.
- The need for extra movements. You can only turn off the drain to fill the bathtub with water for a bath or use the tank for other purposes (for example, for washing) by bending down.
- Possible breakdowns. The most vulnerable part of the automatic device is the spring that holds the valve and drives it. If it breaks, you will have to completely replace the entire system.
When choosing such products, it is better to give preference to well-established manufacturers in order to reduce the risk of malfunction to a minimum.
Other types of devices
A subtype of the automatic system is a harness that has a filling option. Such models take on the functions of a bathroom faucet. A water pipe is connected to the piping, thanks to which the tank is filled using a mechanism located at the overflow hole.
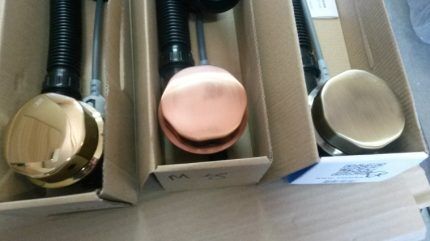
In addition, there are special models that are made at the request of the customer or manufacturer for non-standard bathtubs. They take into account the special sizes of containers and communications connected to them.
Features of device operation
To correctly install any type of harness, you must carefully study the instructions included with the kit: it contains a detailed installation diagram for the product. It is also advisable to study the properties of the material from which the system is made, as well as recommendations for operating and cleaning the structure.
Particularly important are the points that talk about the use of cleaning agents: some of them contain acids and alkalis that can damage metal parts, which will lead to the failure of the harness.
Installing a piping system on a bathtub
In order to mount the device, you need to purchase the device from a specialized store, as well as stock up on tools, the set of which may differ depending on the type of harness chosen.
Tools required to install the harness:
- To install a cast iron or steel siphon you will need a grinder with a cutting wheel (can be replaced with a narrow blade for metal of good strength) and a hammer.
- When installing an automatic device, you need to stock up on a small flat-head screwdriver, as well as a set of hexagons.
In addition, you need two screwdrivers (Phillips, flat), pliers, silicone sealant and cotton napkins.
Dismantling of old equipment
The work should be done in several stages:
- The first step is to thoroughly rinse and clean the outer layer of the bathtub, and then begin dismantling the old device.
- The outdated plastic siphon is unscrewed using pliers, and the overflow is removed with the same tool.
- The cast iron trim is removed using a grinder, into which you need to insert a 115 mm disc. The work is done in a circle, in sectors.
- After this, you should drive a flat-head screwdriver to pick up and remove the upper part of the old siphon adjacent to the bathtub.
The same manipulations (unscrewing or sawing) should be carried out with the overflow. Then you need to take a hammer and use it to try to loosen the siphon, and then pull it out of the sewer pipe.
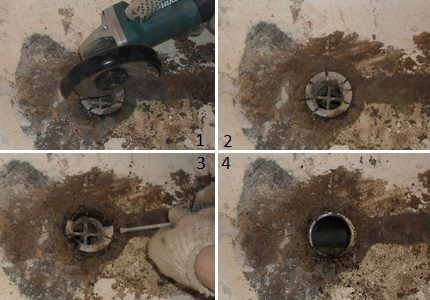
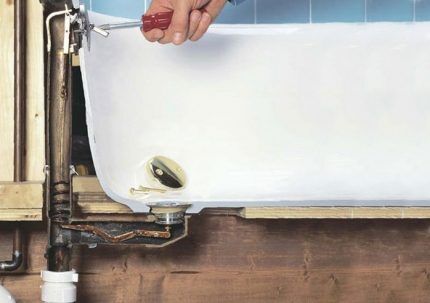
If you have difficulties with rusted bolts, you can use improvised means: a kitchen knife or a bottle opener. With these devices it is quite possible to cut the stainless steel and remove the lid covering the drain hole.
Dismantling the automatic system is quite simple. First of all, remove the plug and unscrew the mounting bolt with pliers or a wrench. To remove the overflow bolt, you need to unscrew the wing with a small flathead screwdriver. Having removed it, you need to unscrew the bolt and dismantle the entire structure without any problems.
Installation of a conventional bathtub trim
Assembly begins with the bottom gasket, which must be found in the kit (it is thicker than the top one). This part is coated with silicone and then put in place.
This is done in the following way: one hand slips the element under the bathtub from below, the other picks it up from above, tucking it into the hole.
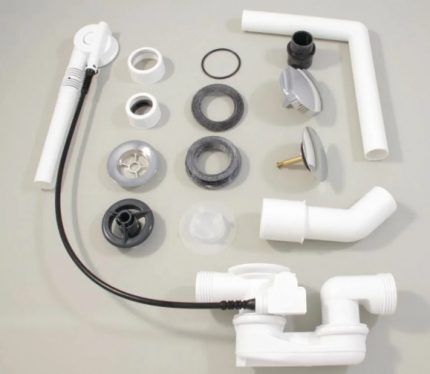
The lower counter part is installed from below, while the overflow mesh with a connected bolt is inserted from above. The structure is carefully tightened with a flat screwdriver. Movements should be made clockwise.
After this, it is important to find the upper overflow in the kit and disassemble it. To facilitate the installation of this important part, a silicone layer is applied to the gasket seat, so that the part will not fall off during installation.
A thin gasket is attached along the diameter of the seat circumference, which also needs to be coated with silicone to improve moisture resistance.
After this, a small corrugated tube is taken, which is slightly stretched, and then alternately put on the nut and the conical gasket - the wide side should be adjacent to the nut.
The corrugated structure is installed in its proper place and secured with a flat-head screwdriver. In this case, you should pull it slightly with two fingers, but this should be done carefully so as not to damage the plastic part. The bolt is first held with your fingers and then tightened with a screwdriver.
If the nut falls out, you can slip a piece of a bag inside or use other methods. The edge of the thin overflow corrugation is inserted into the drain hole, after which the plastic nut is tightened.
Assembling a new water seal (siphon)
The water seal serves to eliminate odors. It is easier to assemble it separately before connecting it to the rest of the parts. One end of it is attached to the drain hole, the other - to the outlet corrugation. The corrugation, in turn, is inserted into the sewer drain hole.
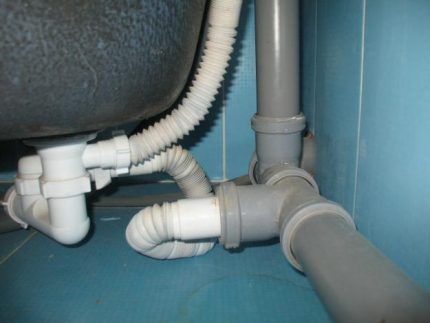
To check the quality of the assembly, just turn on the water and let it flow down the drain. If there are no leaks, the installation was completed correctly.
Step-by-step instructions for installing a siphon on a bathtub are given in this article.
Automatic fixture installation
Installation of the automatic siphon is carried out similarly to the procedure described above.
- First of all, you need to open the package and find the gasket that will be installed on the drain.
- Align it with the hole in the bathroom, so that the thinner part is at the top. If the siphon is placed on cast iron plumbing, it is advisable to cover it from the inside plumbing sealant.
- Unscrew the chrome-plated pressing front part from the overflow.
- The place where the gasket fits in a circle is treated with silicone to improve the strength of the connection. In addition, the gasket mounted on the sealant will not fall or move out of place, which simplifies installation.
- The resulting structure is pushed onto the overflow hole with one hand from the outside of the bath, while the pressing chrome part is screwed on with the other hand.
- The next stage is the lamb, which needs to be carefully placed on the rod. After installing the element, tighten the nut with a small flat-head screwdriver.This must be done with maximum caution so as not to damage the part.
- After this, it is important to start draining. The lower part of the structure is brought to the hole, while a drain mesh with a bolt is inserted on top, which we hold with our fingers. The connection is carefully tightened.
- Next, you should try on the plug with the adjusting bolt. To do this, you need to insert the drain mesh into the hole of the clamping bolt and tighten it if necessary. After this, the lock nut is adjusted, which should drop to the bottom mark and then rise again.
To complete the work, a gasket and nut are inserted into the water seal part; the mating part of the drain is installed and the nut is secured. A sewer pipe or corrugation with a diameter of 40 mm is connected to the counterpart of the siphon.
Having installed the automatic piping for the bathtub, you should conduct a test run to check its reliability.
You can also seal the problem area with silicone, but this process is not recommended for the trim that sits between the water seal and the top of the tub.
After installing the drain and overflow, connecting the plumbing to the sewer and water supply, you can build bathroom screen, providing the possibility of access to the strapping elements.
Popular manufacturers of flush-overflow systems
Among the companies that offer a range of different types of plumbing products are:
- "Aniplast" - a well-known Russian company whose products are of good quality and affordable price;
- Alkaplast – a Czech company that produces budget siphons with automatic lifting of the drain plug;
- Hansgrohe – a well-known German brand that produces high-quality expensive plumbing fixtures, including fittings;
- Jimten is a Spanish manufacturer specializing in plastic products. The products are distinguished by excellent performance characteristics and attractive design.
In specialized stores you can find products from other companies - domestic and foreign.
Conclusions and useful video on the topic
The presented video shows the detailed process of assembling a plastic siphon and connecting it to the bathtub.

When choosing a bathtub fitting, it is important to take into account not only the design features of the model, but also the reputation of the manufacturer: high-quality fixtures are durable and provide a guarantee against leaks.
To prevent such troubles, it is equally important to carefully perform all stages of installation, as well as pay attention to a thorough check of the assembled structure.
Are you looking for a reliable drain and overflow system? Or do you have experience tying up a bathtub yourself? Please leave comments on the article, ask questions and participate in discussions. The contact form is located below.


I want to try to install the harness on the bathtub myself. My bathtub is standard, cast iron, and the fittings, accordingly, are also old and also cast iron. It's probably been standing since the time the house was built.If I don’t see any problems with installing the new harness, at least from the pictures and videos everything looks simple and clear, then I feel like I’ll have to suffer with dismantling the old one. At the moment I don’t see any point in installing anything other than plastic; it lasts a long time and is easy to change. And who will see your beautiful chrome pipes under the bathroom, which also cost a decent amount?
Here, you know, everyone decides for themselves which pipes and piping to install. It’s clear that if all communications are hidden behind the screen, then installing expensive elements with chrome parts is a waste of money.
But there are options when bath screens are made from plexiglass, for example. In this case, piping made of chrome-plated pipes will be an excellent solution. In addition, I saw this option, where the backlight was made behind glass screens made of LEDs, it looks really cool. One of the clients even had this solution implemented; I’ll attach a photo to make it clearer.
Of the strapping options proposed in the article, I like the semi-automatic one the most. Here you get maximum functionality with minimal preventative maintenance. The automatic machine is more convenient, but you need to monitor it so that none of the elements fails.
I also don’t see the point in steel strapping. Unless the bathtub stands separately, on a podium, and all the pipes are visible. But this is true in large private houses, and in apartments, where every centimeter counts, plastic rules.
I have a regular harness with a plug on a chain. Actually, it was only then that I found out that there was a regulator that controls the outflow of water, and I wanted one for myself.