How to prepare a solution for plastering walls with your own hands: tips and tricks
If you properly prepare a solution for plastering walls, it forms a durable layer on the surface that can withstand mechanical loads, excessive humidity in the room and temperature changes outside.
The content of the article:
Composition and features
Before preparing cement mortar for plastering walls, you should understand the mixture recipe. It consists of three components - cement, sand and water, they are also a binder, filler and solvent, respectively.

In order for the quality of the leveling material to meet the standards, you must pay attention to the following:
- For plastering walls, cement grades from M300 to M600 are used. The higher the brand, the more expensive the material. But each of the options is used taking into account the purpose of the plaster. For example, M300 cement is used if it is necessary to level walls inside dry rooms. M600 – for wet rooms.
- Any type of sand can be used as a filler, for example river or quarry sand. The main thing is that the material is as clean as possible, that is, with a minimum amount of clay inclusions. Clay reduces the performance of the plaster mortar. Sand of fraction 20-40 mm is used. Before adding it to the mixture, it must be sifted to remove debris and large granules.
- There is only one requirement for water - it must be free of solid inclusions.
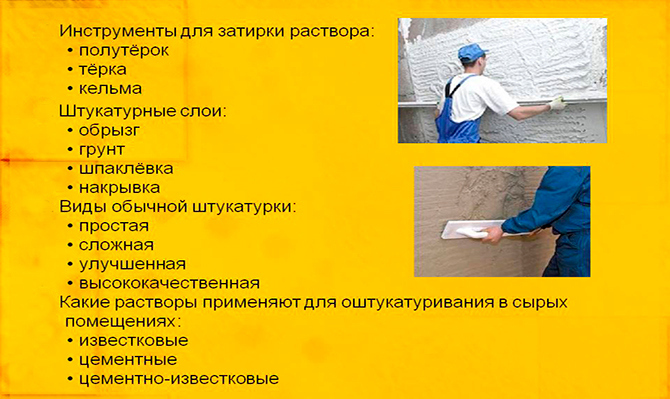
Cement-sand mortar for plastering walls is divided into three types according to quality characteristics:
- Simple.It is used when it is necessary to plaster walls in service-type premises where high quality finishing is not required.
- Improved - at residential, office or industrial complexes.
- High quality. It is a final finish, ready, for example, for painting. This composition is suitable for covering walls in houses, hotels, museums and other similar buildings.
Today, more and more often, additional requirements are placed on plaster mortar. They mainly relate to the technical and operational characteristics of the mixture. For example, increased moisture resistance, rapid hardening, resistance to harmful microorganisms (mold, fungus), increased plasticity for ease of work.
Therefore, different materials are added to the solution at the mixing stage:
- Alabaster, also known as building plaster. Its purpose is to make the solution quick-setting, that is, the hardening time of the mass is reduced. It is used for leveling slopes, during the installation of electrical wiring, and for sealing large defects in wall surfaces. Usually alabaster is added to a solution of cement and sand. Quantity – 25% of the total volume or mass of the cement-sand mixture.
- Gypsum is the same alabaster, only of a smaller fraction, hence its high quality. Plus - it does not dry at lightning speed, which makes the solution more plastic. This mixture is used for finishing corners, ceilings and hard-to-reach places. It is added to a solution of cement and sand in the form of an aqueous pulp.
- Lime. With the addition of this building material, cement plaster acquires a large number of positive properties - bactericidal, strength, moisture-resistant and others. This mixture will not crack on the wall. Lime is not added in its pure form.Lime milk is added to the solution - this is mixed with water in a ratio of 1:2.
- PVA glue. Firstly, it is added very little - 5% of the total amount. Secondly, with its addition, the plaster acquires additional qualities - low cracking, high adhesive properties, increased strength of the applied layer.
- Liquid soap. This material has only one purpose - to make the plaster solution plastic. It is added in an amount of 3% of the total volume of the mixture.
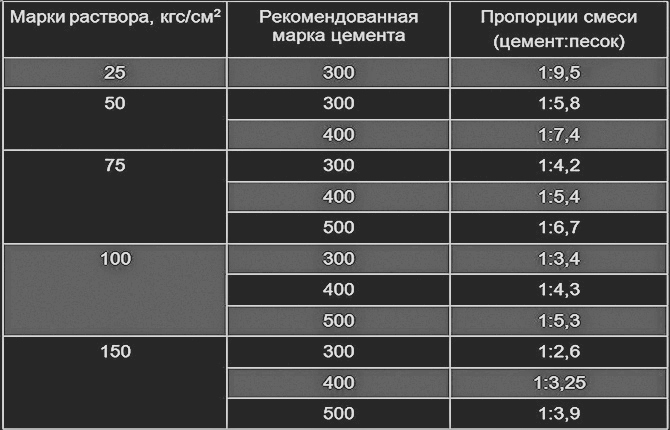
Proportions for cement-sand plaster
There is a classic recipe in which the ratio of cement and sand is 1:3. That is, one part binder, three parts filler. In this case, a certain brand of plaster mortar itself is obtained, but it depends specifically on the brand of cement:
- if the binder is grade M300, then the grade of the solution will be M100;
- if M500, then the mixture will be M200.
That is, the higher the grade of binder, the higher the grade of plaster.
But you can get the M100 grade of mortar from M500 cement. To do this, the recipe changes, that is, the ratio of the components added. It is 1:5, that is, one part cement, five parts sand. In this way, the desired brand of mixture is selected.
It seems that by changing the recipe, you can reduce the cost of the final product. But in order to add more cheap sand, you have to purchase an expensive brand of cement. So it is impossible to save money on this.
It is not difficult to mix the solution for plastering walls yourself. The main thing is to prepare the amount that will be consumed within an hour.Exceeding this time leads to hardening of the mass, which can no longer be used.
Procedure for preparing plaster:
- Cement and sand are poured into the container, mixed with a trowel or shovel;
- pour water, knead using a construction mixer;
- The resulting material is checked for readiness - the consistency should be creamy. A trowel is passed along its surface, leaving a groove.
How to prepare a solution for plastering walls can be seen in the video.

Additional components for plaster
Often other building materials are added to the plaster mortar, with the help of which the surface characteristics and decorativeness of the outer layer are enhanced. For example, they add:
- Coarse quartz sand. The plaster becomes moisture-proof. It resists the negative effects of acids and alkalis well. It is characterized by high vapor permeability, that is, it allows air to pass through itself, which is important for creating an optimal microclimate inside rooms.
- Fine fraction barite. The wall becomes a protection against radiation penetration. This is the type of plaster I use to decorate the walls in X-ray rooms.
- Foamed polystyrene crumbs. This type of plaster forms a thermal insulation layer on the wall.
- Metal shavings. The wall becomes impact-resistant and at the same time beautiful.
- Marble chips. It makes the wall strong, but additionally adds other useful qualities to the plaster composition - moisture resistance, the ability to withstand temperature changes well. When applied to external walls, such a solution is not afraid of natural loads. Aesthetic appearance is also a feature of marble plaster.
- Crushed mica.The plaster layer protects the building from ultraviolet radiation.
- Acrylic, resins (epoxy, polyurethane). The plaster acquires high waterproofing qualities.
- Liquid glass, stone flour, quartzite. Make the solution acid protected. Such plasters are used in finishing the walls of chemical industry buildings.
Preparing walls before applying plaster
Preparing the walls takes a lot of time. This must be done carefully and strictly according to the following recommendations:
- All old finishing is removed. For this purpose, well-known methods using construction tools are used. For example, paint is cleaned with spatulas. If some areas cannot be removed, use a grinder with a metal brush mounted on its shaft.
- Metal materials protruding from the wall (reinforcement, embedded parts) are cut flush with a grinder, the remaining ends are treated with anti-corrosion compounds.
- The entire surface of the wall is dust free. A construction vacuum cleaner is often used.
- A primer is applied, which increases the adhesive properties of the wall.

Primer is an important material in the process of preparing walls for plastering. It is presented in three types on the market:
- Deep penetration, it is also polymer. Penetrates into the upper layers of walls, where it polymerizes, strengthening the material. Used to treat walls made of loose material that has delaminated if the surfaces were covered with lime plaster.
- Adhesive primer. This is a composition to which quartz sand is added. It increases the adhesion of the wall to other materials.
- Acrylic, it is also universal. It can be used to treat any surface except wood and metal. This primer fights well against fungi and mold.
The next stage of preparation is the installation of beacons on the wall.For this purpose, ready-made aluminum or galvanized steel profiles are used. For wooden walls, ordinary slats are used.
The process of installing beacons is simple:
- Check the walls for unevenness using a plumb line.
- Install one profile strictly vertically near the corner between two adjacent walls. Fastening is carried out using plaster.
- Mount the second profile at the opposite corner in the same way.
- Two fishing lines are pulled between the profiles: one 20 cm below the ceiling, the second 20 cm above the floor.
- Intermediate beacons are installed along stretched lines between two profiles. The distance between them is less than the length of the rule. This tool should rest with its ends on two adjacent beacons.
Number of layers
Plastering walls is carried out in three stages, each of which uses a solution of a certain consistency. And each such mixture has its own name - spray, primer and covering.
Splash
This is a creamy solution, somewhat runny.
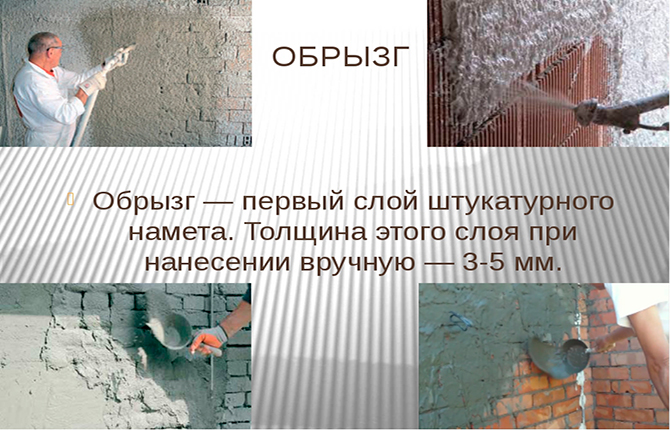
Its purpose:
- form a layer with high adhesive characteristics on the wall;
- cover large wall defects, such as seams between bricks, wide cracks, chips, gouges.
Prepare a solution with plenty of water. Apply with a thickness of 2-5 mm. The process is carried out with effort. That is, the mixture is taken into a trowel and thrown with force onto the surface being processed. The movements must be sharp so that the throwing speed creates pressure on the defects, which would be completely filled with the material.
Priming
This is the thickest layer - up to 5 cm. The plaster itself is a dense solution with a low water content. It was his aligned with beacons. That is, they fill the space between the profiles with the mixture and pull it out from the bottom up, making wave-like movements from side to side.
If the difference in the plane of the wall is large, then the soil is applied in several layers. But leveling the surface is usually carried out only after the entire space has been filled with material.
The beacons are removed after the soil has dried. The grooves remaining in their place are filled with plaster mortar.
Covering
This layer can be attributed to the final formation of the plastered wall. After applying it, the surface becomes as even and smooth as possible. Therefore, the mixture is made almost liquid.

Apply the solution with a trowel, and use it to level the surface in a circular motion, distributing the material evenly. It is important to prepare the mixture correctly here. Application thickness – no more than 2 mm.
Each previous layer must be thoroughly dried before applying the next one. The applied mixture must acquire a certain strength in order to withstand the weight of the next applied layer.
How long does it take to dry cement-sand plaster?
In order for the quality of the plaster to be high, it is necessary to adhere to the requirements of SNiP. One of them says that it is necessary to work with plaster mixtures at a temperature of 18-20°C and a humidity of no more than 70%. These are optimal conditions.
The rules also include drying standards for layers applied with a thickness of 2 mm. They are determined by the materials used to construct the building.
| Wall view | Drying time for cement plaster, hours. |
| Brick, concrete | 24 |
| Aerated concrete, expanded clay concrete (dry) | 6 |
| Aerated concrete, expanded clay concrete (wet) | 24-48 |
| Plasterboard | 9 |
| Wooden | 9 |
Since the plaster is made on the basis of cement, it gains its original strength only after 28 days. The drying process can be accelerated if all work is carried out in the summer. Do not use artificial drying using heat guns, dehumidifiers or other devices. This will lead to cracking of the applied layer.
The quality of plaster applied to walls will always be high if you strictly adhere to all the rules described above for preparing the mortar, installing beacons, preparing walls and applying the plaster itself.
If you liked the article, or if there is something you are not happy with, please let us know in the comments. Save useful information in bookmarks and repost on social networks.
Mixing mortar on plaster in the video.

Related article: Decorative plaster for concrete.
Sources:
- https://kvartirnyj-remont.com/shtukaturka-iz-cementa-i-peska.html
- https://dekorshtukaturka.ru/oshtukaturivanie/rastvor-dlya-shtukaturki
- https://m-strana.ru/articles/kak-prigotovit-rastvor-dlya-shtukaturki-sten-iz-tsementa-i-peska


You can't do everything right with thick plaster. No more than 5 cm. Under its weight, it can peel off from the wall. If the difference is large, then it is better to use drywall.
It will peel off in any case if the wall is not prepared correctly. They used to water it, and many people still do this today. Last century. The primer is what will protect it from delamination.